基础篇 开发环境 学习要求
熟悉Spring基础
Java8及以上https://docs.spring.io/spring-boot/docs/current/reference/html/getting-started.html#getting-started-system-requirements
Spring Boot官网:https://spring.io/projects/spring-boot
Spring Boot 官方文档:https://docs.spring.io/spring-boot/docs/current/reference/html/
Spring Boot 中文文档:http://felord.cn/_doc/_springboot/2.1.5.RELEASE/_book/
视频地址:https://www.bilibili.com/video/BV15b4y1a7yG?p=24&share_source=copy_web
源码地址:GitHub Gitee
内容介绍 Java基础语法Spring与SpringMVC Mybatis与Mybatis-Plus 数据库MySQL 服务器 maven web技术(含vue,ElementUI)
SpringBoot框架搭建 SpringBoot入门案例(Idea联网版)
SpringBoot是由Pivotal团队提供的全新框架,其设计目的是用来简化Spring应用的初始搭建以及开发过程
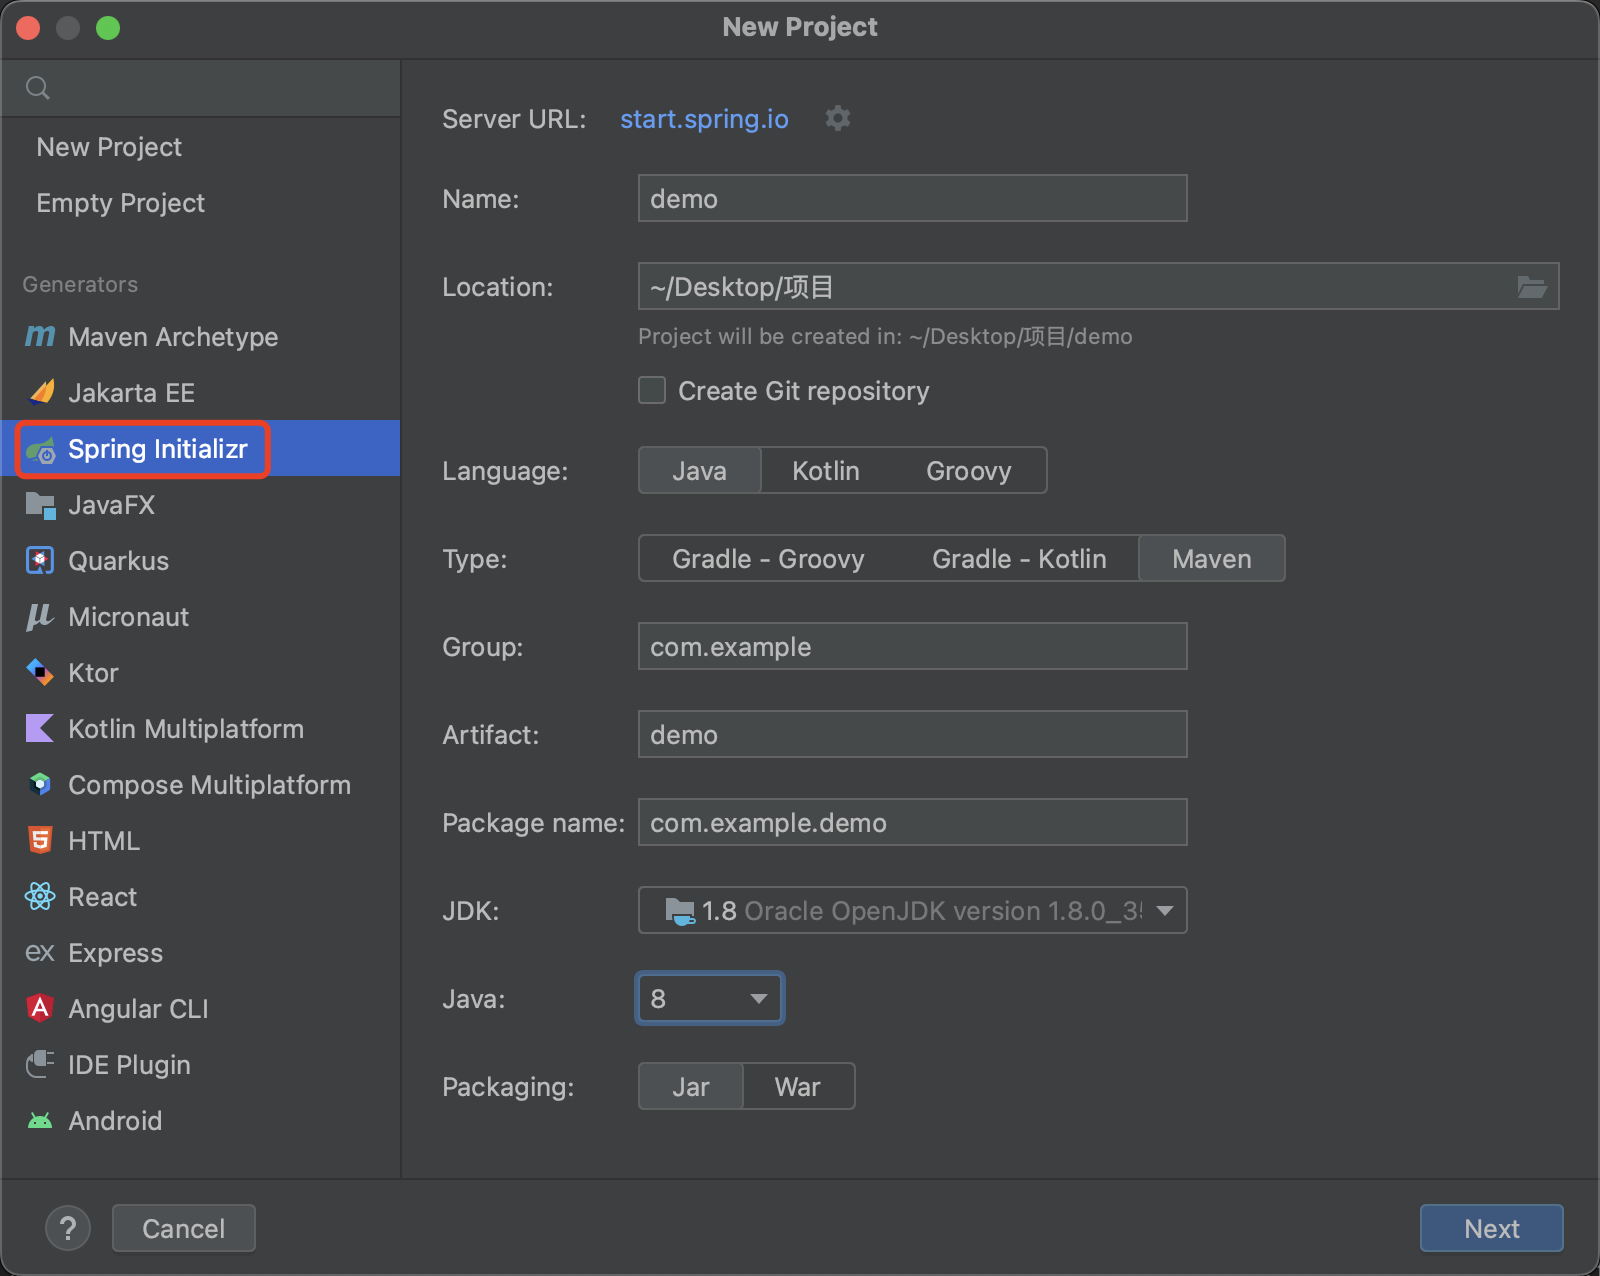
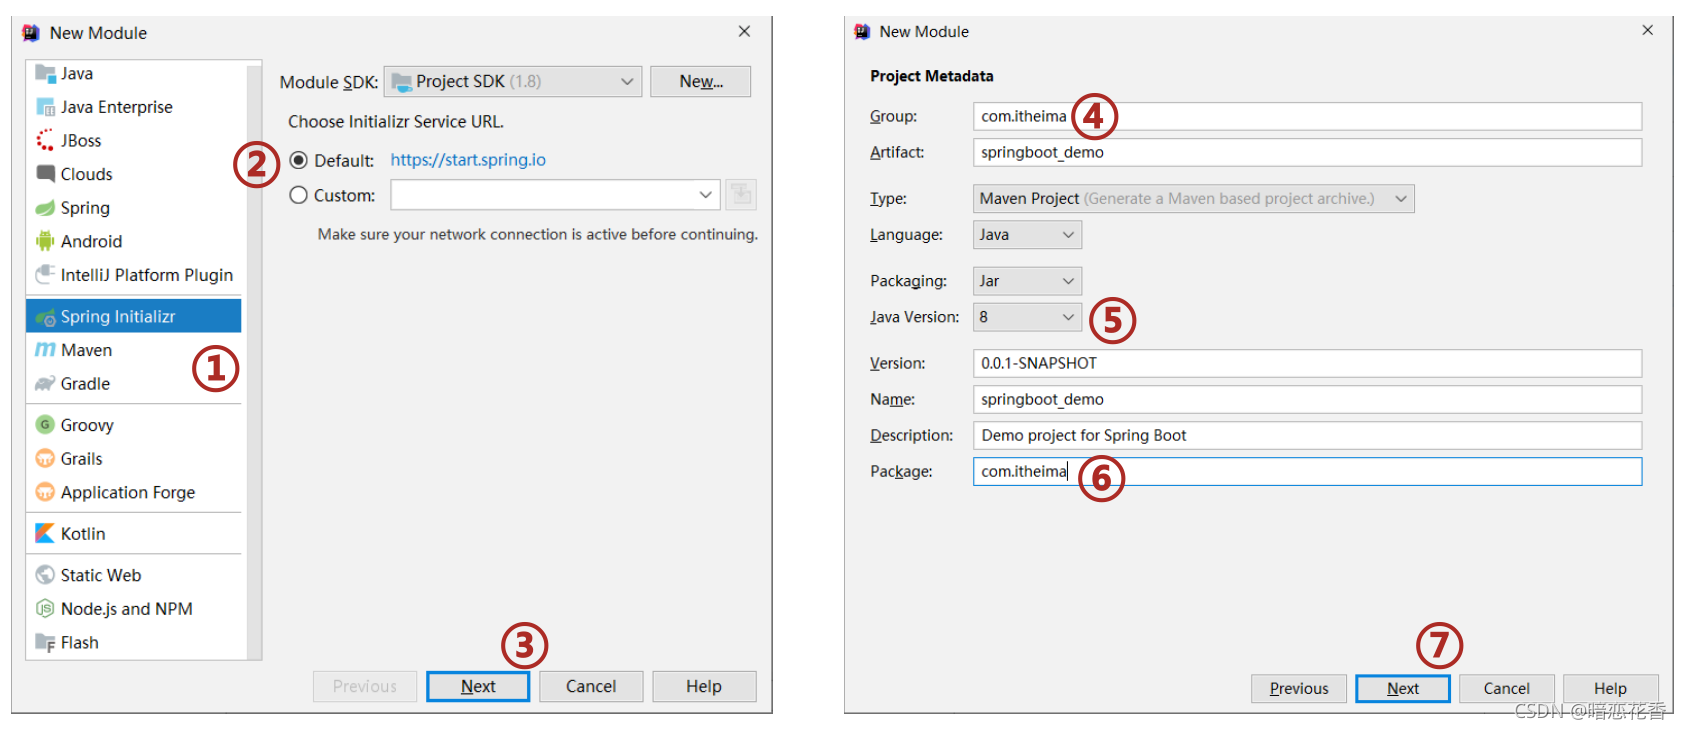
①:创建新模块,选择Spring Initializr,并配置模块相关基础信息
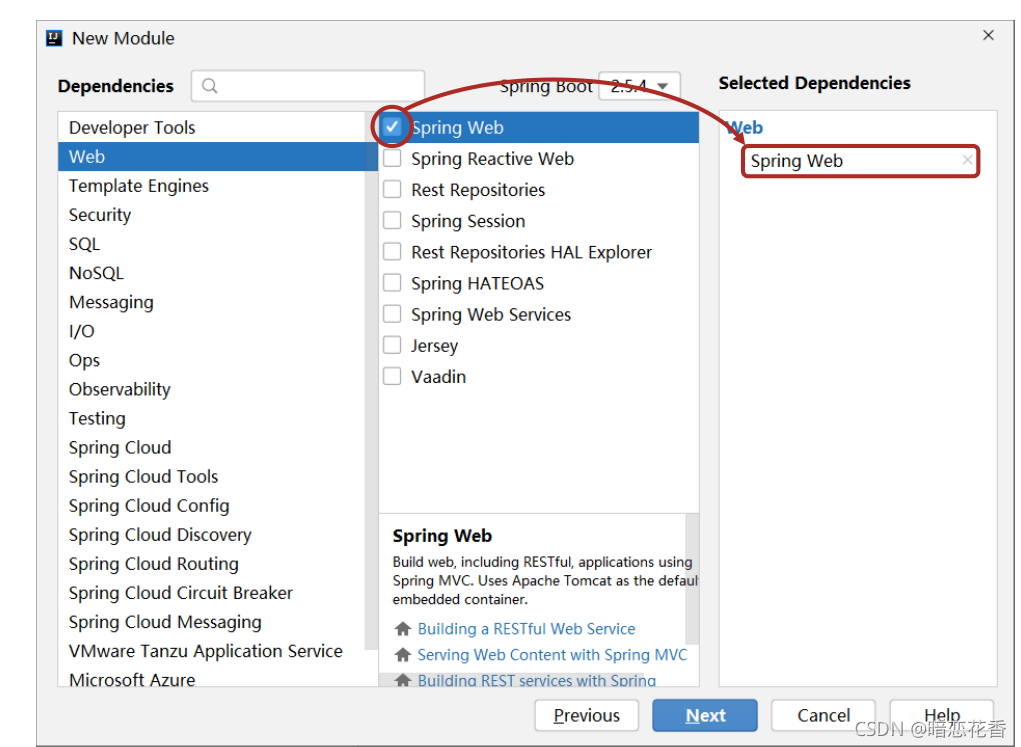
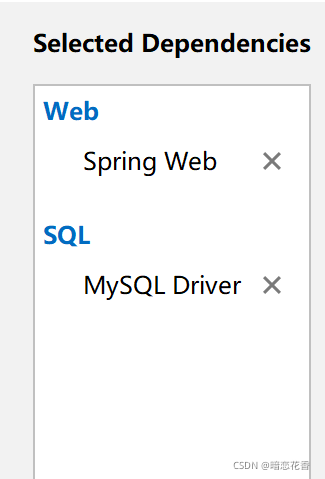
②:选择当前模块需要使用的技术集
③:开发控制器类
1 2 3 4 5 6 7 8 9 10 11 @RestController @RequestMapping("/books") public class BookController { @GetMapping public String getById () { System.out.println("springboot is running..." ); return "springboot is running..." ; } }
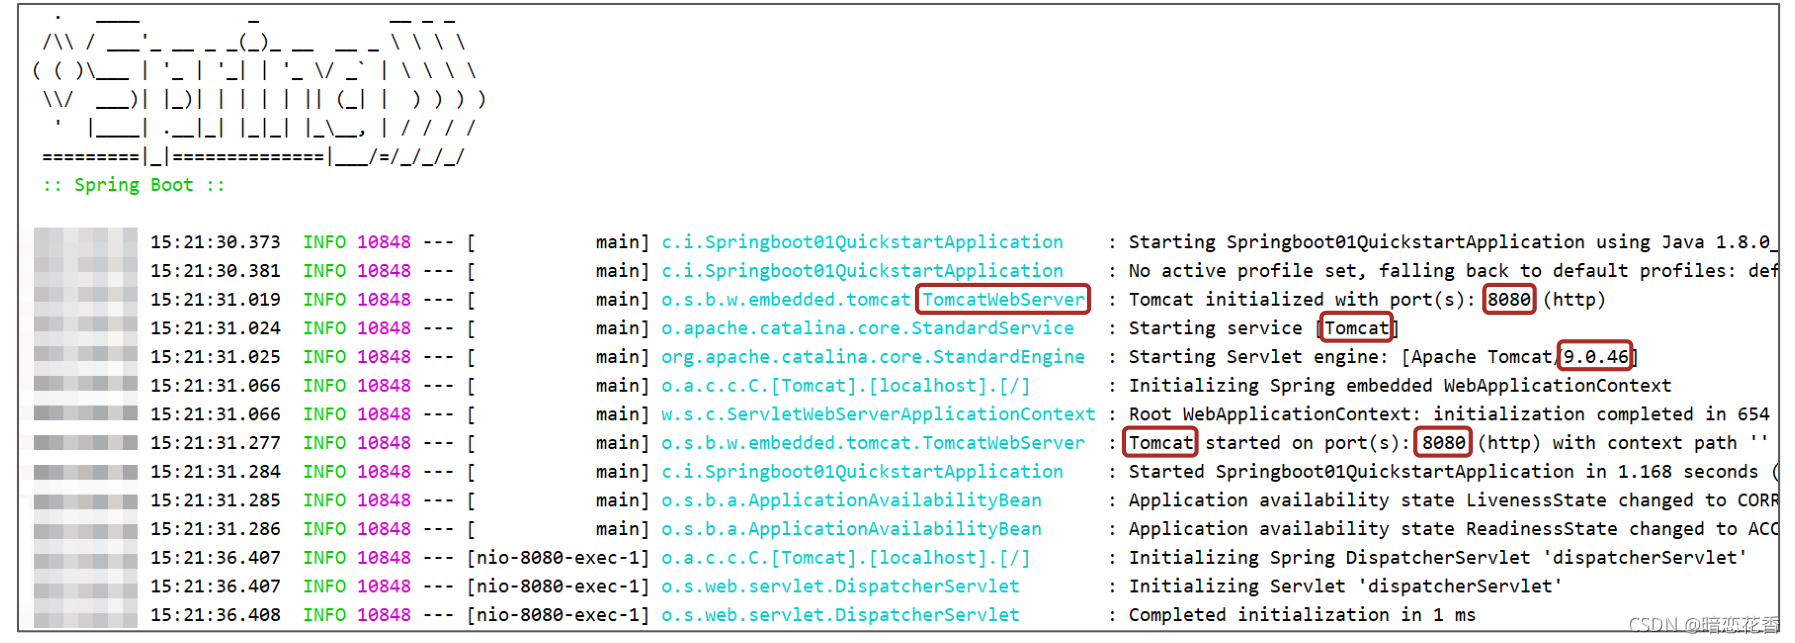
④:运行自动生成的Application类
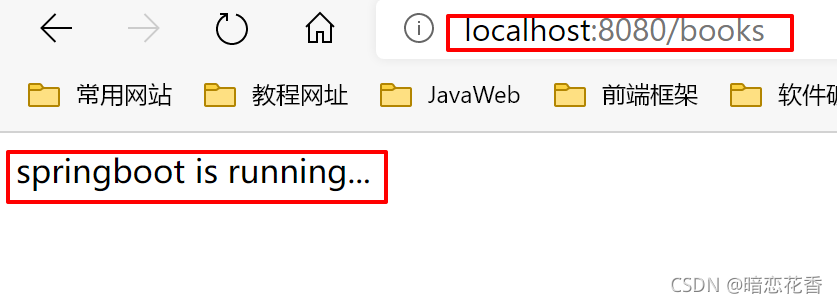
⑤:打开浏览器访问url地址为:http://localhost:8080/books
最简SpringBoot程序所包含的基础文件 (pom.xml文件 和 Application类 )
1
2
3
4
5
6
7
8
9
10
11
12
13
14
15
16
17
18
19
20
21
22
23
24
25
<?xml version="1.0" encoding="UTF-8" ?> <project xmlns ="http://maven.apache.org/POM/4.0.0" xmlns:xsi ="http://www.w3.org/2001/XMLSchema-instance" xsi:schemaLocation ="http://maven.apache.org/POM/4.0.0 https://maven.apache.org/xsd/maven-4.0.0.xsd" > <modelVersion > 4.0.0</modelVersion > <parent > <groupId > org.springframework.boot</groupId > <artifactId > spring-boot-starter-parent</artifactId > <version > 2.5.6</version > </parent > <groupId > com.example</groupId > <artifactId > springboot-01-quickstart</artifactId > <version > 0.0.1-SNAPSHOT</version > <dependencies > <dependency > <groupId > org.springframework.boot</groupId > <artifactId > spring-boot-starter-web</artifactId > </dependency > <dependency > <groupId > org.springframework.boot</groupId > <artifactId > spring-boot-starter-test</artifactId > <scope > test</scope > </dependency > </dependencies > </project >
1
2
3
4
5
6
7
8
9
@SpringBootApplication public class Springboot0101QuickstartApplication { public static void main (String[] args) { SpringApplication.run(Springboot0101QuickstartApplication.class, args); } }
Spring程序与SpringBoot程序对比
注意: 基于idea开发SpringBoot程序需要确保联网且能够加载到程序框架结构
小结:
开发SpringBoot程序可以根据向导进行联网快速制作
SpringBoot程序需要基于JDK8进行制作
SpringBoot程序中需要使用何种功能通过勾选选择技术
运行SpringBoot程序通过运行Application程序入口进行
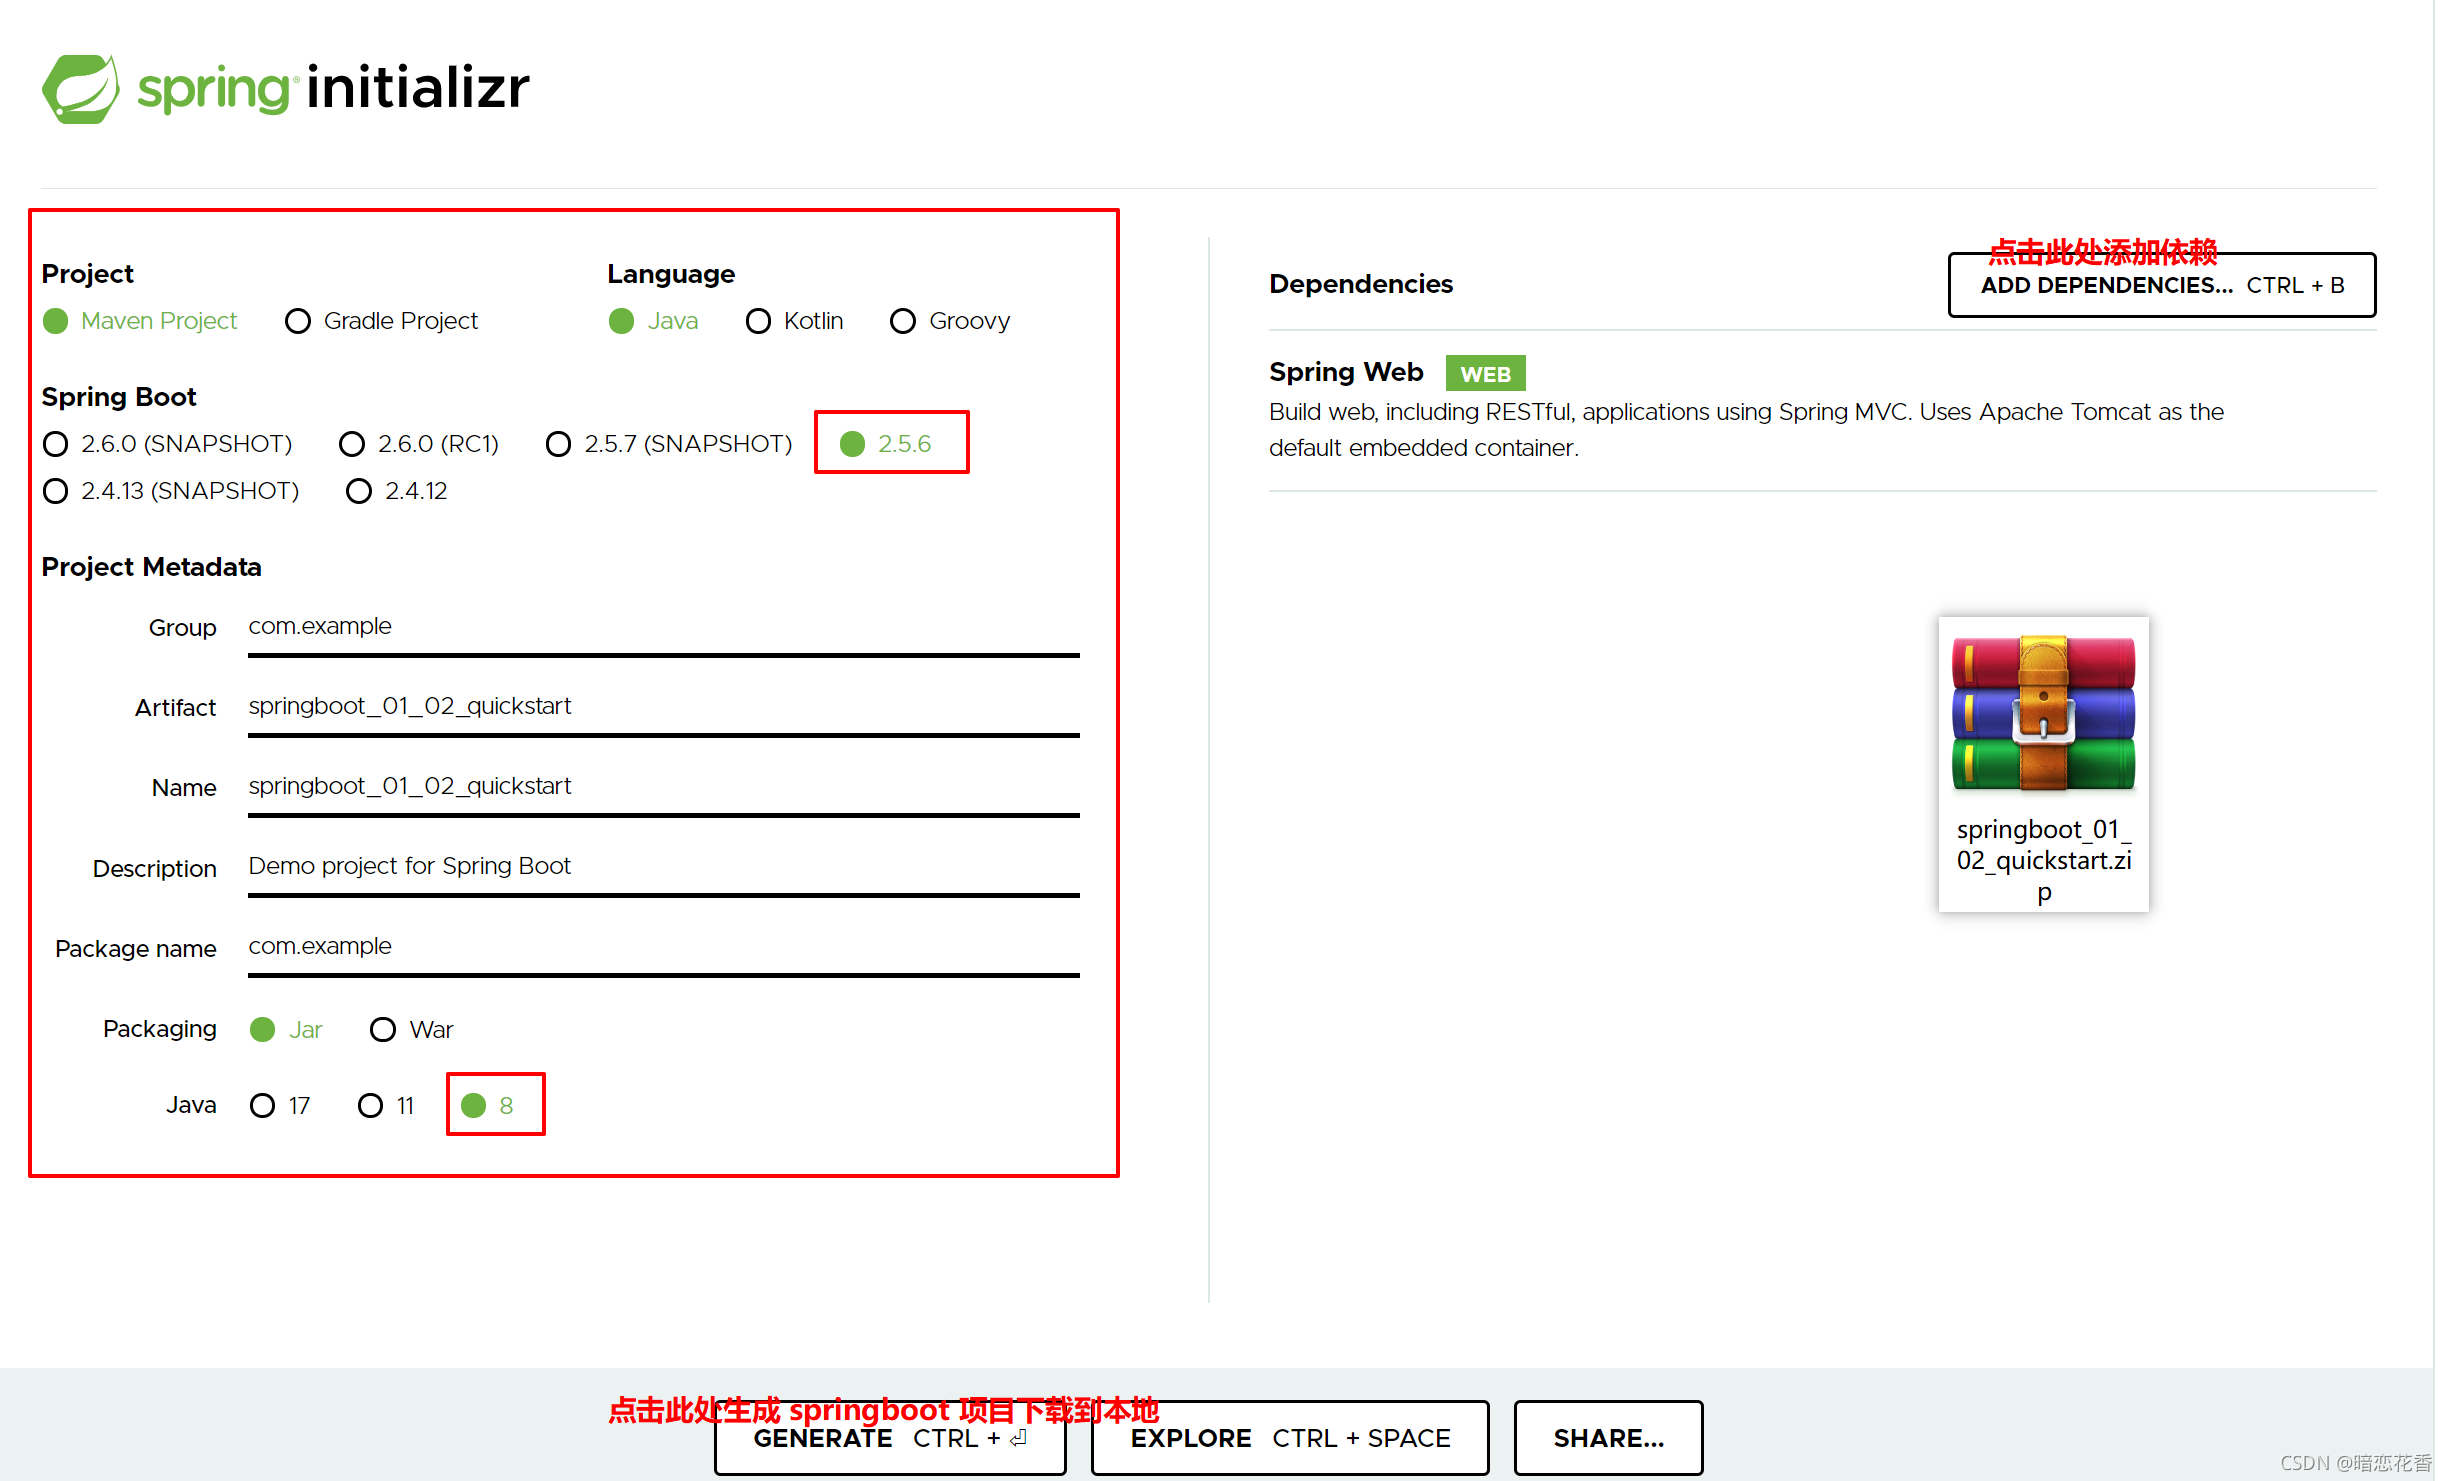
SpringBoot入门案例(官网创建版) 基于SpringBoot官网创建项目,地址:https://start.spring.io/
小结:
打开SpringBoot官网,选择Quickstart Your Project
创建工程,并保存项目
解压项目,通过IDE导入项目
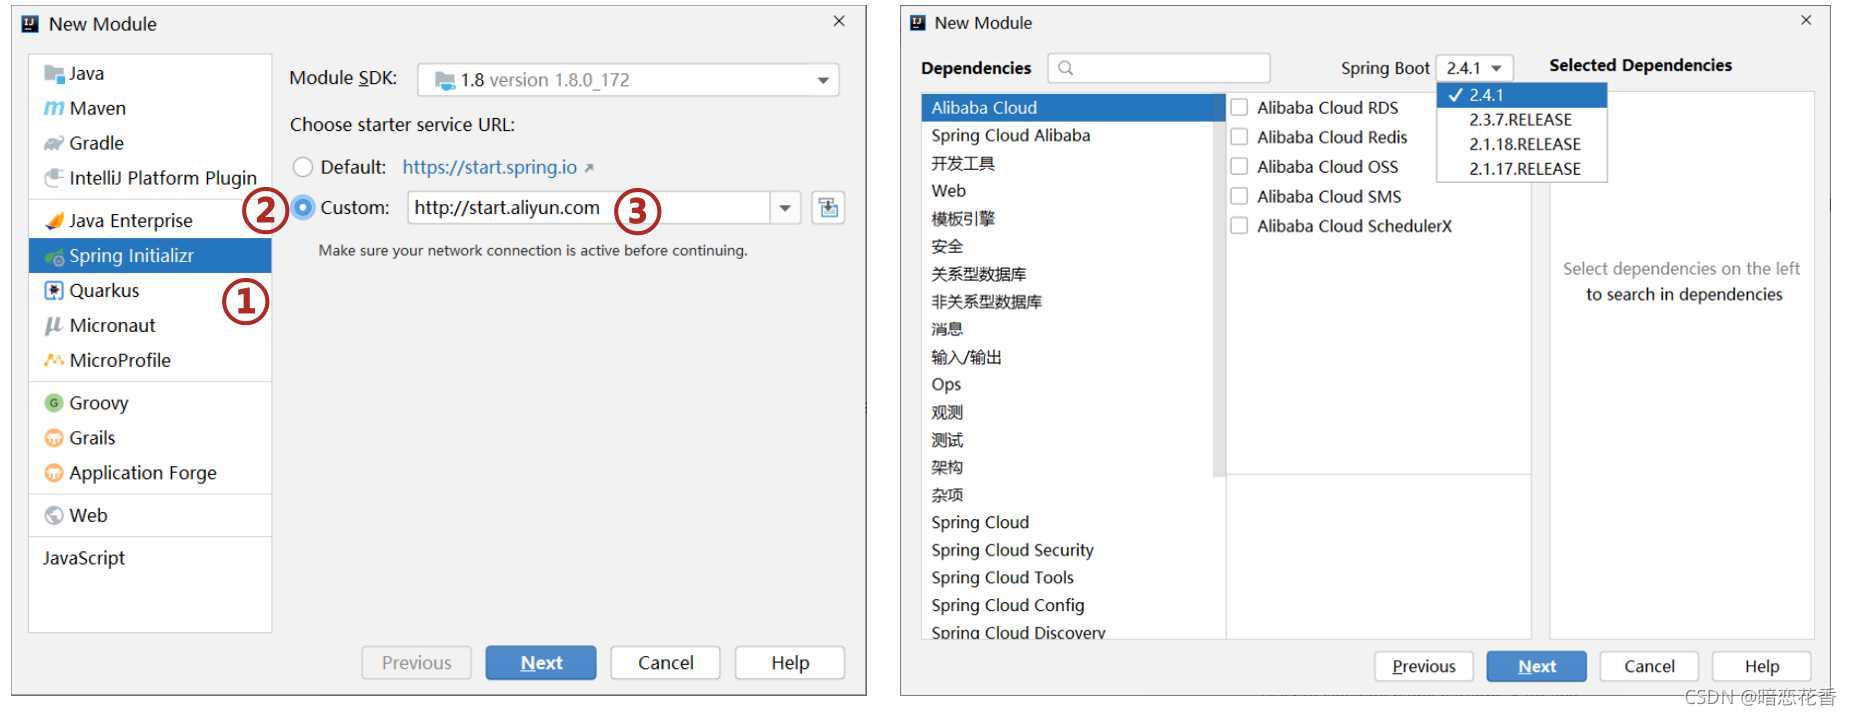
SpringBoot入门案例(阿里云版) 基于阿里云创建项目,地址:https://start.aliyun.com
注意事项:
阿里云提供的坐标版本较低,如果需要使用高版本,进入工程后手工切换SpringBoot版本
阿里云提供的工程模板与Spring官网提供的工程模板略有不同
小结:
选择start来源为自定义URL
输入阿里云start地址
创建项目
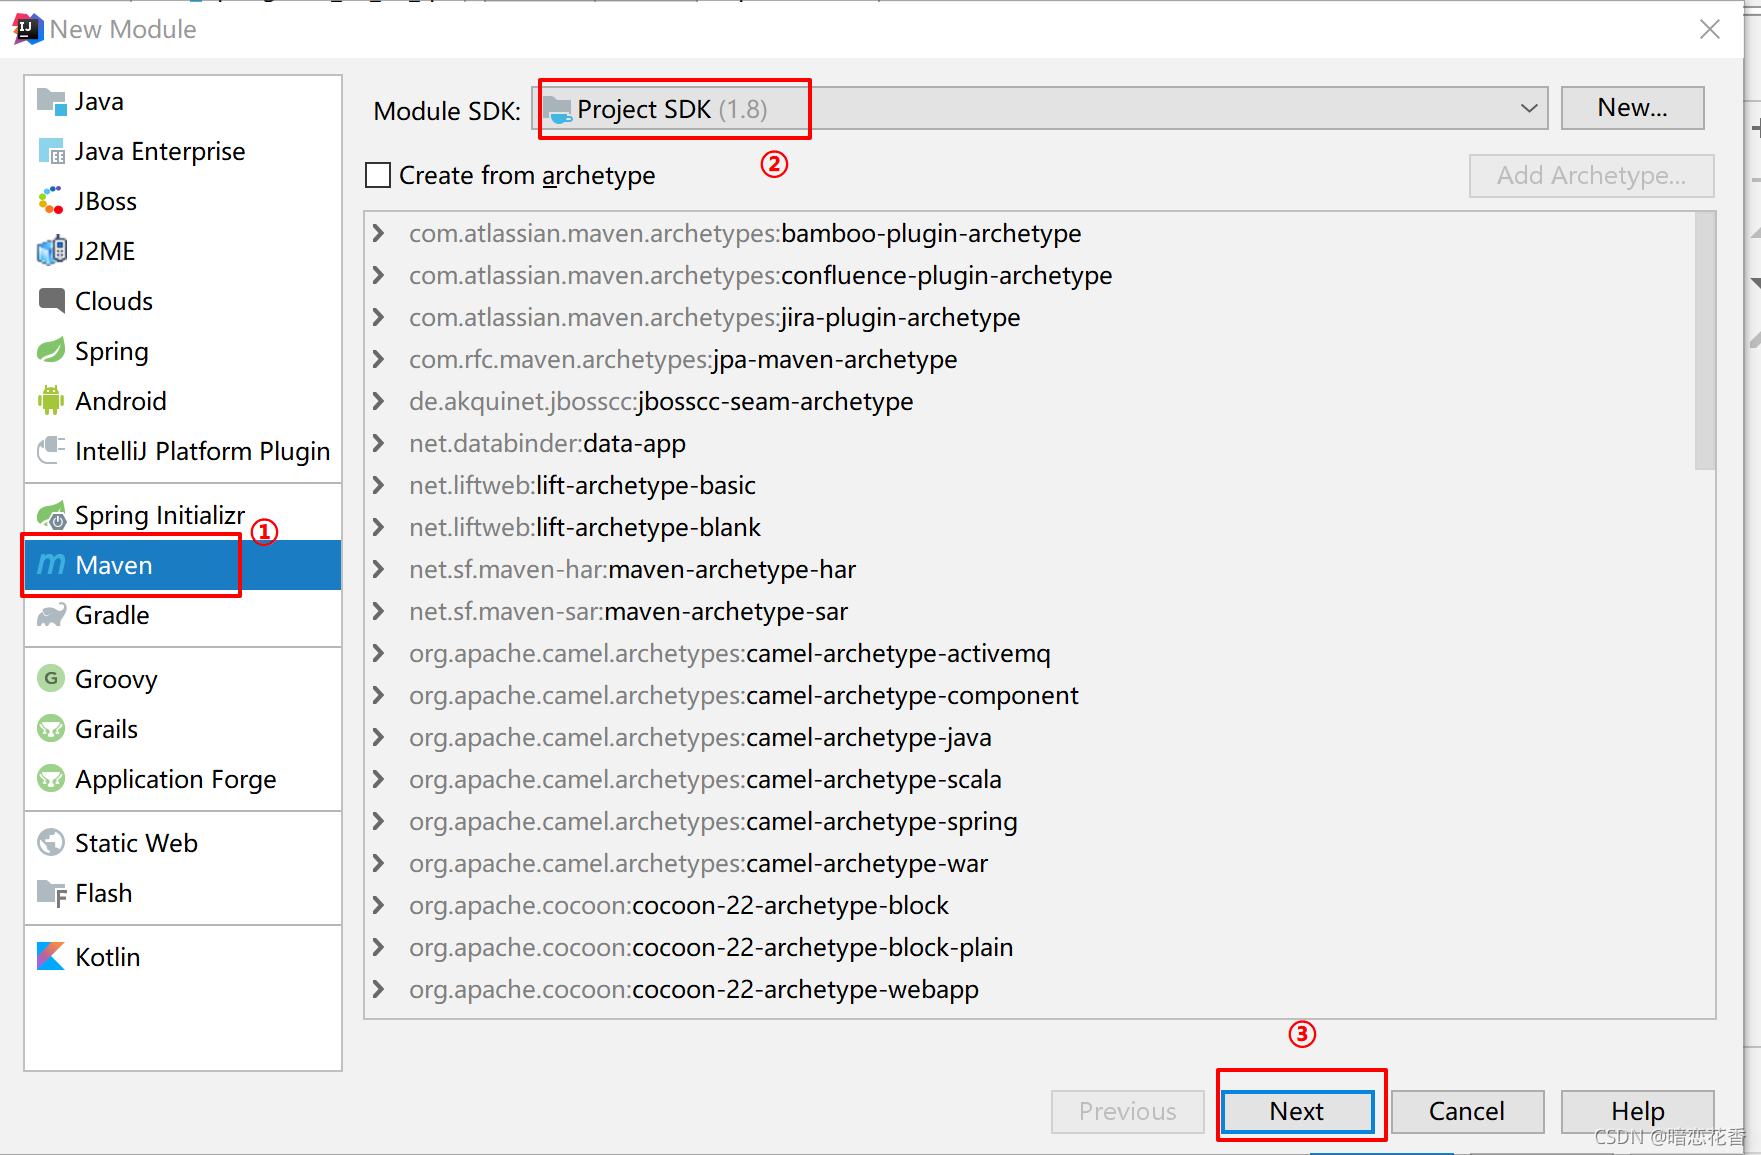
SpringBoot入门案例(手工制作版) 手工创建项目(手工导入坐标)
1
2
3
4
5
6
7
8
9
10
11
12
13
14
15
16
17
18
19
20
21
22
23
24
<?xml version="1.0" encoding="UTF-8" ?> <project xmlns ="http://maven.apache.org/POM/4.0.0" xmlns:xsi ="http://www.w3.org/2001/XMLSchema-instance" xsi:schemaLocation ="http://maven.apache.org/POM/4.0.0 http://maven.apache.org/xsd/maven-4.0.0.xsd" > <modelVersion > 4.0.0</modelVersion > <parent > <groupId > org.springframework.boot</groupId > <artifactId > spring-boot-starter-parent</artifactId > <version > 2.5.6</version > </parent > <groupId > com.example</groupId > <artifactId > springboot_01_04_quickstart</artifactId > <version > 1.0-SNAPSHOT</version > <dependencies > <dependency > <groupId > org.springframework.boot</groupId > <artifactId > spring-boot-starter-web</artifactId > </dependency > </dependencies > </project >
1
2
3
4
5
6
7
8
@SpringBootApplication public class Application { public static void main (String[] args) { SpringApplication.run(Application.class, args); } }
小结:
创建普通Maven工程
继承spring-boot-starter-parent
添加依赖spring-boot-starter-web
制作引导类Application
总结 创建SpringBoot工程的四种方式 基于Idea创建SpringBoot工程 基于官网创建SpringBoot工程 基于阿里云创建SpringBoot工程 手工创建Maven工程修改为SpringBoot工程
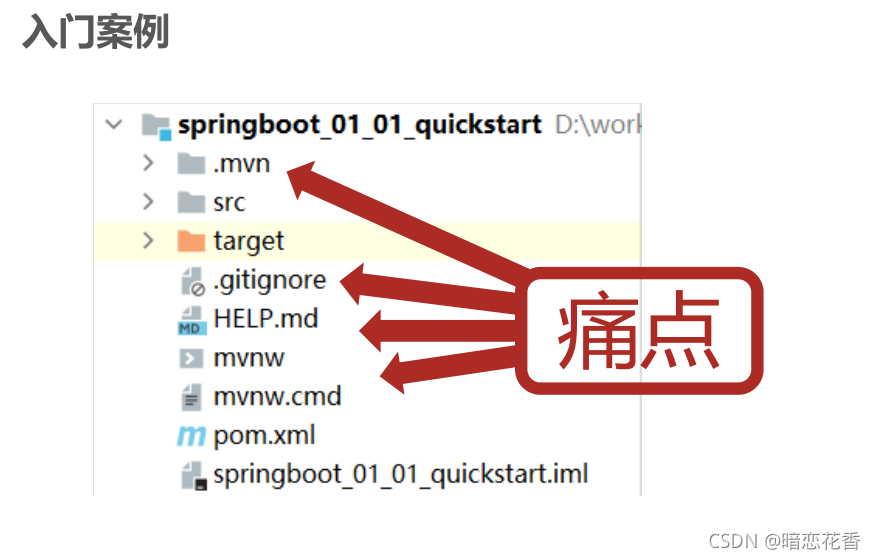
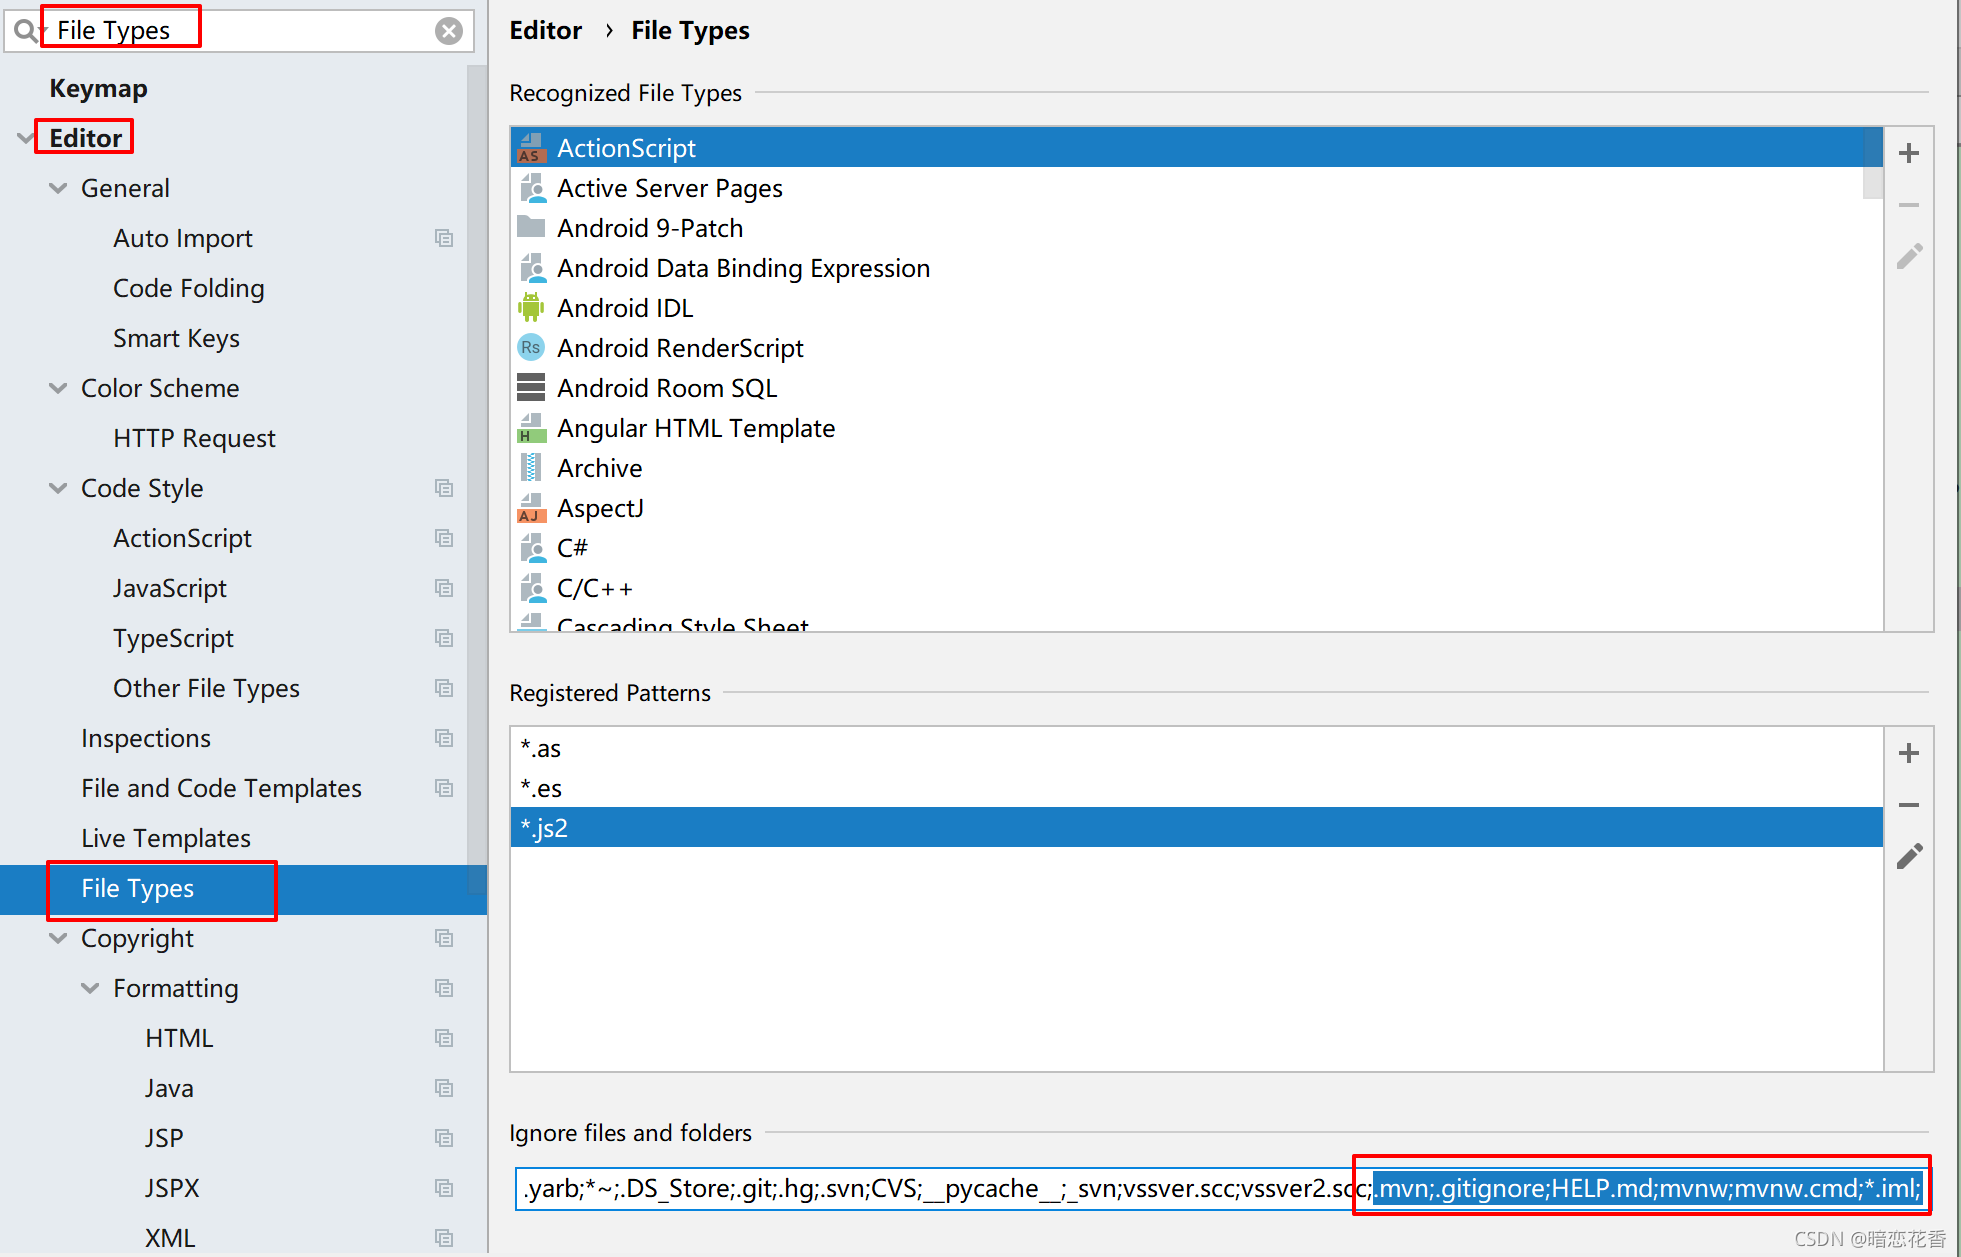
隐藏文件或文件夹 .mvn;.gitignore;HELP.md;mvnw;mvnw.cmd;*.iml;
2018版的做法:
较新版本的做法 :
小结:
Idea中隐藏指定文件或指定类型文件号通配符
入门案例解析 parent
1
2
3
4
5
6
7
8
9
10
11
12
13
14
15
16
17
18
19
20
21
22
23
24
25
<?xml version="1.0" encoding="UTF-8" ?> <project xmlns ="http://maven.apache.org/POM/4.0.0" xmlns:xsi ="http://www.w3.org/2001/XMLSchema-instance" xsi:schemaLocation ="http://maven.apache.org/POM/4.0.0 https://maven.apache.org/xsd/maven-4.0.0.xsd" > <modelVersion > 4.0.0</modelVersion > <parent > <groupId > org.springframework.boot</groupId > <artifactId > spring-boot-starter-parent</artifactId > <version > 2.5.6</version > </parent > <groupId > com.example</groupId > <artifactId > springboot-01-quickstart</artifactId > <version > 0.0.1-SNAPSHOT</version > <dependencies > <dependency > <groupId > org.springframework.boot</groupId > <artifactId > spring-boot-starter-web</artifactId > </dependency > <dependency > <groupId > org.springframework.boot</groupId > <artifactId > spring-boot-starter-test</artifactId > <scope > test</scope > </dependency > </dependencies > </project >
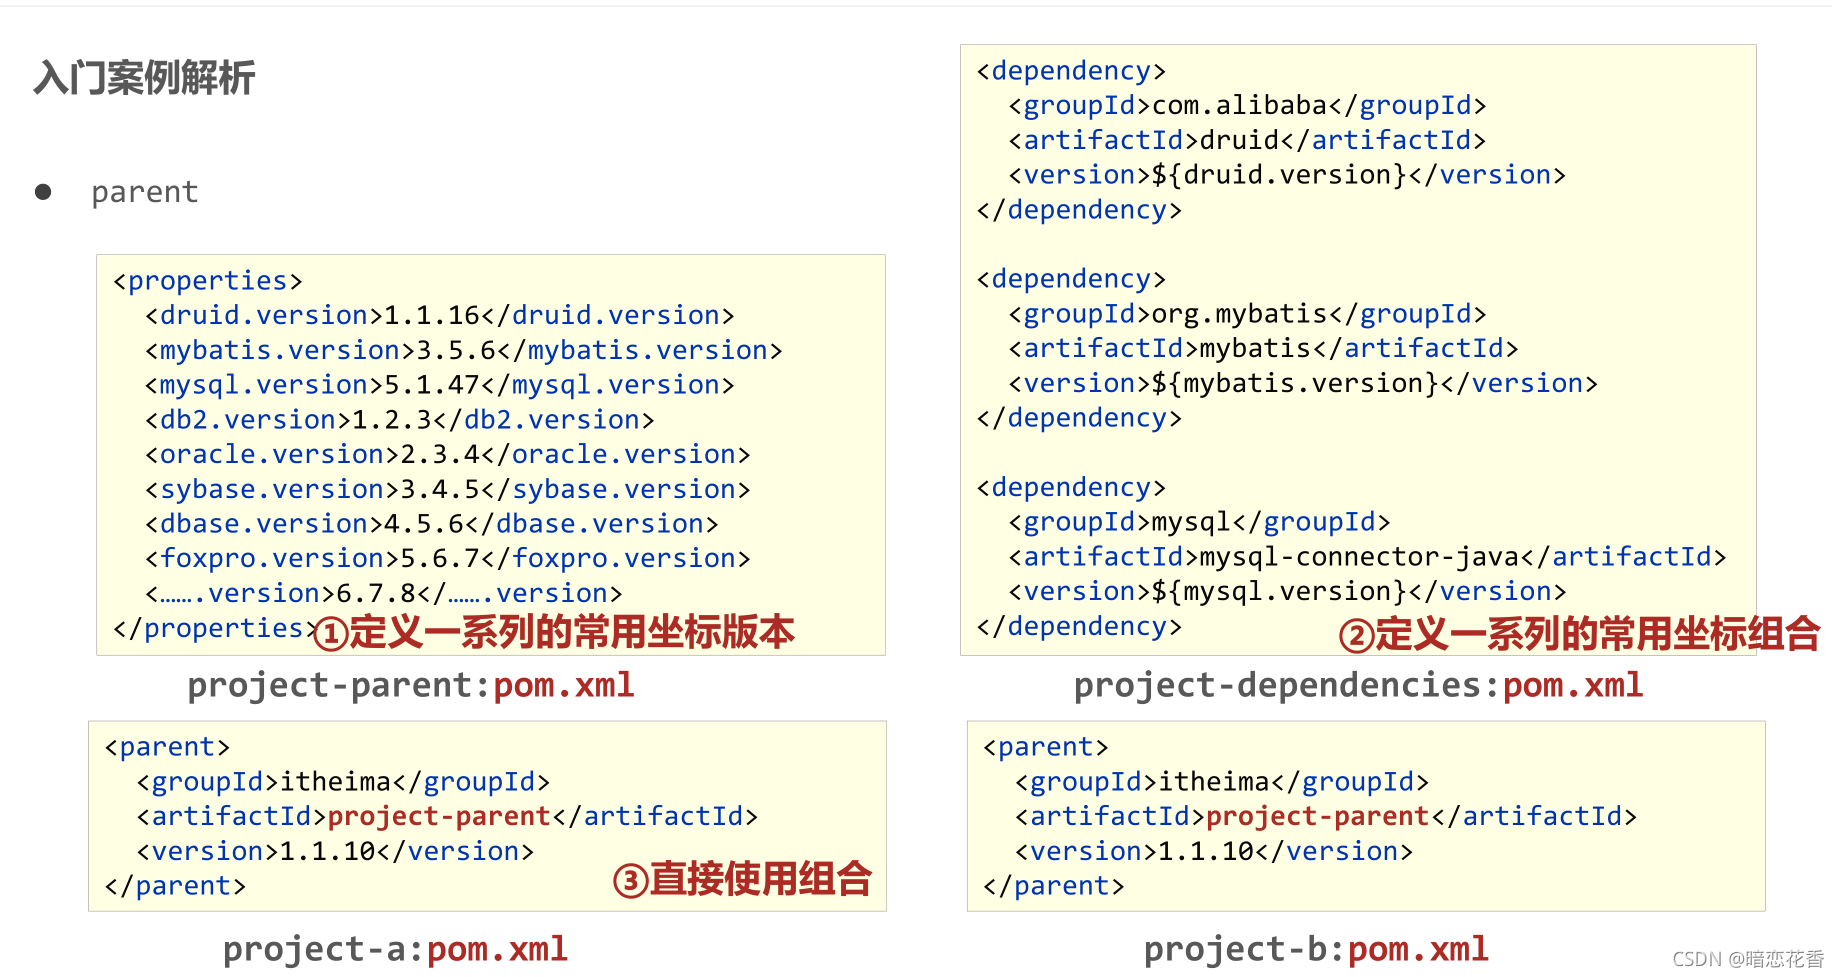
按住Ctrl点击pom.xml中的spring-boot-starter-parent,跳转到了spring-boot-starter-parent的pom.xml,xml配置如下(只摘抄了部分重点配置):
1 2 3 4 5 6 <parent > <groupId > org.springframework.boot</groupId > <artifactId > spring-boot-dependencies</artifactId > <version > 2.5.6</version > </parent >
按住Ctrl点击pom.xml中的spring-boot-starter-dependencies,跳转到了spring-boot-starter-dependencies的pom.xml,xml配置如下(只摘抄了部分重点配置):
1 2 3 4 5 6 7 8 9 10 11 12 13 14 15 16 17 18 19 20 21 22 23 24 25 26 27 28 29 30 31 32 33 34 35 36 37 38 39 40 41 42 43 44 45 46 47 48 49 50 51 <properties > <activemq.version > 5.15.3</activemq.version > <antlr2.version > 2.7.7</antlr2.version > <appengine-sdk.version > 1.9.63</appengine-sdk.version > <artemis.version > 2.4.0</artemis.version > <aspectj.version > 1.8.13</aspectj.version > <assertj.version > 3.9.1</assertj.version > <atomikos.version > 4.0.6</atomikos.version > <bitronix.version > 2.1.4</bitronix.version > <build-helper-maven-plugin.version > 3.0.0</build-helper-maven-plugin.version > <byte-buddy.version > 1.7.11</byte-buddy.version > ... ... ... </properties > <dependencyManagement > <dependencies > <dependency > <groupId > org.springframework.boot</groupId > <artifactId > spring-boot</artifactId > <version > 2.0.1.RELEASE</version > </dependency > <dependency > <groupId > org.springframework.boot</groupId > <artifactId > spring-boot-test</artifactId > <version > 2.0.1.RELEASE</version > </dependency > ... ... ... </dependencies > </dependencyManagement > <build > <pluginManagement > <plugins > <plugin > <groupId > org.jetbrains.kotlin</groupId > <artifactId > kotlin-maven-plugin</artifactId > <version > ${kotlin.version}</version > </plugin > <plugin > <groupId > org.jooq</groupId > <artifactId > jooq-codegen-maven</artifactId > <version > ${jooq.version}</version > </plugin > <plugin > <groupId > org.springframework.boot</groupId > <artifactId > spring-boot-maven-plugin</artifactId > <version > 2.0.1.RELEASE</version > </plugin > ... ... ... </plugins > </pluginManagement > </build >
从上面的spring-boot-starter-dependencies的pom.xml中我们可以发现,一部分坐标的版本、依赖管理、插件管理已经定义好,所以我们的SpringBoot工程继承spring-boot-starter-parent后已经具备版本锁定等配置了。所以起步依赖的作用就是进行依赖的传递。
小结:
开发SpringBoot程序要继承spring-boot-starter-parent
spring-boot-starter-parent中定义了若干个依赖管理
继承parent模块可以避免多个依赖使用相同技术时出现依赖版本冲突
继承parent的形式也可以采用引入依赖的形式实现效果
starter
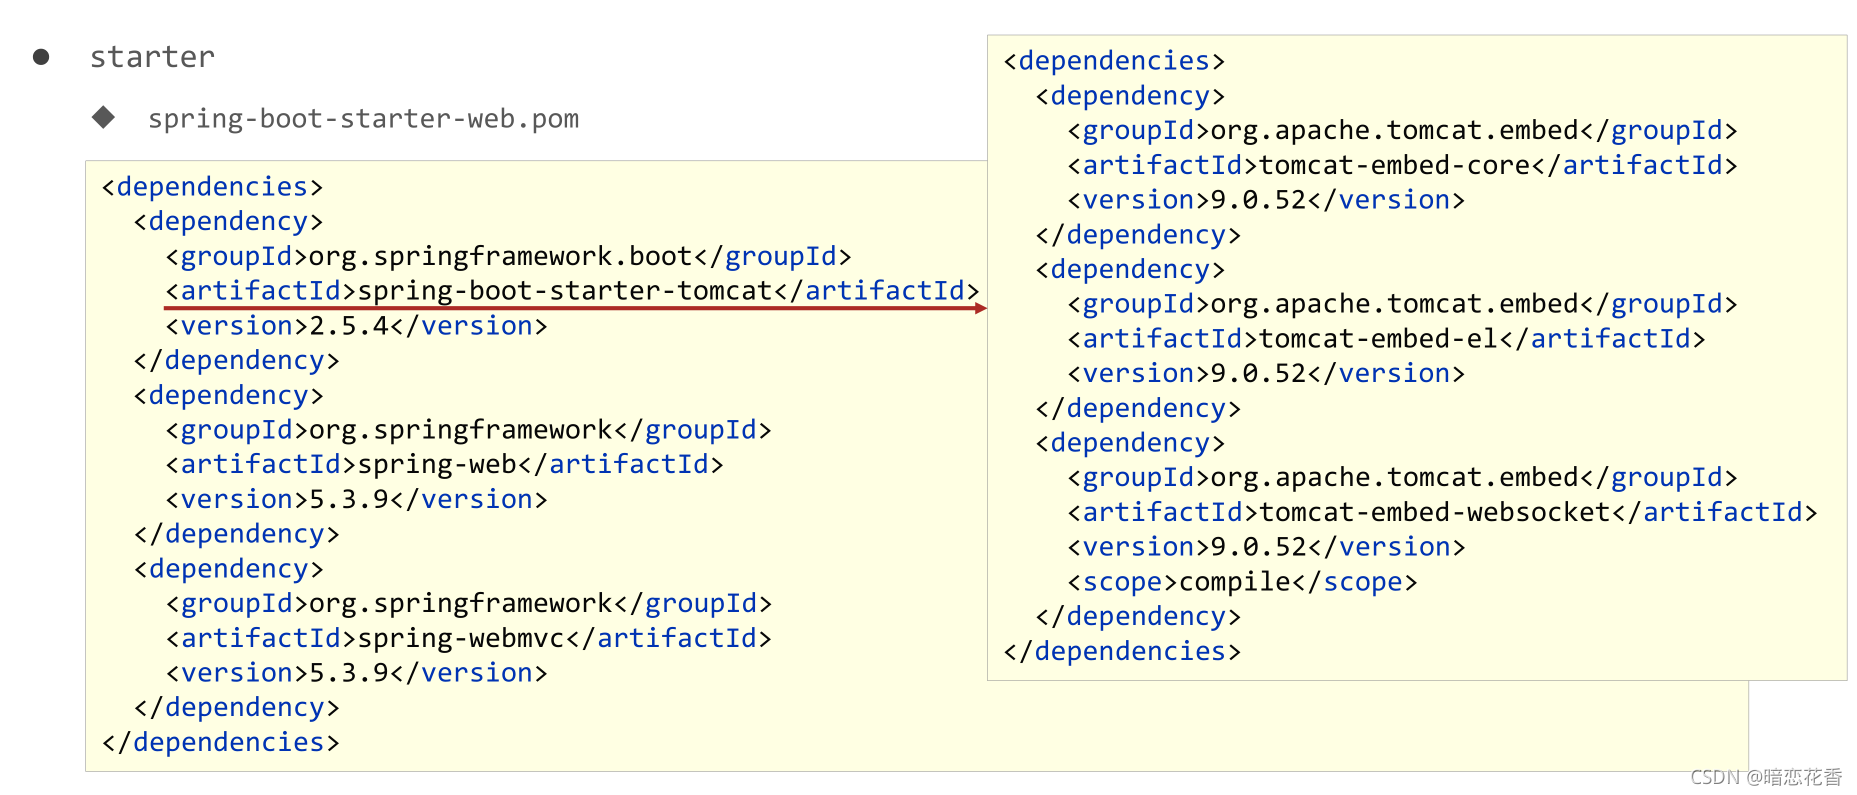
spring-boot-starter-web.pomspring-boot-starter-web ,跳转到了spring-boot-starter-web的pom.xml,xml配置如下(只摘抄了部分重点配置):
1
2
3
4
5
6
7
8
9
10
11
12
13
14
15
16
17
18
19
20
21
22
23
24
25
26
27
28
29
30
31
32
33
34
35
36
37
38
39
40
41
42
43
44
45
46
47
48
49
50
51
52
53
54
<?xml version="1.0" encoding="UTF-8" ?> <project xsi:schemaLocation ="http://maven.apache.org/POM/4.0.0 http://maven.apache.org/xsd/maven-4.0.0.xsd" xmlns ="http://maven.apache.org/POM/4.0.0" xmlns:xsi ="http://www.w3.org/2001/XMLSchema-instance" > <modelVersion > 4.0.0</modelVersion > <parent > <groupId > org.springframework.boot</groupId > <artifactId > spring-boot-starters</artifactId > <version > 2.0.1.RELEASE</version > </parent > <groupId > org.springframework.boot</groupId > <artifactId > spring-boot-starter-web</artifactId > <version > 2.0.1.RELEASE</version > <name > Spring Boot Web Starter</name > <dependencies > <dependency > <groupId > org.springframework.boot</groupId > <artifactId > spring-boot-starter</artifactId > <version > 2.0.1.RELEASE</version > <scope > compile</scope > </dependency > <dependency > <groupId > org.springframework.boot</groupId > <artifactId > spring-boot-starter-json</artifactId > <version > 2.0.1.RELEASE</version > <scope > compile</scope > </dependency > <dependency > <groupId > org.springframework.boot</groupId > <artifactId > spring-boot-starter-tomcat</artifactId > <version > 2.0.1.RELEASE</version > <scope > compile</scope > </dependency > <dependency > <groupId > org.hibernate.validator</groupId > <artifactId > hibernate-validator</artifactId > <version > 6.0.9.Final</version > <scope > compile</scope > </dependency > <dependency > <groupId > org.springframework</groupId > <artifactId > spring-web</artifactId > <version > 5.0.5.RELEASE</version > <scope > compile</scope > </dependency > <dependency > <groupId > org.springframework</groupId > <artifactId > spring-webmvc</artifactId > <version > 5.0.5.RELEASE</version > <scope > compile</scope > </dependency > </dependencies > </project >
从上面的spring-boot-starter-web的pom.xml中我们可以发现,spring-boot-starter-web就是将web开发要使用的spring-web、spring-webmvc等坐标进行了“打包”,这样我们的工程只要引入spring-boot-starter-web起步依赖的坐标就可以进行web开发了,同样体现了依赖传递的作用。
starter parent 实际开发
小结:
开发SpringBoot程序需要导入坐标时通常导入对应的starter
每个不同的starter根据功能不同,通常包含多个依赖坐标
使用starter可以实现快速配置的效果,达到简化配置的目的
引导类
1
2
3
4
5
6
7
8
9
10
11
@SpringBootApplication public class Springboot0101QuickstartApplication { public static void main (String[] args) { ConfigurableApplicationContext ctx = SpringApplication.run(Springboot0101QuickstartApplication.class, args); BookController bean = ctx.getBean(BookController.class); System.out.println("bean======>" + bean); } }
SpringBoot的引导类是Boot工程的执行入口,运行main方法就可以启动项目
SpringBoot工程运行后初始化Spring容器,扫描引导类所在包加载bean
小结:
SpringBoot工程提供引导类用来启动程序
SpringBoot工程启动后创建并初始化Spring容器
辅助功能 辅助功能 内嵌tomcat
1 2 3 4 5 6 7 8 9 10 11 12 13 14 15 16 17 18 19 20 21 22 23 24 <dependencies > <dependency > <groupId > org.springframework.boot</groupId > <artifactId > spring-boot-starter-web</artifactId > <exclusions > <exclusion > <groupId > org.springframework.boot</groupId > <artifactId > spring-boot-starter-tomcat</artifactId > </exclusion > </exclusions > </dependency > <dependency > <groupId > org.springframework.boot</groupId > <artifactId > spring-boot-starter-jetty</artifactId > </dependency > <dependency > <groupId > org.springframework.boot</groupId > <artifactId > spring-boot-starter-test</artifactId > <scope > test</scope > </dependency > </dependencies >
Jetty比Tomcat更轻量级,可扩展性更强(相较于Tomcat),谷歌应用引擎(GAE)已经全面切换为Jetty
内置服务器
tomcat(默认) apache出品,粉丝多,应用面广,负载了若干较重的组件
jetty 更轻量级,负载性能远不及tomcat
undertow undertow,负载性能勉强跑赢tomcat
小结:
内嵌Tomcat服务器是SpringBoot辅助功能之一
内嵌Tomcat工作原理是将Tomcat服务器作为对象运行,并将该对象交给Spring容器管理
变更内嵌服务器思想是去除现有服务器,添加全新的服务器
总结:
入门案例(4种方式)
SpringBoot概述
REST风格 REST风格简介 什么是 rest :
REST(Representational State Transfer)表现形式状态转换
传统风格资源描述形式http://localhost/user/getById?id=1 (得到id为1的用户)http://localhost/user/saveUser (保存用户)
REST风格描述形式http://localhost/user/1 (得到id为1的用户)http://localhost/user (保存用户)
优点:
隐藏资源的访问行为, 无法通过地址得知对资源是何种操作
书写简化
按照REST风格访问资源时使用行为动作 区分对资源进行了何种操作
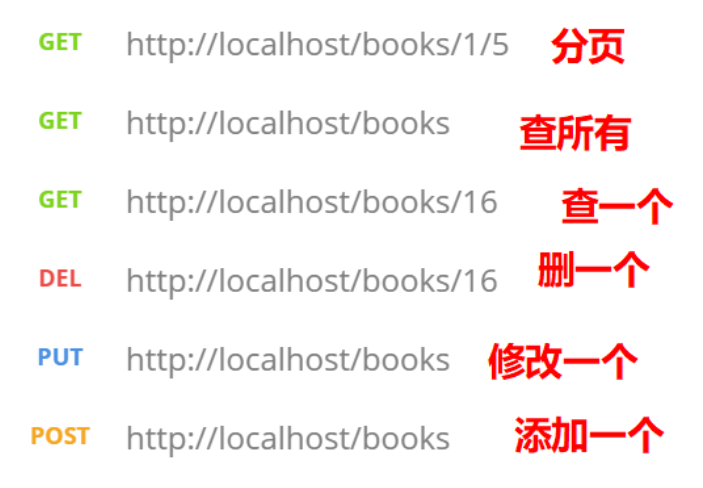
GET 用来获取资源,POST 用来新建资源,PUT 用来更新资源,DELETE 用来删除资源
1
2
3
4
5
http://localhost/users 查询全部用户信息 GET (查询) http://localhost/users/1 查询指定用户信息 GET (查询) http://localhost/users 添加用户信息 POST (新增/保存) http://localhost/users 修改用户信息 PUT (修改/更新) http://localhost/users/1 删除用户信息 DELETE (删除)
注意:
上述行为是约定方式,约定不是规范,可以打破,所以称REST风格,而不是REST规范
根据REST风格对资源进行访问称为RESTful
小结:
REST
动作4个
RESTful
RESTful入门案例 步骤:
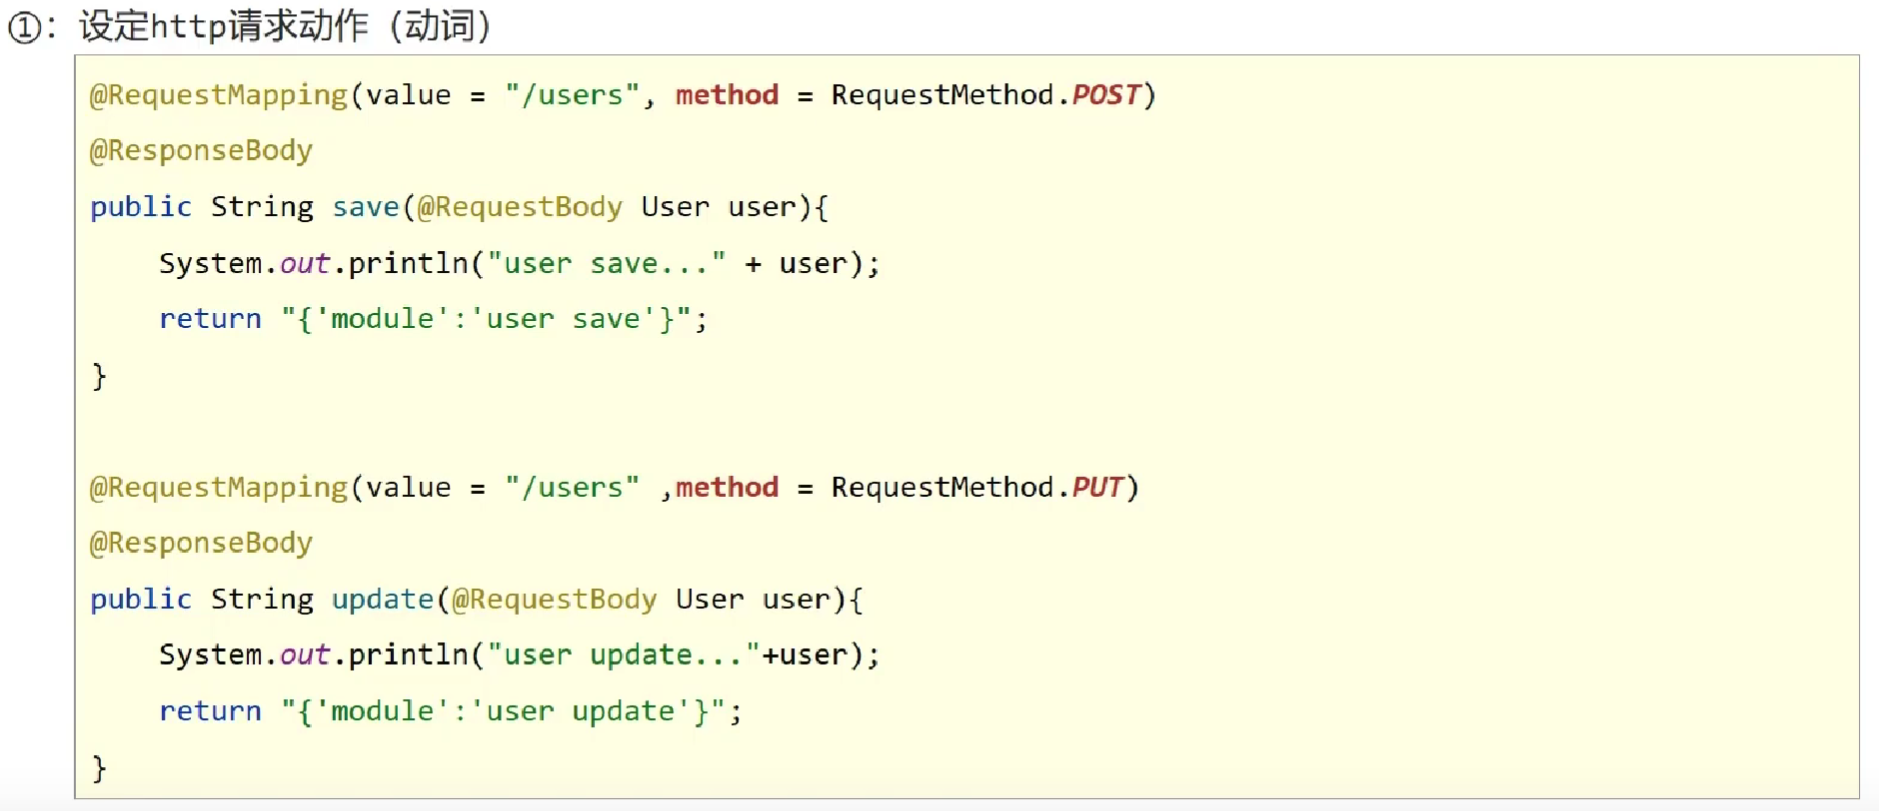
①:设定http请求动作(动词)
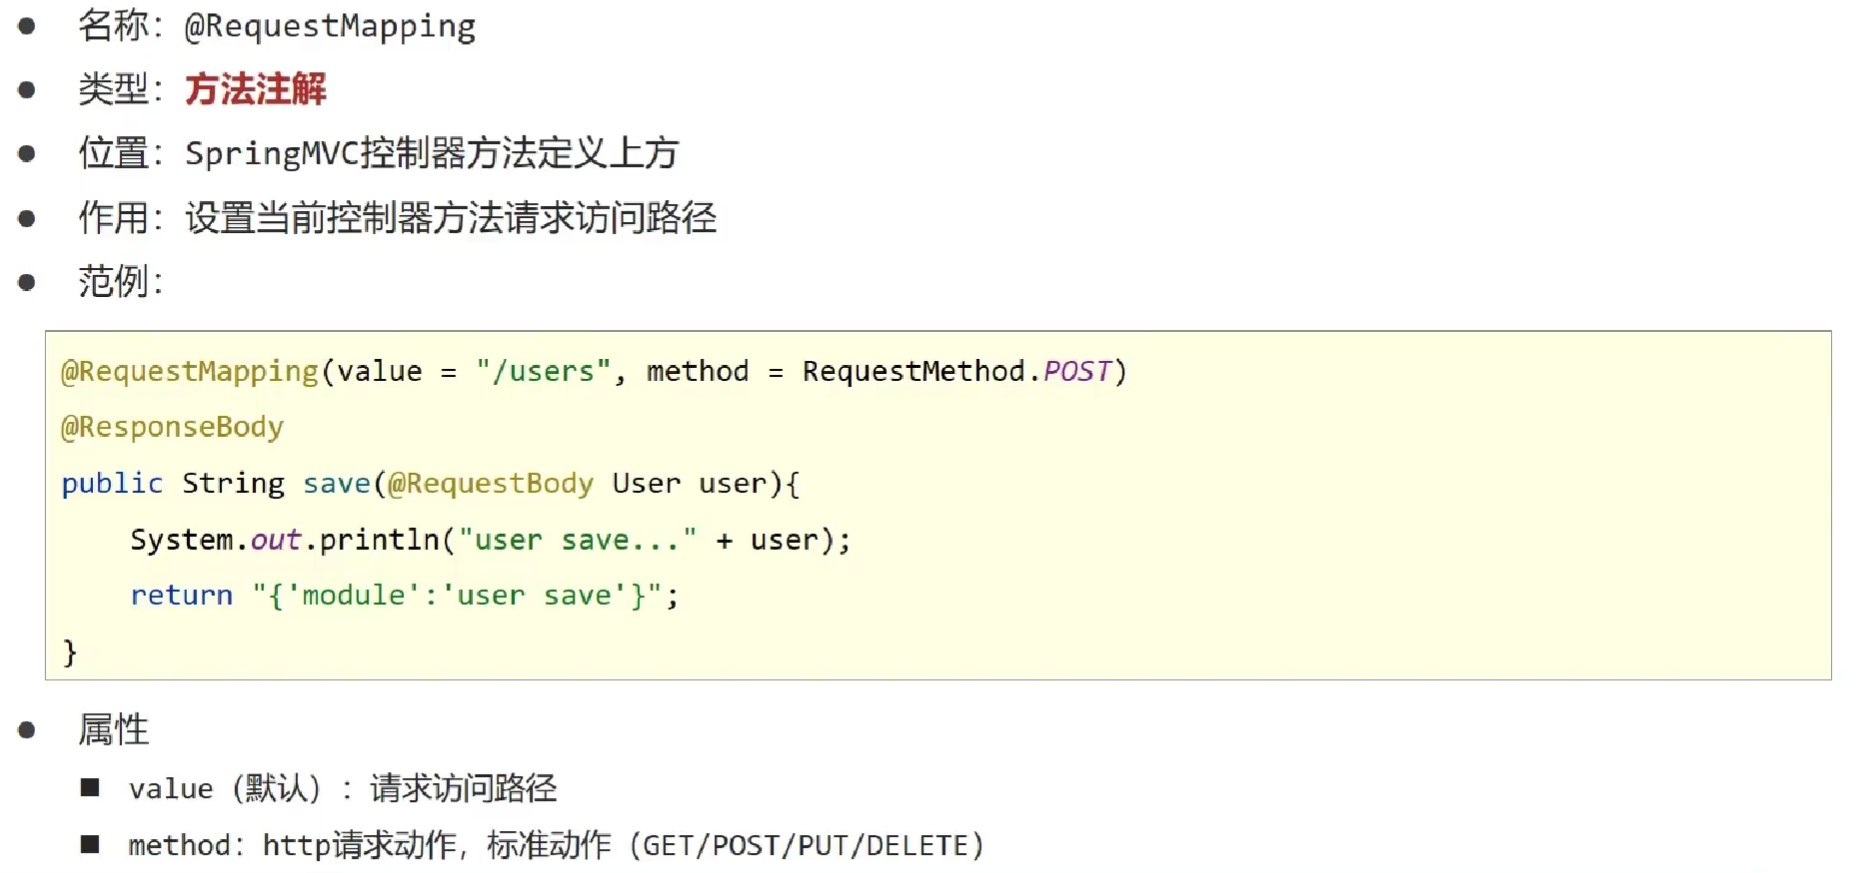
使用 @RequestMapping 注解的 method 属性声明请求的方式
使用 @RequestBody 注解 获取请求体内容。直接使用得到是 key=value&key=value…结构的数据。get 请求方式不适用。
使用@ResponseBody 注解实现将 controller 方法返回对象转换为 json 响应给客户端。
@RequestMapping(value=”/users”,method=RequestMethod.POST)
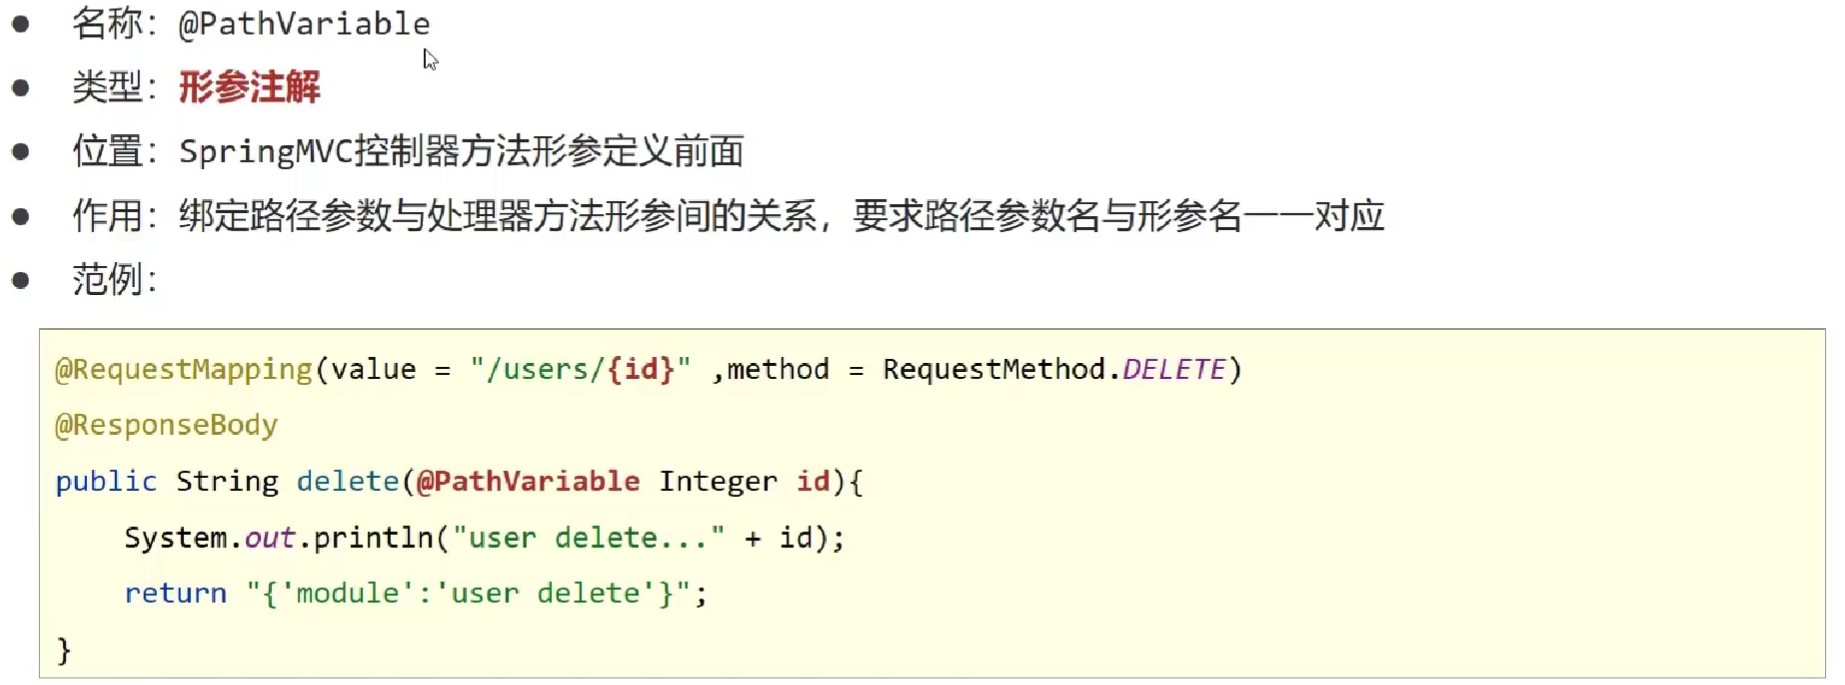
②:设定请求参数(路径变量)
使用@PathVariable 用于绑定 url 中的占位符。例如:请求 url 中 /delete/{id},这个{id}就是 url 占位符。
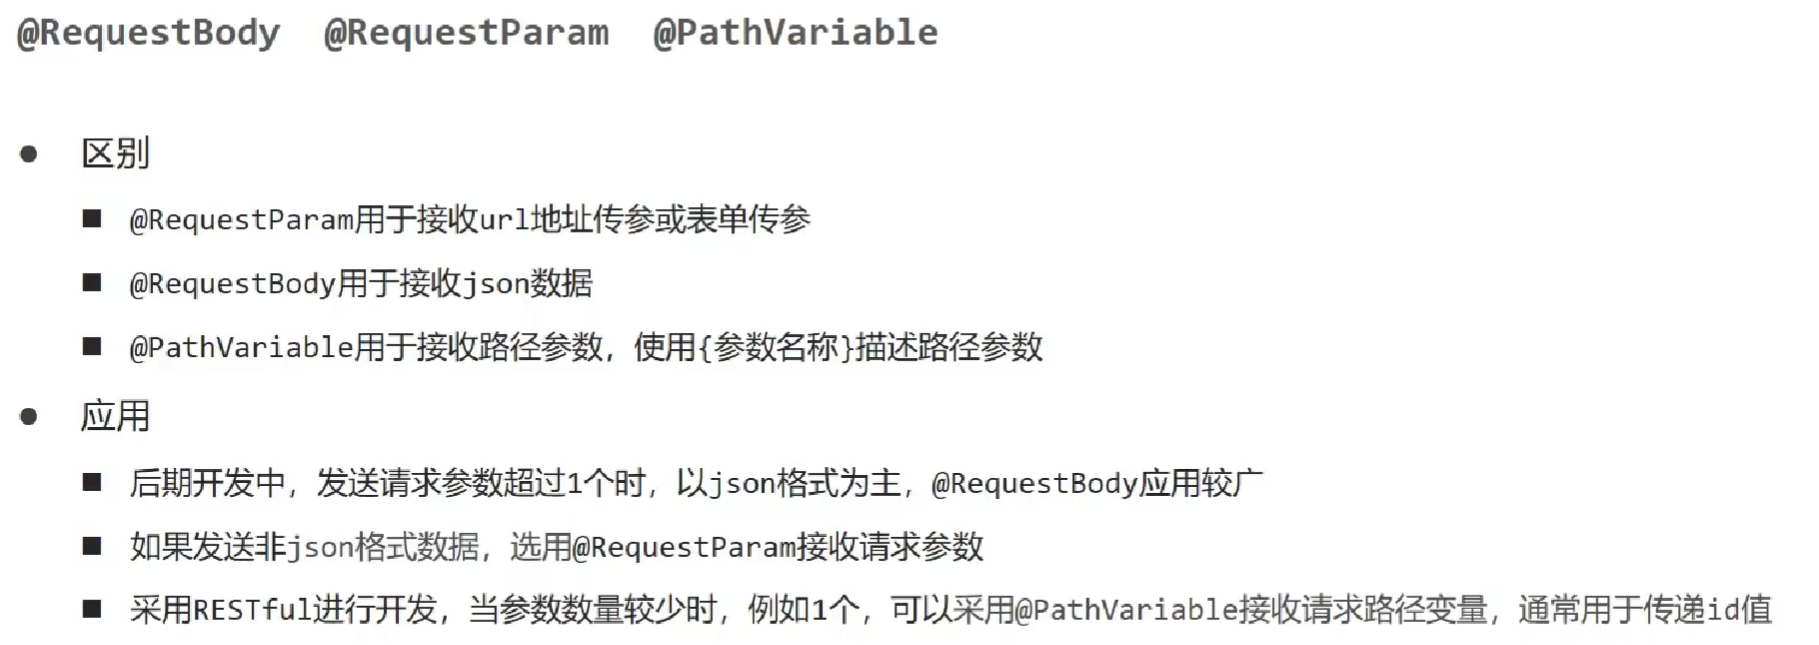
@RequestBody @RequestParam @PathVariable
RESTful快速开发
使用 @RestController 注解开发 RESTful 风格
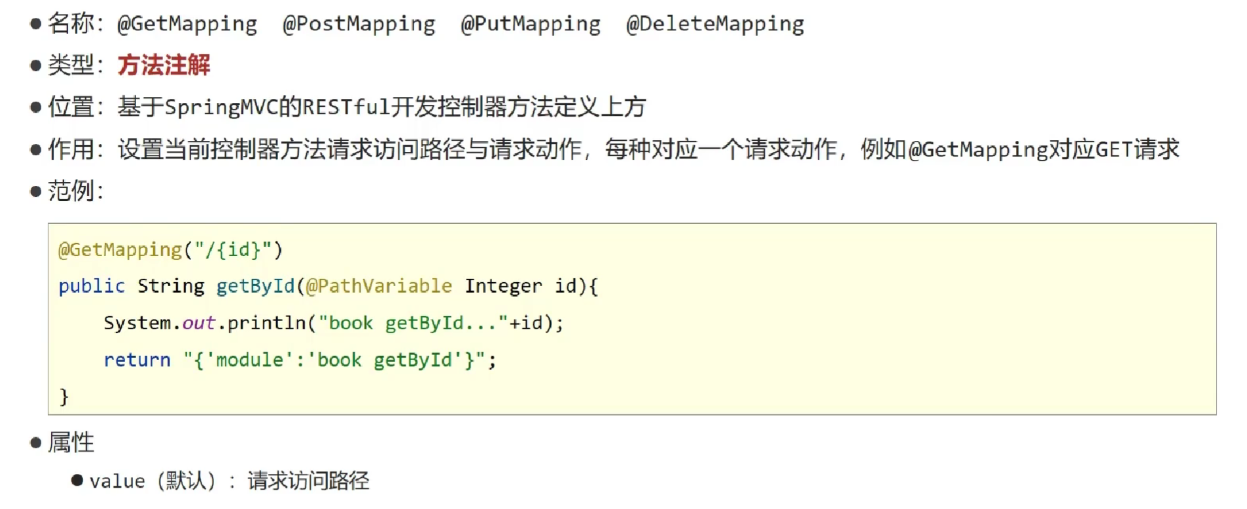
使用 @GetMapping @PostMapping @PutMapping @DeleteMapping 简化 @RequestMapping 注解开发
复制模块 原则
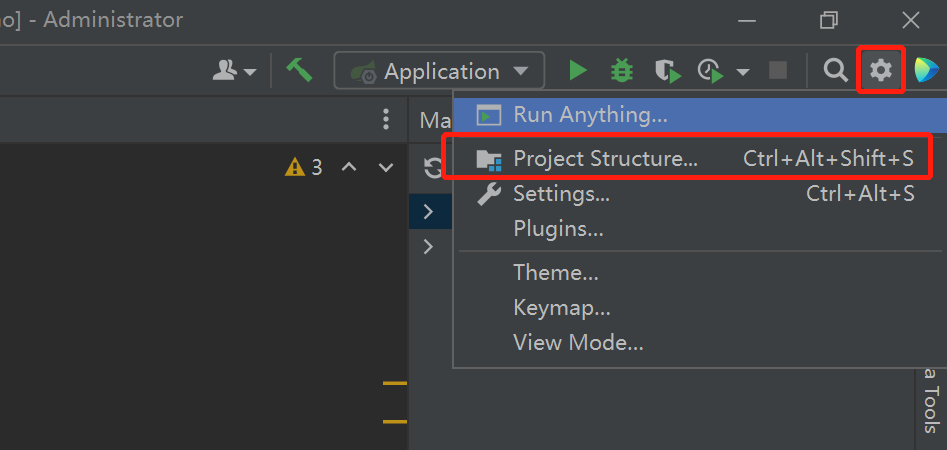
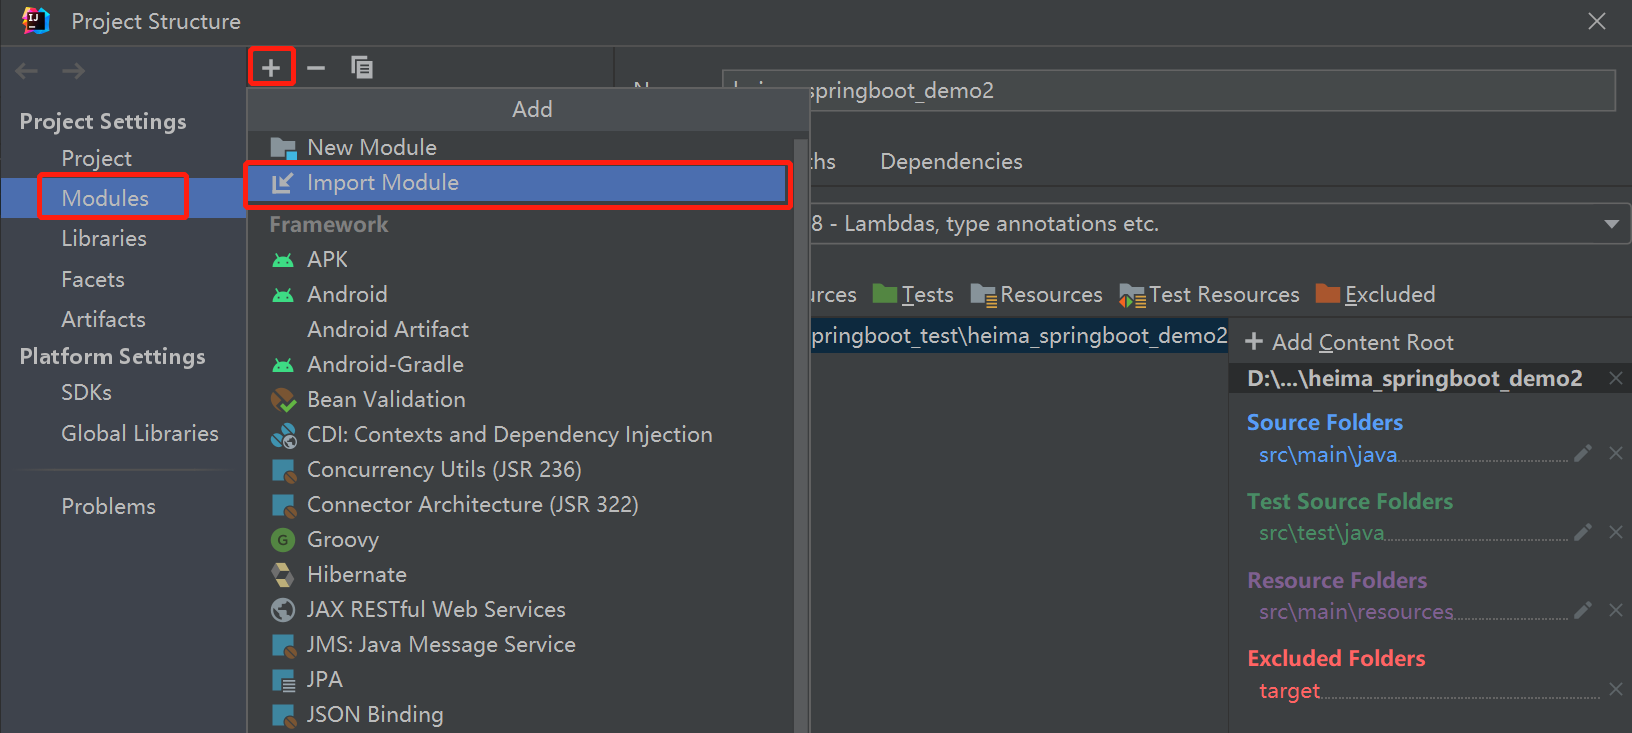
在IDEA 中点击模块管理添加模块
小结:
在工作空间中复制对应工程,并修改工程名称
删除与Idea相关配置文件,仅保留src目录与pom.xml文件
修改pom.xml文件中的artifactId与新工程/模块名相同
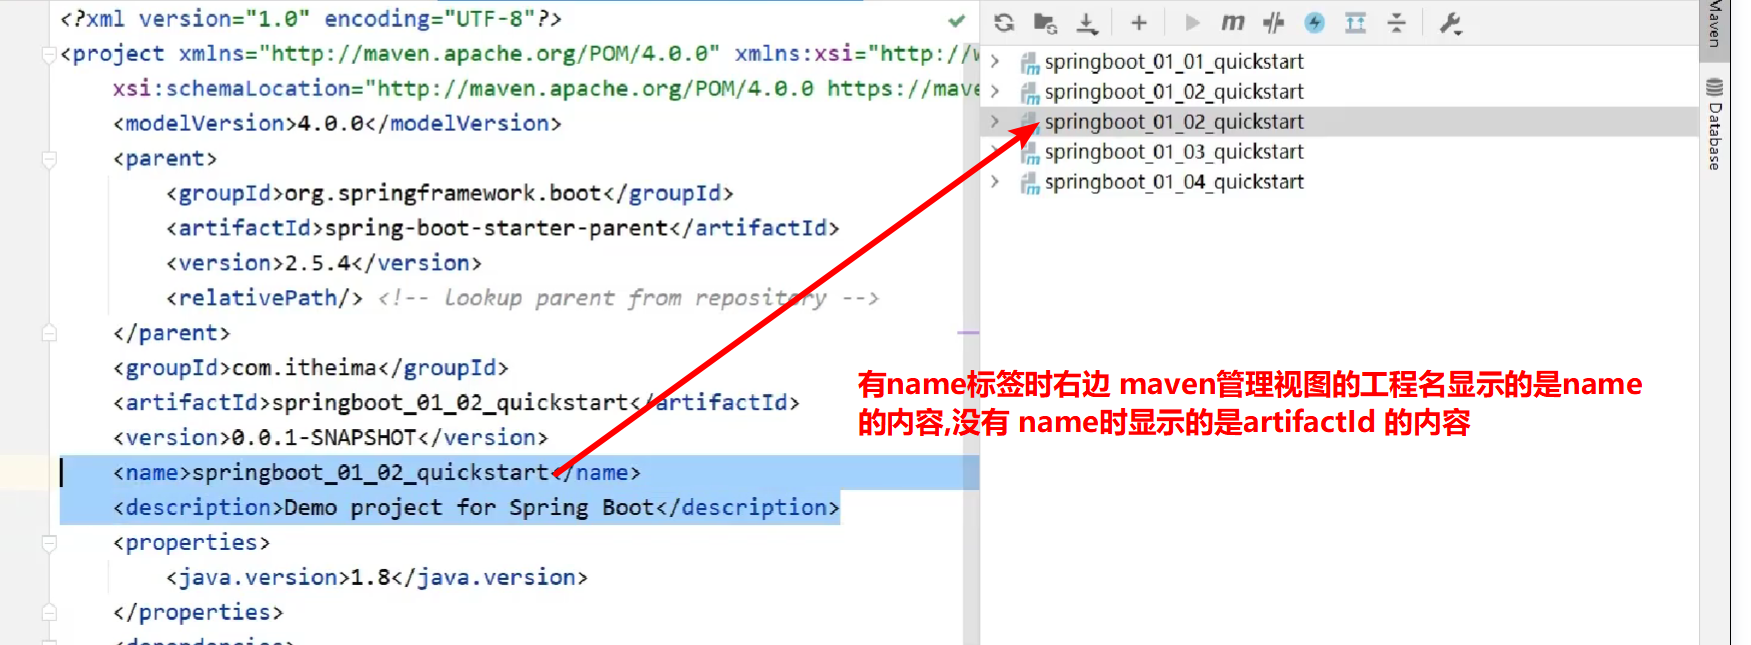
删除name标签(可选)
保留备份工程供后期使用
属性配置 属性配置方式
SpringBoot默认配置文件application.properties,通过键值对配置对应属性
修改配置
1
2
# 服务器端口配制 server.port=80
SpringBoot默认配置文件application.properties
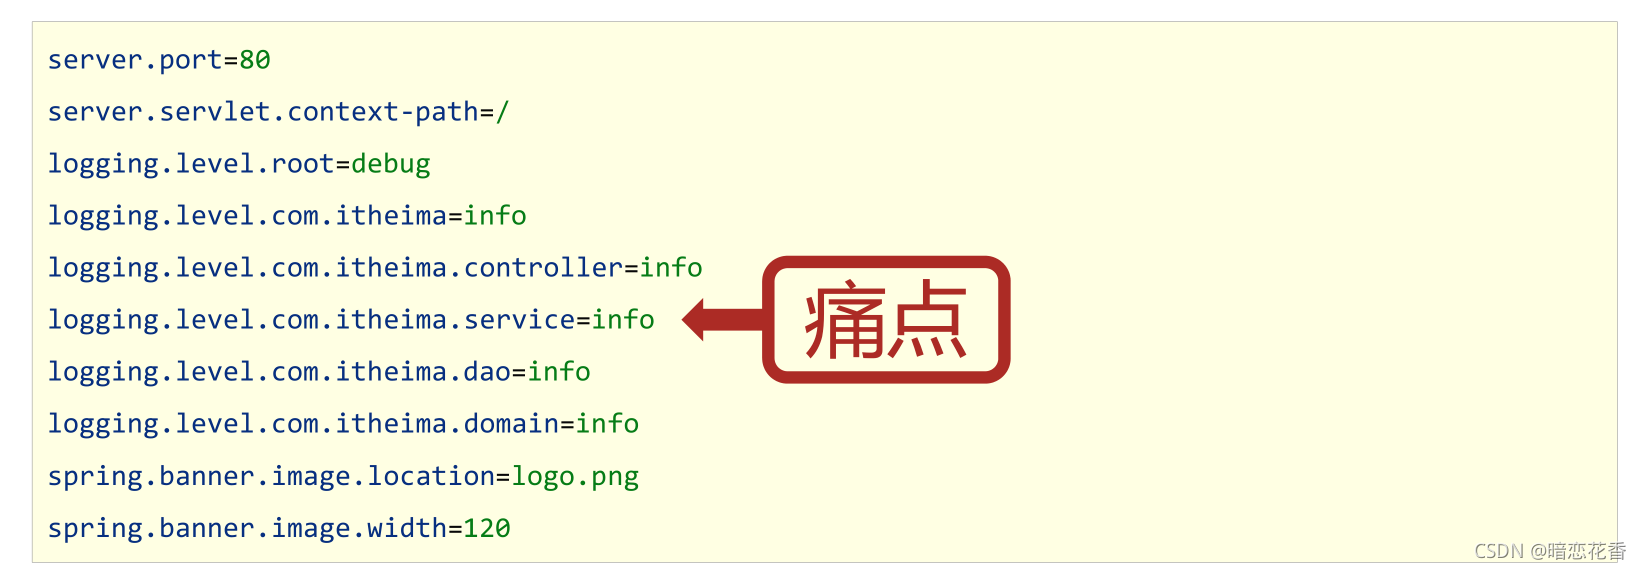
基础配置 1 2 3 4 5 6 7 8 9 10 server.port=80 logging.level.root=info
SpringBoot内置属性查询https://docs.spring.io/spring-boot/docs/current/reference/html/application-properties.html#application-properties
小结:
SpringBoot中导入对应starter后,提供对应配置属性
书写SpringBoot配置采用关键字+提示形式书写
3种配置文件类型 配置文件格式
application.properties
application.yml
application.yaml
小结:
SpringBoot提供了3种配置文件的格式yml(主流格式)
配置文件加载优先级
SpringBoot配置文件加载顺序application.properties > application.yml > application.yaml 常用配置文件种类application.yml
小结:
配置文件间的加载优先级
不同配置文件中相同配置按照加载优先级相互覆盖 (高优先级配置内容会覆盖低优先级配置内容 ),不同配置文件中不同配置全部保留
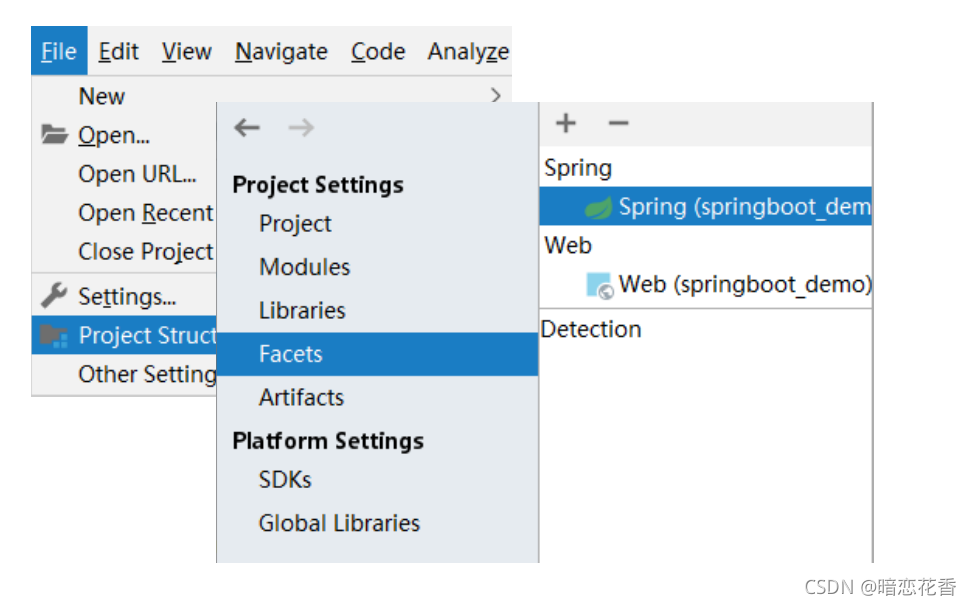
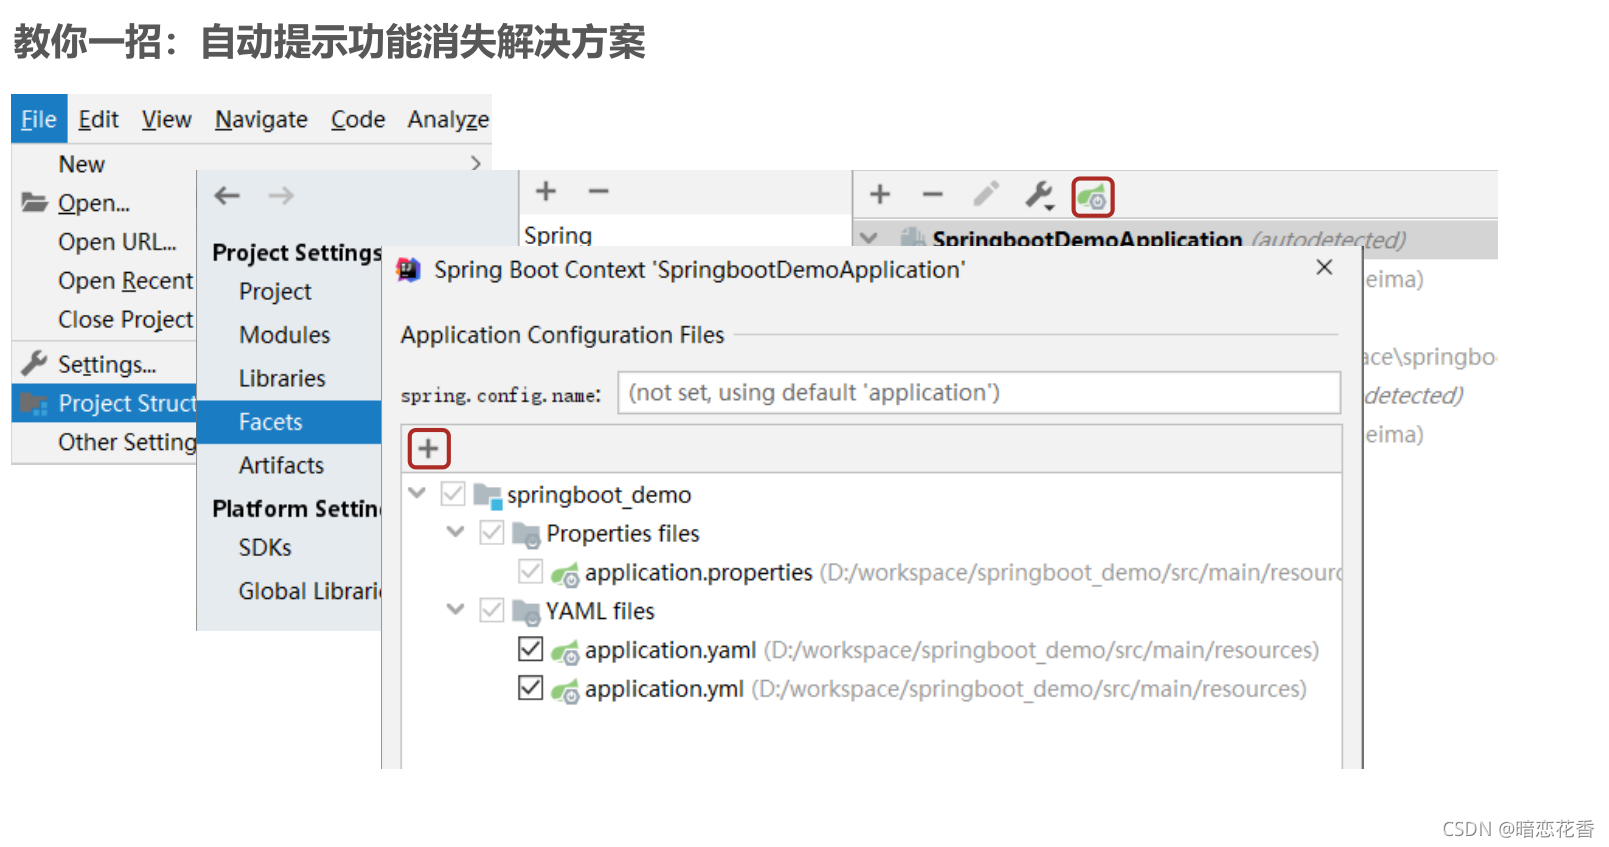
属性提示消失解决方案
小结:
指定SpringBoot配置文件Setting → Project Structure → Facets Customize Spring Boot
yaml数据格式 yaml
YAML(YAML Ain’t Markup Language) ,一种数据序列化格式
优点:
容易阅读
容易与脚本语言交互
以数据为核心,重数据轻格式
YAML文件扩展名
yaml语法规则 基本语法 key: value -> value 前面一定要有空格敏感 缩进 表示层级关系,同层级左侧对齐 ,只允许使用空格 (不允许使用Tab键)数据前面要加空格与冒号隔开
1 2 3 4 server: servlet: context-path: /hello port: 82
数据类型
1 2 3 4 5 6 7 8 9 10 11 12 boolean: TRUE float: 3.14 int: 123 null: ~ string: HelloWorld string2: "Hello World" date: 2018-02-17 datetime: 2018-02-17T15:02:31+08:00
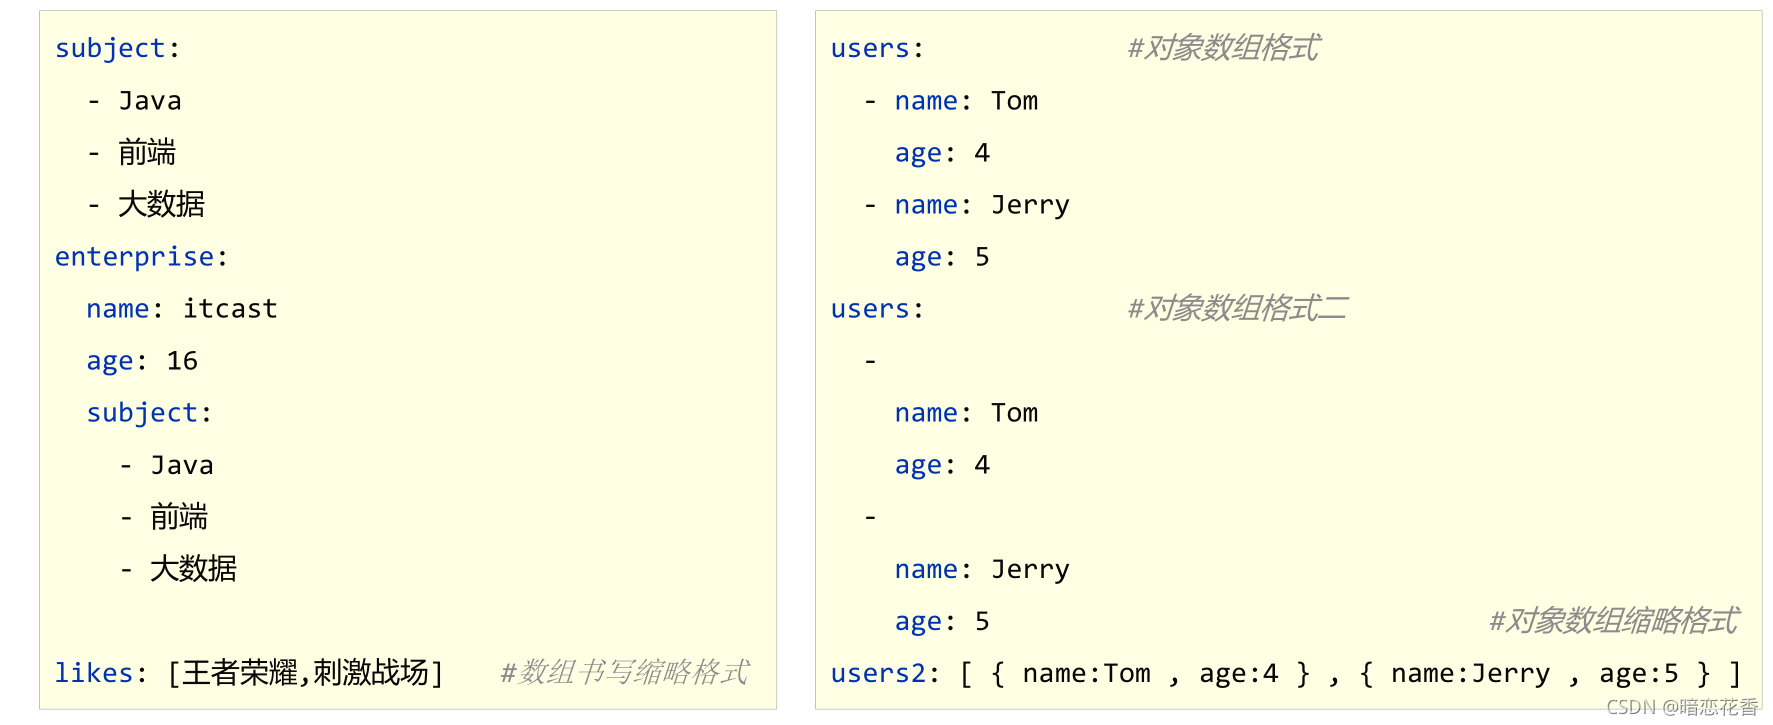
数组表示方式:在属性名书写位置的下方使用减号作为数据开始符号,每行书写一个数据,减号与数据间空格分隔
1 2 3 4 5 6 7 8 9 10 11 12 13 14 15 16 17 18 19 20 21 22 23 24 25 26 27 28 29 30 31 32 33 34 35 subject: - Java - 前端 - 大数据 enterprise: name: zhangsan age: 16 subject2: - Java - 前端 - 大数据 likes: [王者荣耀 ,刺激战场 ] users: - name: Tom age: 4 - name: Jerry age: 5 users2: - name: Tom age: 4 - name: Jerry age: 5 users3: [ { name:Tom , age:4 } , { name:Jerry , age:5 } ]
小结:
1 2 3 4 5 6 7 8 9 1 . yaml语法规则 大小写敏感 属性层级关系使用多行描述,每行结尾使用冒号结束 使用缩进表示层级关系,同层级左侧对齐,只允许使用空格(不允许使用Tab键) 属性值前面添加空格(属性名与属性值之间使用冒号+空格作为分隔) 2 . 注意属性名冒号后面与数据之间有一个空格 3 . 字面值、对象数据格式、数组数据格式(略)
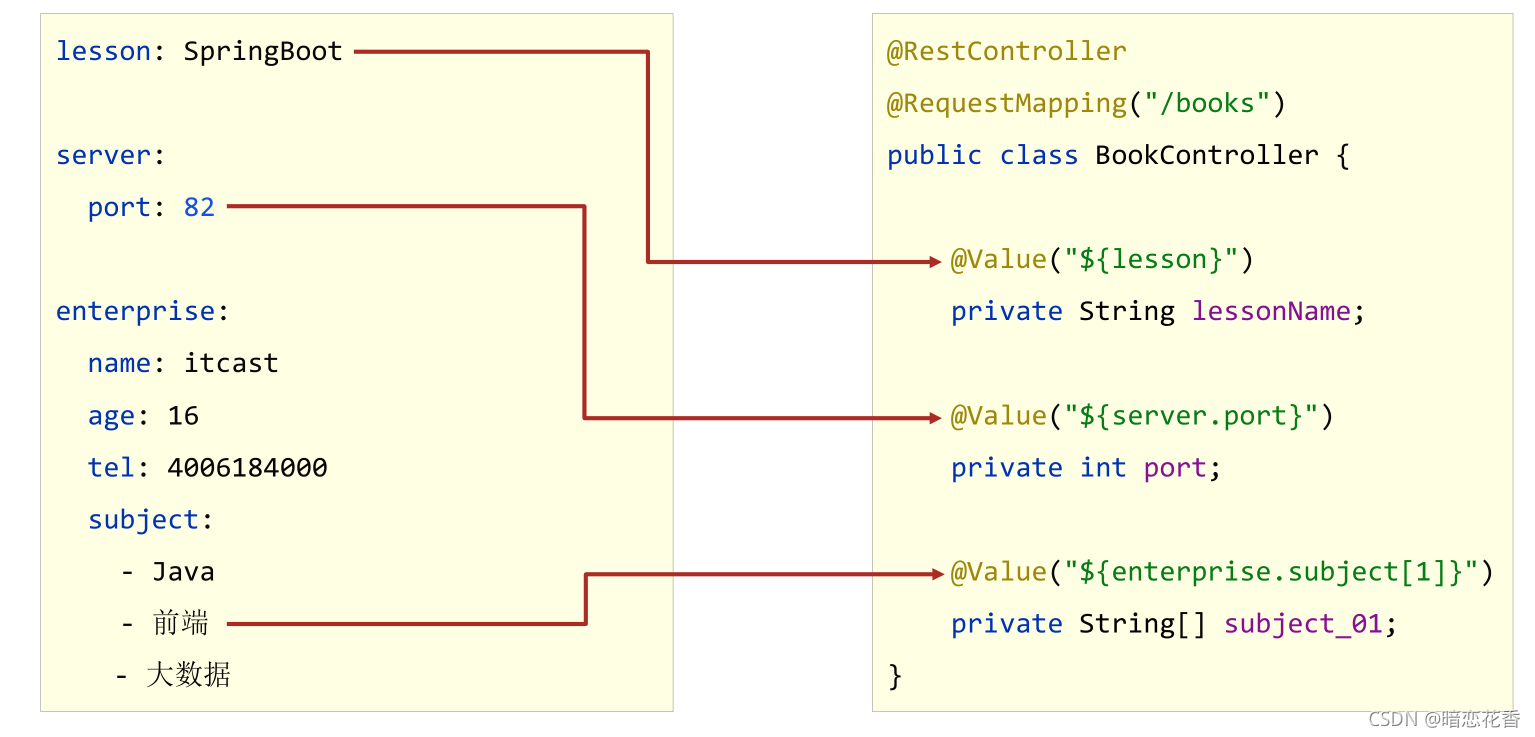
读取yaml单一属性数据 使用@Value读取单个数据,属性名引用方式:${一级属性名.二级属性名……}
1 2 3 4 5 6 7 8 9 10 11 12 13 14 15 16 17 18 19 20 21 22 23 @Value("${country}") private String country1;@Value("${user.age}") private String age1;@Value("${likes[1]}") private String likes1;@Value("${users[1].name}") private String name1;@GetMapping public String getById () { System.out.println("springboot is running2..." ); System.out.println("country1=>" + country1); System.out.println("age1=>" + age1); System.out.println("likes1=>" + likes1); System.out.println("name1=>" + name1); return "springboot is running2..." ; }
小结:
使用@Value配合${}读取单个数据
如果数据存在多层级,依次书写层级名称即可
yaml文件中的变量引用 在配置文件中可以使用属性名引用方式引用属性
属性值中如果出现转移字符,需要使用双引号包裹
小结:
在配置文件中可以使用${属性名}方式引用属性值
如果属性中出现特殊字符,可以使用双引号包裹起来作为字符解析
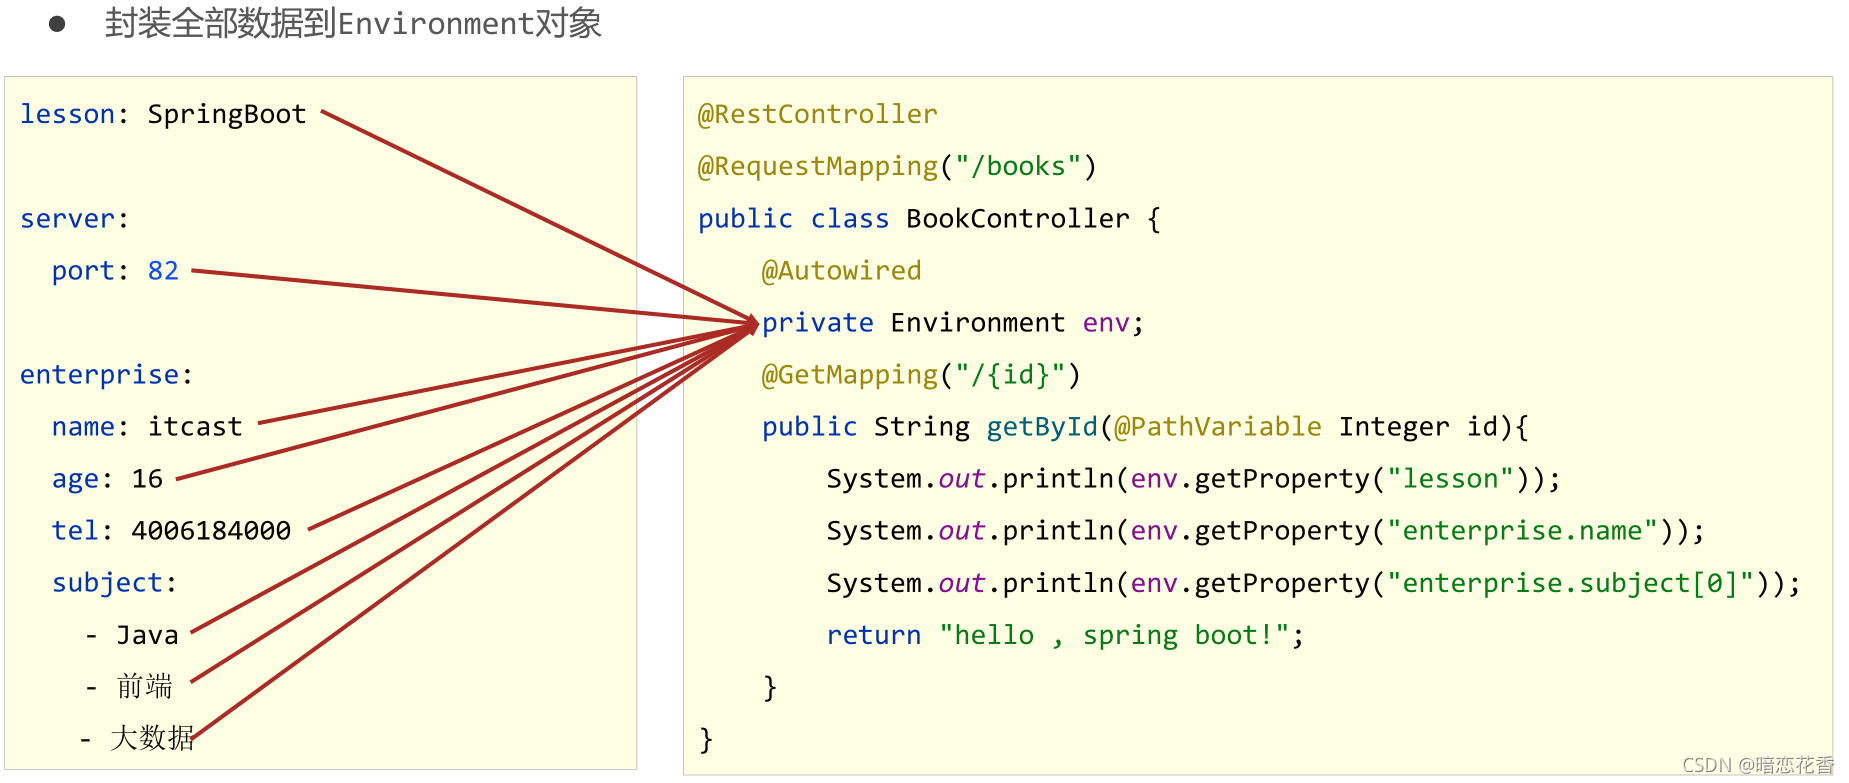
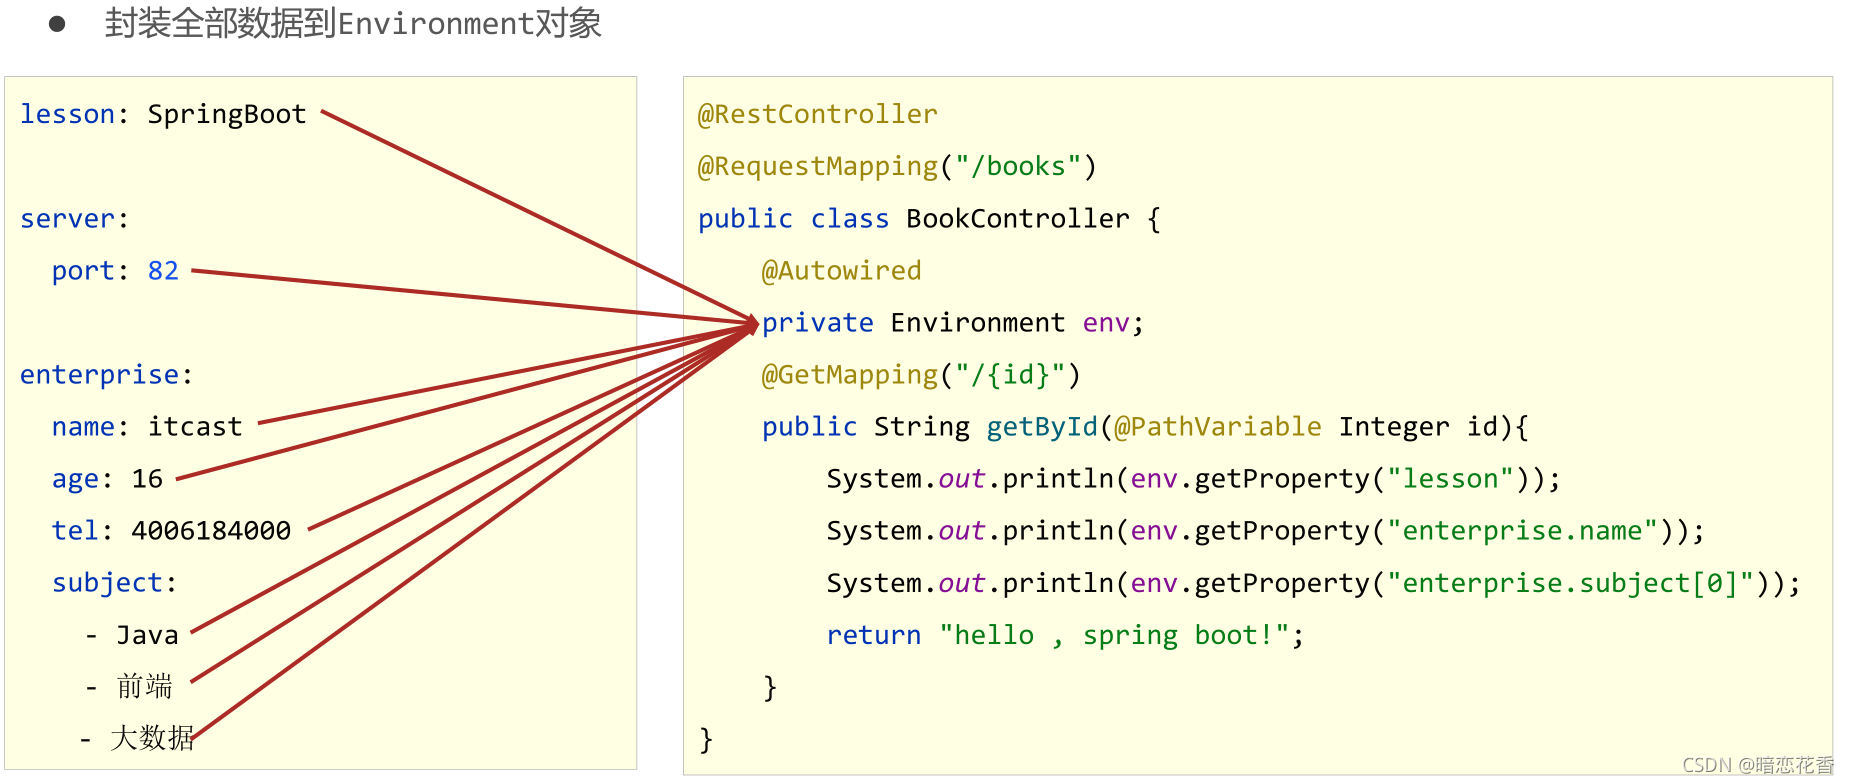
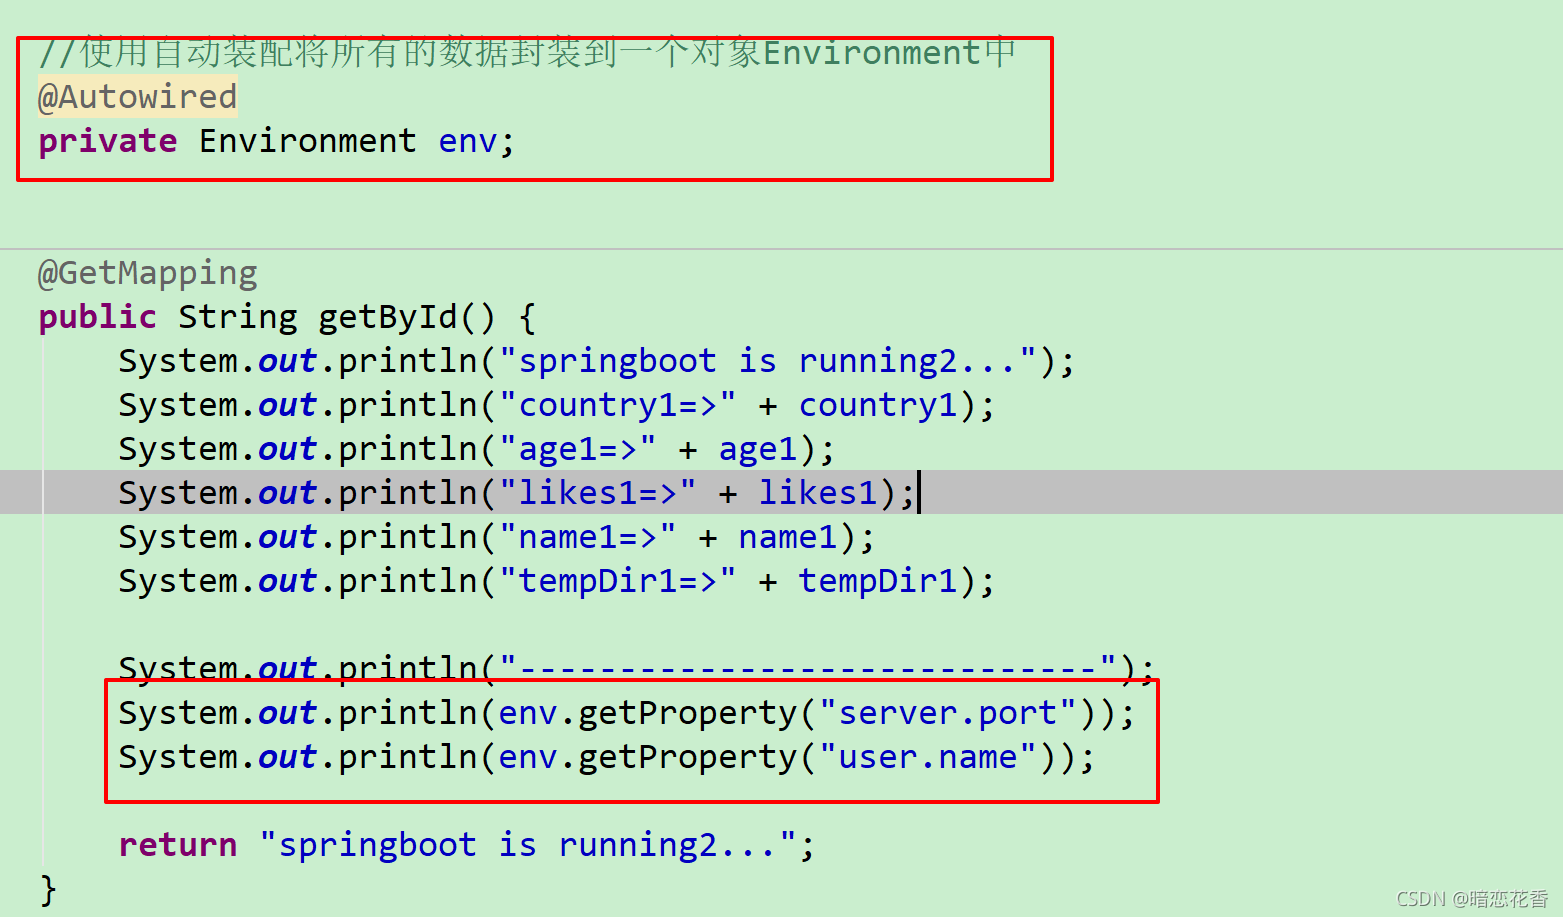
读取yaml全部属性数据
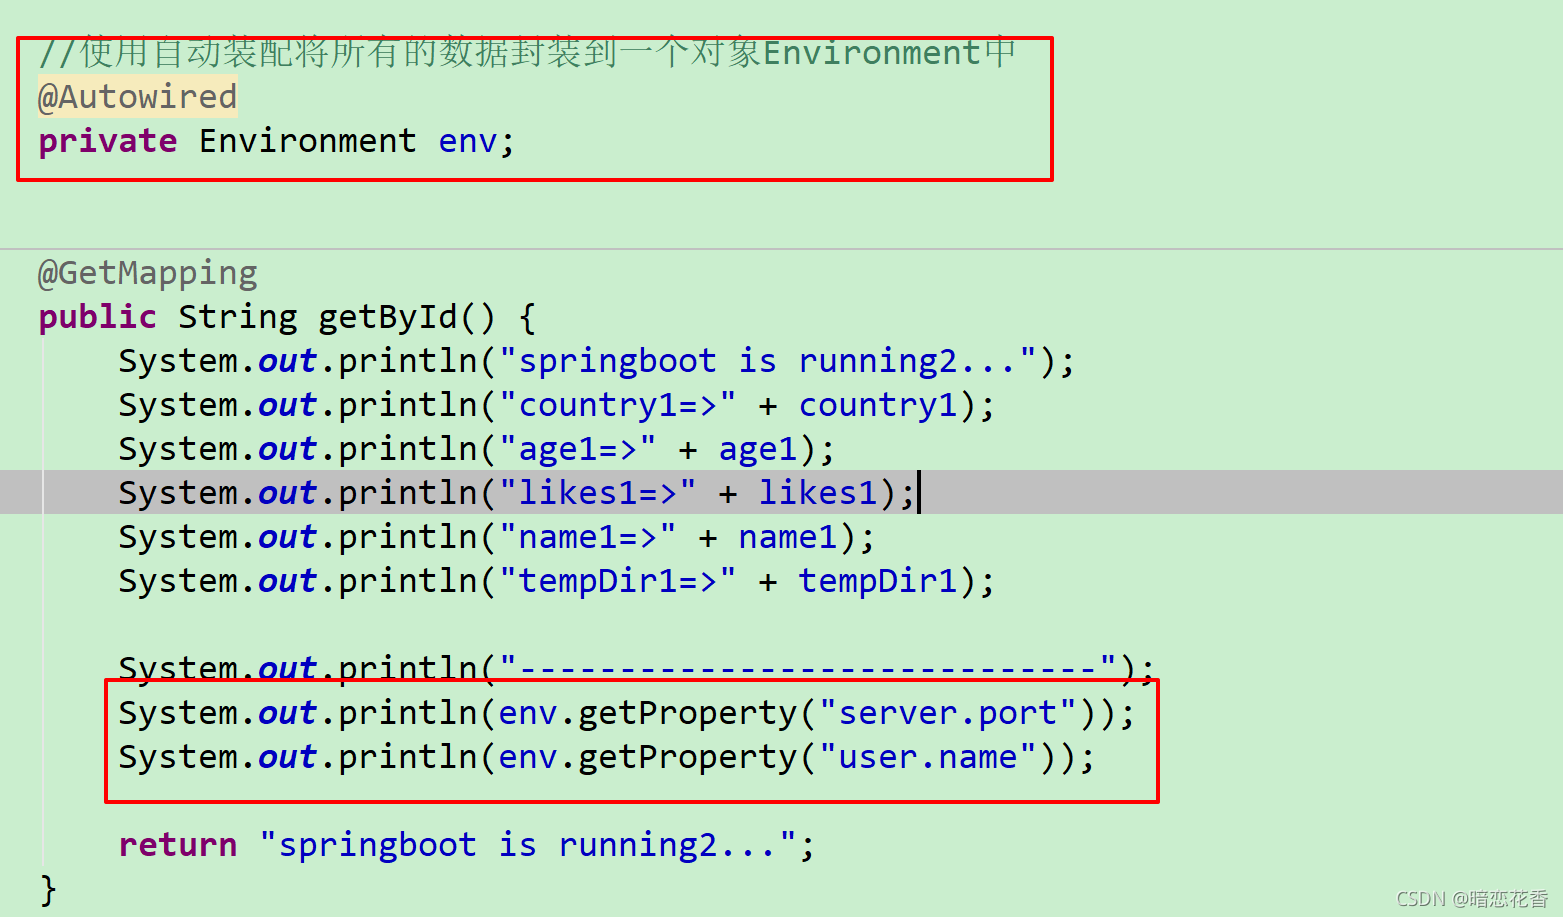
封装全部数据到Environment对象
注意 要导这个包
import org.springframework.core.env.Environment;
小结:
使用Environment对象封装全部配置信息
使用@Autowired自动装配数据到Environment对象中
小结:
使用Environment对象封装全部配置信息
使用@Autowired自动装配数据到Environment对象中
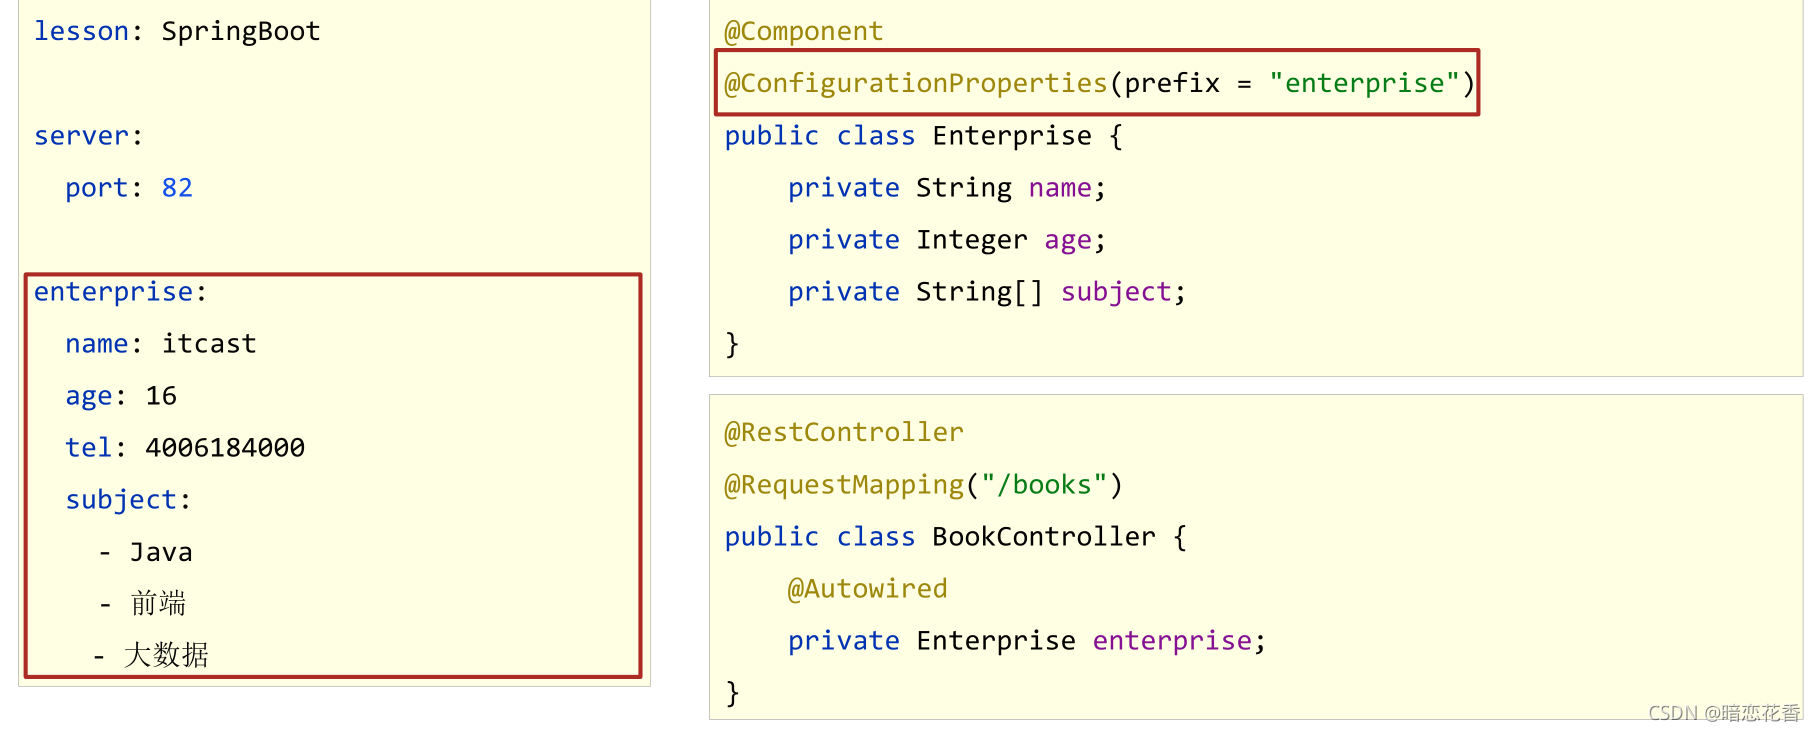
读取yaml引用类型属性数据
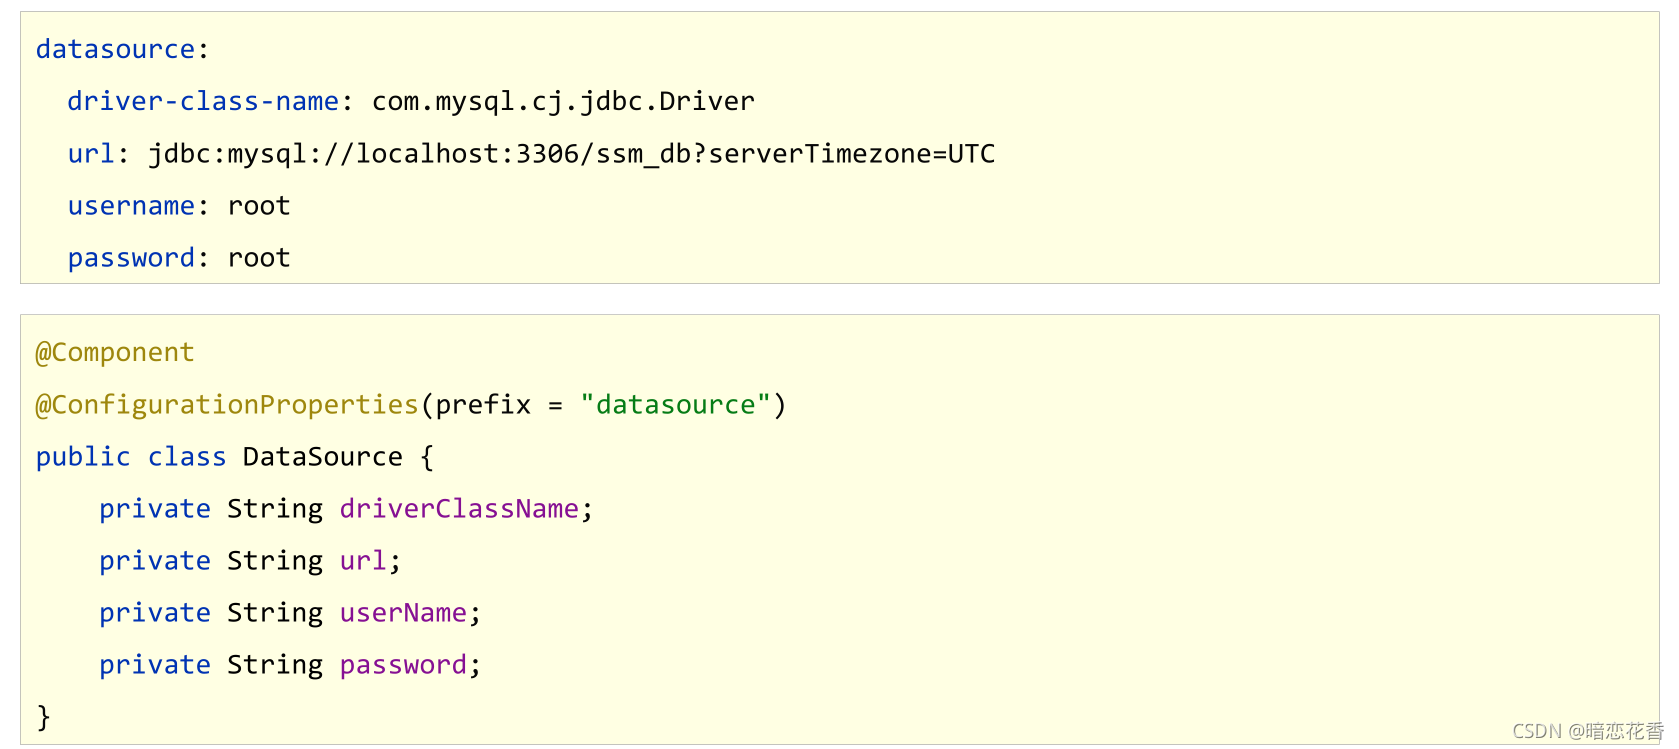
1 2 3 4 5 6 7 8 9 10 datasource: driver: com.mysql.jdbc.Driver url: jdbc:mysql://localhost/springboot_db username: root password: root666123
1 2 3 4 5 6 7 8 9 10 11 12 13 14 15 @Component @ConfigurationProperties(prefix = "datasource") public class MyDataSource { private String driver; private String url; private String username; private String password; }
使用自动装配封装指定数据
1 2 @Autowired private MyDataSource myDataSource;
输出查看
1 System.out.println(myDataSource);
小结:
使用@ConfigurationProperties注解绑定配置信息到封装类中
封装类需要定义为Spring管理的bean,否则无法进行属性注入
SpringBoot整合JUnit
添加Junit的起步依赖 Spring Initializr 创建时自带
1 2 3 4 5 6 <dependency > <groupId > org.springframework.boot</groupId > <artifactId > spring-boot-starter-test</artifactId > <scope > test</scope > </dependency >
1 2 3 4 5 6 7 8 9 @SpringBootTest class Springboot07JunitApplicationTests { @Autowired private BookService bookService; @Test public void testSave () { bookService.save(); } }
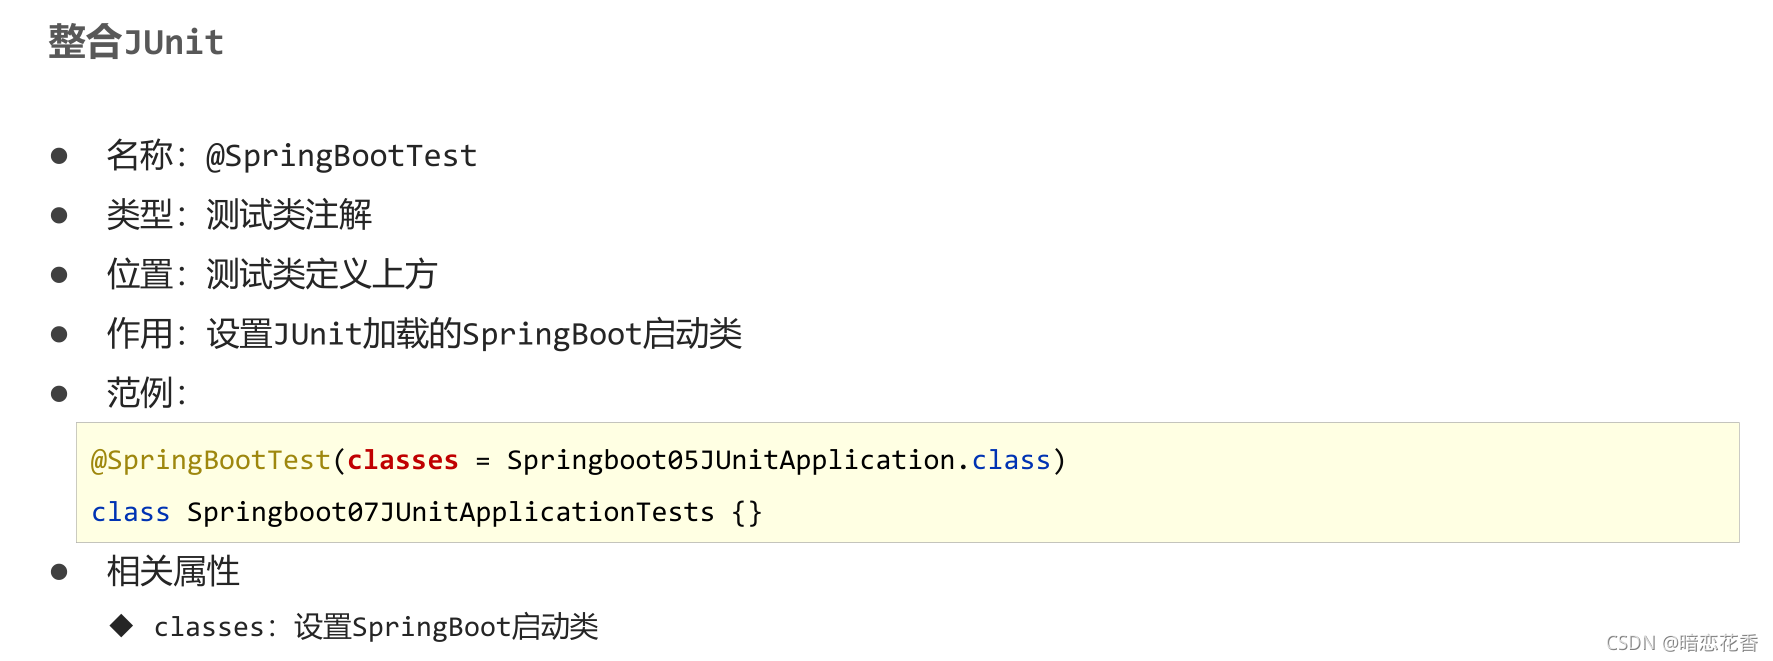
@SpringBootTestJUnit加载的SpringBoot启动类
1 2 @SpringBootTest class Springboot05JUnitApplicationTests {}
小结:
导入测试对应的starter
测试类使用@SpringBootTest修饰
使用自动装配的形式添加要测试的对象
整合JUnit——classes属性
1 2 3 4 5 6 7 8 9 10 11 12 13 14 15 16 @SpringBootTest(classes = Springboot04JunitApplication.class) class Springboot04JunitApplicationTests { @Autowired private BookDao bookDao; @Test void contextLoads () { bookDao.save(); System.out.println("two..." ); } }
注意:
如果测试类在SpringBoot启动类的包或子包中,可以省略启动类的设置,也就是省略classes的设定
小结:
测试类如果存在于引导类所在包或子包中无需指定引导类
测试类如果不存在于引导类所在的包或子包中需要通过 classes 属性指定引导类
SpringBoot整合MyBatis SpringBoot整合MyBatis流程
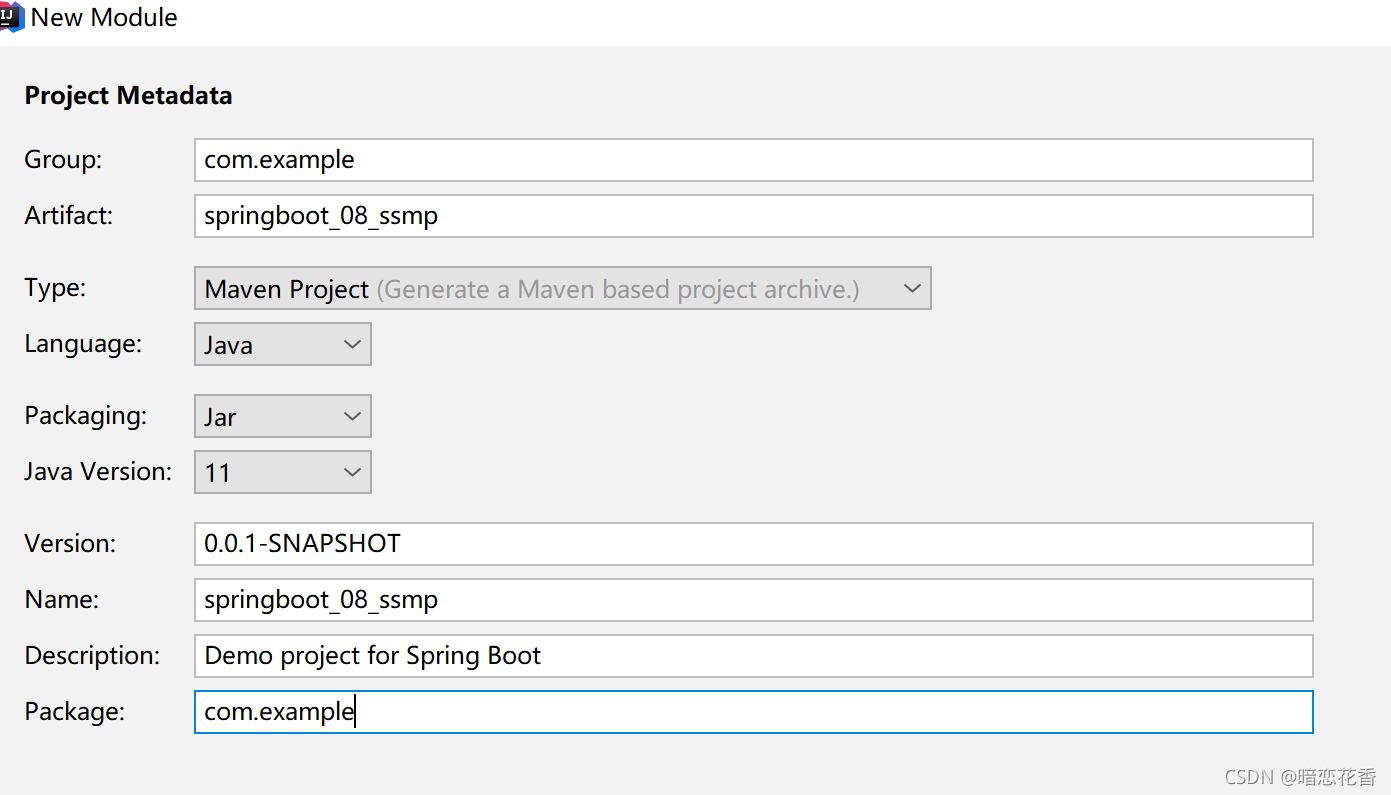
创建新模块,选择Spring初始化,并配置模块相关基础信息
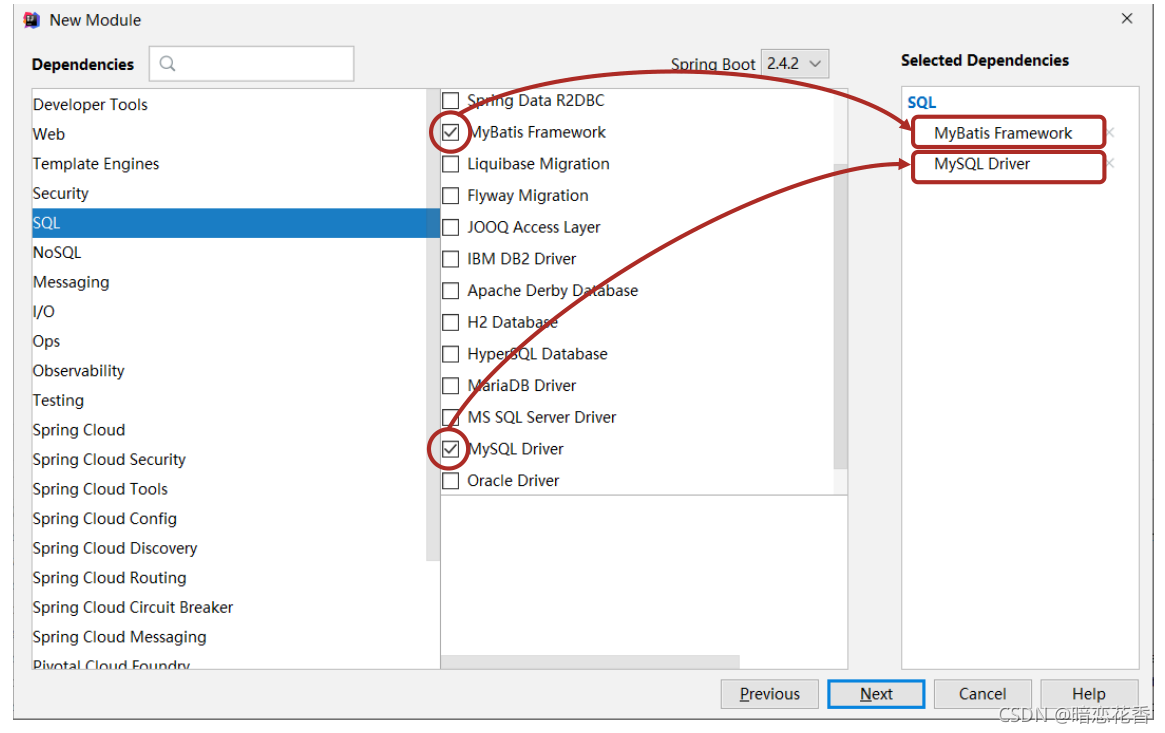
选择当前模块需要使用的技术集(MyBatis、MySQL)
1 2 3 4 5 6 7 spring: datasource: driver-class-name: com.mysql.cj.jdbc.Driver url: jdbc:mysql://localhost:3306/springboot_db username: root password: 123456
在 springboot_db 数据库中创建 user 表
1 2 3 4 5 6 7 8 9 10 11 12 13 14 15 16 17 18 DROP TABLE IF EXISTS `user `;CREATE TABLE `user ` ( `id` int (11 ) NOT NULL AUTO_INCREMENT, `username` varchar (50 ) DEFAULT NULL , `password` varchar (50 ) DEFAULT NULL , `name` varchar (50 ) DEFAULT NULL , PRIMARY KEY (`id`) ) ENGINE= InnoDB AUTO_INCREMENT= 10 DEFAULT CHARSET= utf8; INSERT INTO `user ` VALUES ('1' , 'zhangsan' , '123' , '张三' );INSERT INTO `user ` VALUES ('2' , 'lisi' , '123' , '李四' );
1 2 3 4 5 6 7 8 9 10 11 12 13 public class User { private Long id; private String username; private String password; private String name; }
1 2 3 4 5 6 @Mapper public interface UserDao { @Select("select * from user") public List<User> getAll () ; }
1 2 3 4 5 6 7 8 9 10 11 12 13 @SpringBootTest class Springboot05MybatisApplicationTests { @Autowired private UserDao userDao; @Test void contextLoads () { List<User> userList = userDao.getAll(); System.out.println(userList); } }
1 [User{id=1 , username='zhangsan' , password='123' , name='张三' }, User{id=2 , username='lisi' , password='123' , name='李四' }]
总结:
勾选MyBatis技术,也就是导入MyBatis对应的starter
数据库连接相关信息转换成配置
数据库SQL映射需要添加@Mapper被容器识别到
SpringBoot整合MyBatis常见问题处理 SpringBoot版本低于2.4.3(不含),Mysql驱动版本大于8.0时,需要在url连接串中配置时区
1 jdbc:mysql://localhost:3306/springboot_db?serverTimezone=UTC
或在MySQL数据库端配置时区解决此问题
1.MySQL 8.X驱动强制要求设置时区
修改url,添加serverTimezone设定
修改MySQL数据库配置(略)
2.驱动类过时,提醒更换为com.mysql.cj.jdbc.Driver
SpringBoot整合Druid
①: 导入Druid对应的starter
1 2 3 4 5 <dependency > <groupId > com.alibaba</groupId > <artifactId > druid-spring-boot-starter</artifactId > <version > 1.2.6</version > </dependency >
②: 指定数据源类型 (这种方式只需导入一个 Druid 的坐标)
1 2 3 4 5 6 7 8 spring: datasource: driver-class-name: com.mysql.cj.jdbc.Driver url: jdbc:mysql://localhost:3306/springboot_db?serverTimezone=UTC username: root password: 123456 type: com.alibaba.druid.pool.DruidDataSource
或者 变更Druid的配置方式(推荐) 这种方式需要导入 Druid对应的starter
1 2 3 4 5 6 7 spring: datasource: druid: driver-class-name: com.mysql.cj.jdbc.Driver url: jdbc:mysql://localhost:3306/springboot_db?serverTimezone=UTC username: root password: 123456
小结:
1.整合Druid需要导入Druid对应的starterDruid提供的配置方式进行配置
导入对应的starter
根据提供的配置格式,配置非默认值对应的配置项
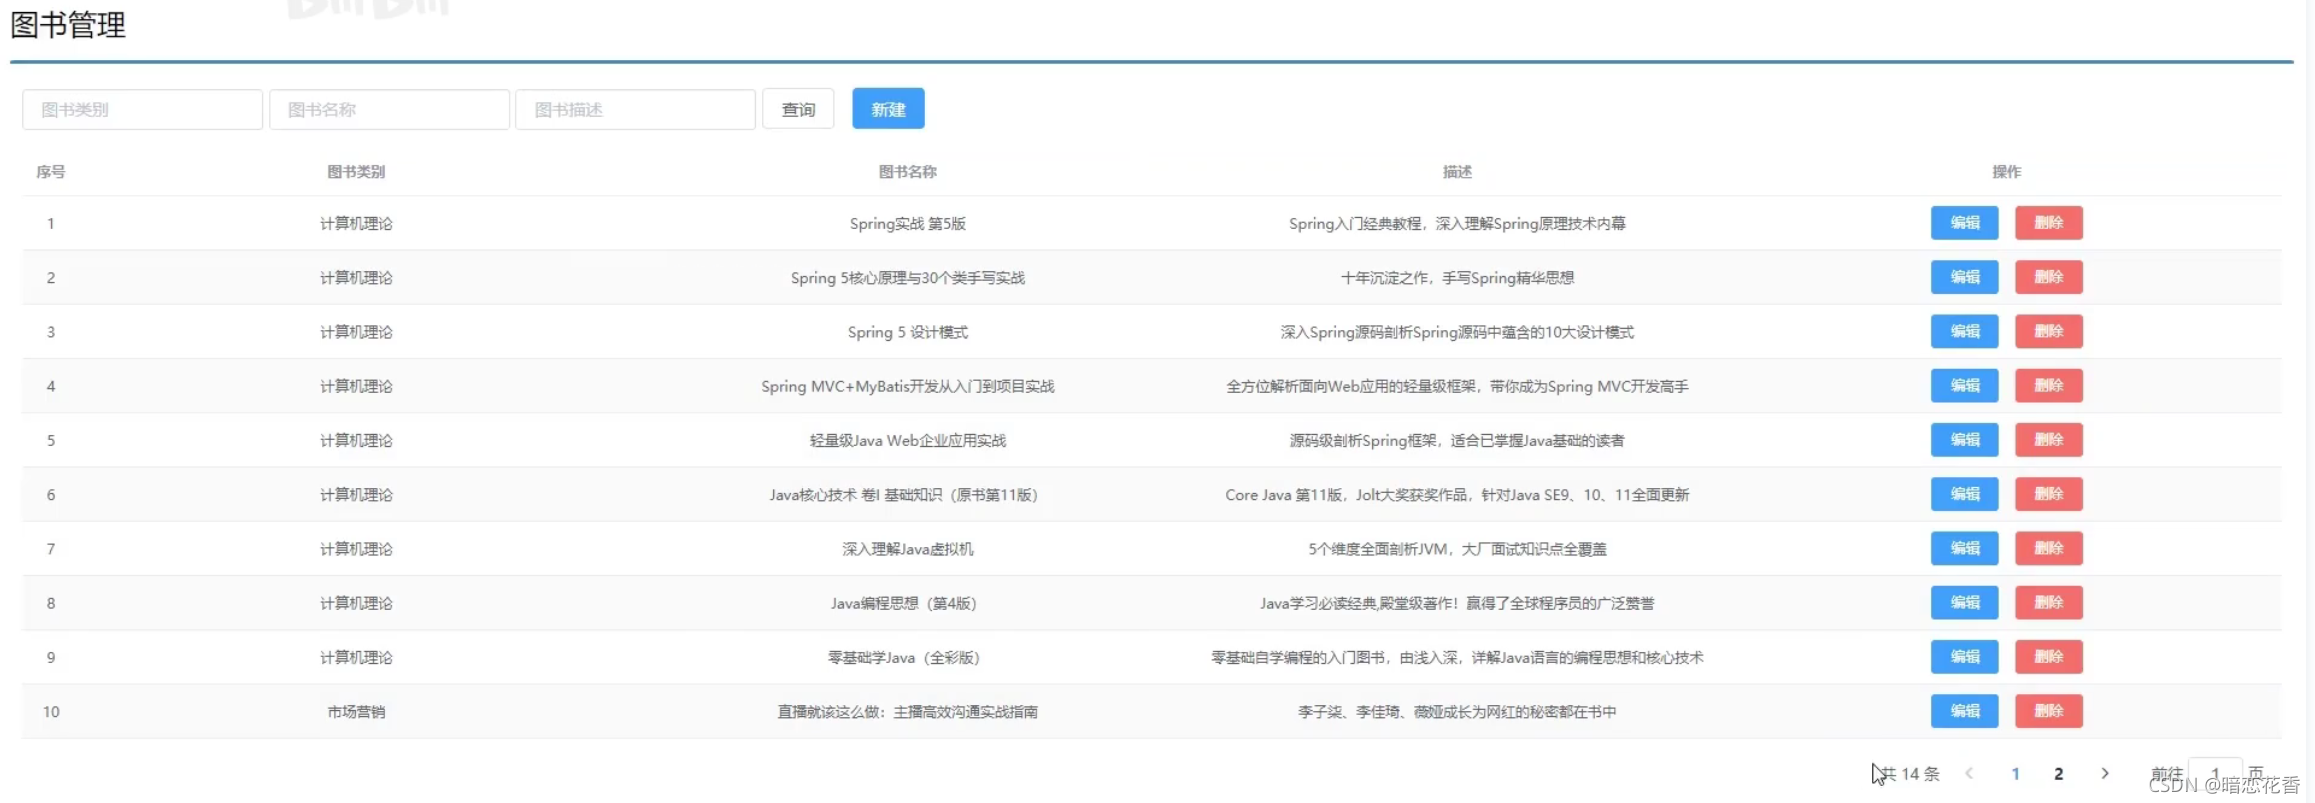
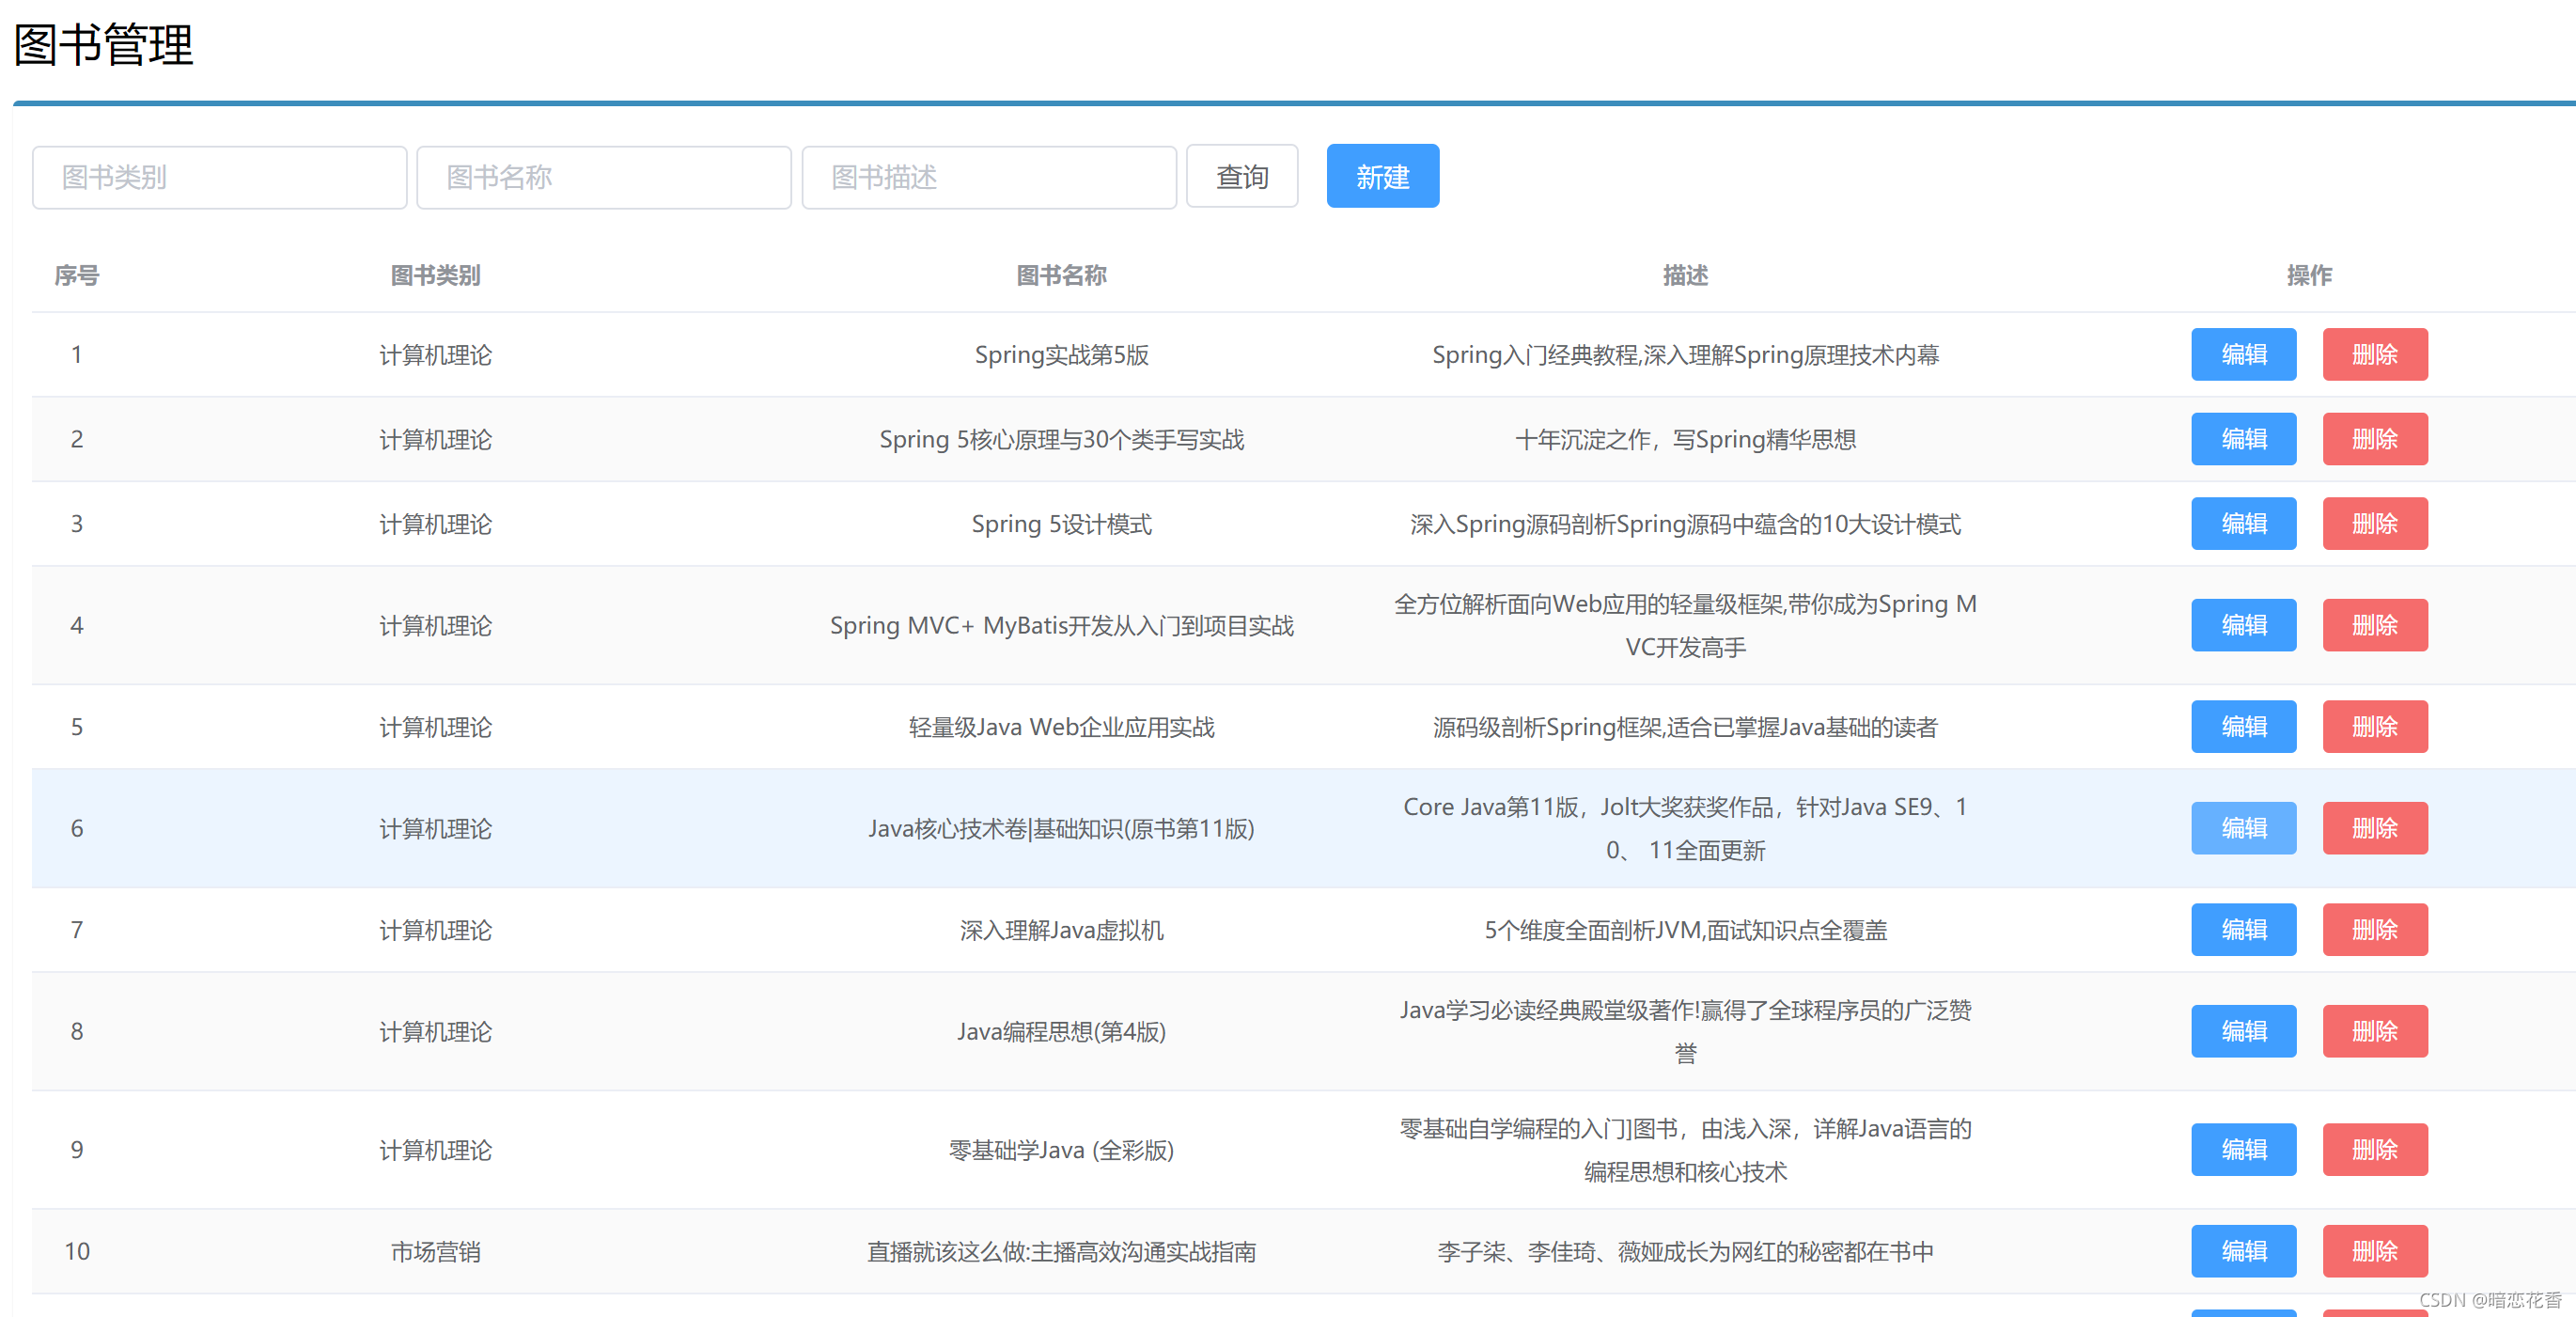
SSMP整合案例制作分析 案例效果演示
案例实现方案分析与流程解析
案例实现方案分析Lombok快速制作实体类Dao开发————整合MyBatisPlus,制作数据层测试类Service开发————基于MyBatisPlus进行增量开发,制作业务层测试类Controller开发————基于Restful开发,使用PostMan测试接口功能Controller开发————前后端开发协议制作VUE+ElementUI制作,前后端联调,页面数据处理,页面消息处理 列表、新增、修改、删除、分页、查询
Controller修正功能、Service修正功能
SSMP案例制作流程解析CRUD功能,做一层测一层
模块创建
1 2 3 4 5 6 7 8 9 10 11 12 13 14 15 16 17 18 19 20 21 22 23 24 25 26 27 28 29 30 31 <dependencies > <dependency > <groupId > org.springframework.boot</groupId > <artifactId > spring-boot-starter-web</artifactId > </dependency > <dependency > <groupId > mysql</groupId > <artifactId > mysql-connector-java</artifactId > <scope > runtime</scope > </dependency > <dependency > <groupId > com.baomidou</groupId > <artifactId > mybatis-plus-boot-starter</artifactId > <version > 3.4.3</version > </dependency > <dependency > <groupId > com.alibaba</groupId > <artifactId > druid-spring-boot-starter</artifactId > <version > 1.2.6</version > </dependency > <dependency > <groupId > org.springframework.boot</groupId > <artifactId > spring-boot-starter-test</artifactId > <scope > test</scope > </dependency > </dependencies >
数据准备 tbl_book.sql
1 2 3 4 5 6 7 8 9 10 11 12 13 14 15 16 17 18 19 20 21 22 23 24 25 DROP TABLE IF EXISTS `tbl_book`;CREATE TABLE `tbl_book` ( `id` int (11 ) NOT NULL AUTO_INCREMENT, `type` varchar (20 ) DEFAULT NULL , `name` varchar (50 ) DEFAULT NULL , `description` varchar (255 ) DEFAULT NULL , PRIMARY KEY (`id`) ) ENGINE= InnoDB AUTO_INCREMENT= 13 DEFAULT CHARSET= utf8; INSERT INTO `tbl_book` VALUES ('1' , '计算机理论' , 'Spring实战第5版' , 'Spring入门经典教程,深入理解Spring原理技术内幕' );INSERT INTO `tbl_book` VALUES ('2' , '计算机理论' , 'Spring 5核心原理与30个类手写实战' , '十年沉淀之作,写Spring精华思想' );INSERT INTO `tbl_book` VALUES ('3' , '计算机理论' , 'Spring 5设计模式' , '深入Spring源码剖析Spring源码中蕴含的10大设计模式' );INSERT INTO `tbl_book` VALUES ('4' , '计算机理论' , 'Spring MVC+ MyBatis开发从入门到项目实战' , '全方位解析面向Web应用的轻量级框架,带你成为Spring MVC开发高手' );INSERT INTO `tbl_book` VALUES ('5' , '计算机理论' , '轻量级Java Web企业应用实战' , '源码级剖析Spring框架,适合已掌握Java基础的读者' );INSERT INTO `tbl_book` VALUES ('6' , '计算机理论' , 'Java核心技术卷|基础知识(原书第11版)' , 'Core Java第11版,Jolt大奖获奖作品,针对Java SE9、10、 11全面更新' );INSERT INTO `tbl_book` VALUES ('7' , '计算机理论' , '深入理解Java虚拟机' , '5个维度全面剖析JVM,面试知识点全覆盖' );INSERT INTO `tbl_book` VALUES ('8' , '计算机理论' , 'Java编程思想(第4版)' , 'Java学习必读经典殿堂级著作!赢得了全球程序员的广泛赞誉' );INSERT INTO `tbl_book` VALUES ('9' , '计算机理论' , '零基础学Java (全彩版)' , '零基础自学编程的入门]图书,由浅入深,详解Java语言的编程思想和核心技术' );INSERT INTO `tbl_book` VALUES ('10' , '市场营销' , '直播就该这么做:主播高效沟通实战指南' , '李子柒、李佳琦、薇娅成长为网红的秘密都在书中' );INSERT INTO `tbl_book` VALUES ('11' , '市场营销' , '直播销讲实战一本通' , '和秋叶一起学系列网络营销书籍' );INSERT INTO `tbl_book` VALUES ('12' , '市场营销' , '直播带货:淘宝、天猫直播从新手到高手' , '一本教你如何玩转直播的书, 10堂课轻松实现带货月入3W+' );
小结:
勾选SpringMVC与MySQL坐标
修改配置文件为yml格式
设置端口为80方便访问
实体类快速开发(lombok)
Lombok,一个Java类库,提供了一组注解,简化POJO实体类开发
1 2 3 4 <dependency > <groupId > org.projectlombok</groupId > <artifactId > lombok</artifactId > </dependency
lombok版本由SpringBoot提供,无需指定版本
常用注解:@Data
1 2 3 4 5 6 7 @Data public class Book { private Integer id; private String type; private String name; private String description; }
为当前实体类在编译期设置对应的get/set方法,toString方法,hashCode方法,equals方法等
小结:
实体类制作
使用lombok简化开发lombok无需指定版本,由SpringBoot提供版本@Data注解
数据层标准开发(基础CRUD)
导入MyBatisPlus与Druid对应的starter
1 2 3 4 5 6 7 8 9 10 11 12 <dependency > <groupId > com.baomidou</groupId > <artifactId > mybatis-plus-boot-starter</artifactId > <version > 3.4.3</version > </dependency > <dependency > <groupId > com.alibaba</groupId > <artifactId > druid-spring-boot-starter</artifactId > <version > 1.2.6</version > </dependency >
配置数据源与MyBatisPlus对应的基础配置(id生成策略使用数据库自增策略)
1 2 3 4 5 6 7 8 9 10 11 12 13 14 15 16 spring: datasource: druid: driver-class-name: com.mysql.cj.jdbc.Driver url: jdbc:mysql://localhost:3306/springboot_db?serverTimezone=UTC username: root password: 123456 mybatis-plus: global-config: db-config: table-prefix: tbl_ id-type: auto
1 2 3 4 5 6 7 8 9 10 11 12 13 @Mapper public interface BookDao extends BaseMapper <Book> { @Select("select * from tbl_book where id = #{id}") Book getById (Integer id) ; }
1 2 3 4 5 6 7 8 9 10 11 12 13 14 15 16 17 18 19 20 21 22 23 24 25 26 27 28 29 30 31 32 33 34 35 36 37 38 39 40 41 42 43 44 45 46 47 48 49 50 51 @SpringBootTest public class BookDaoTestCase { @Autowired private BookDao bookDao; @Test void testGetById () { System.out.println(bookDao.getById(1 )); System.out.println(bookDao.selectById(1 )); } @Test void testSave () { Book book = new Book (); book.setType("测试数据123" ); book.setName("测试数据123" ); book.setDescription("测试数据123" ); bookDao.insert(book); } @Test void testUpdate () { Book book = new Book (); book.setId(13 ); book.setType("测试数据asfd" ); book.setName("测试数据123" ); book.setDescription("测试数据123" ); bookDao.updateById(book); } @Test void testDelete () { bookDao.deleteById(13 ); } @Test void testGetAll () { System.out.println(bookDao.selectList(null )); } @Test void testGetPage () { } @Test void testGetBy () { } }
小结:
手工导入starter坐标(2个)
配置数据源与MyBatisPlus对应的配置
开发Dao接口(继承BaseMapper)
制作测试类测试Dao功能是否有效
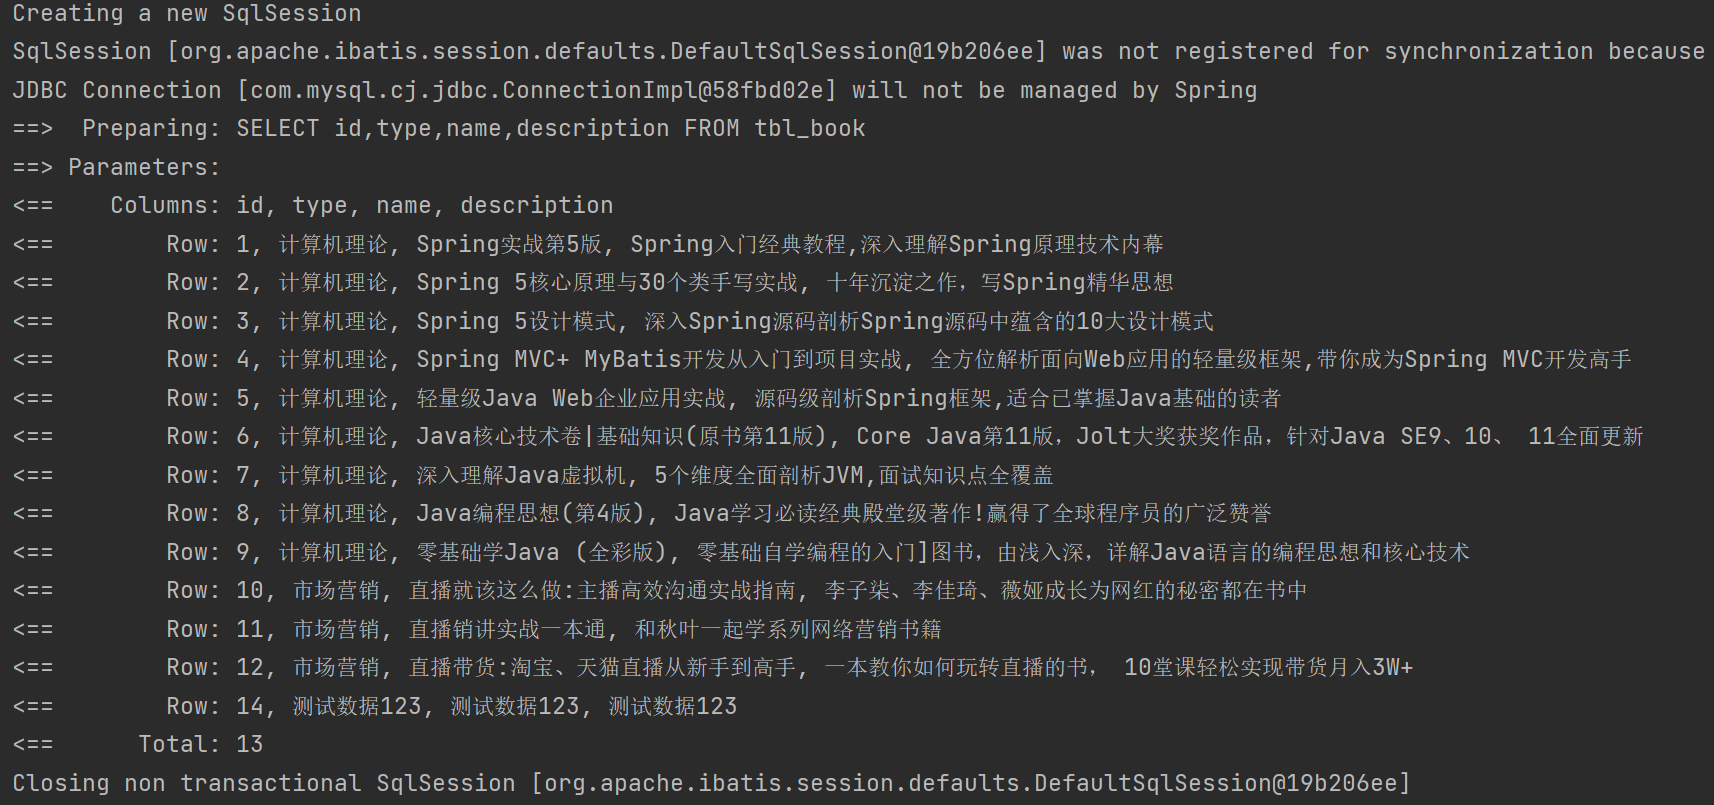
开启MP运行日志
1 2 3 4 5 6 7 8 9 10 mybatis-plus: global-config: db-config: table-prefix: tbl_ id-type: auto configuration: log-impl: org.apache.ibatis.logging.stdout.StdOutImpl
小结:
使用配置方式开启日志,设置日志输出方式为标准输出
分页
1 2 3 4 5 @Test void testGetPage () { IPage page = new Page (1 , 5 ); bookDao.selectPage(page, null ); }
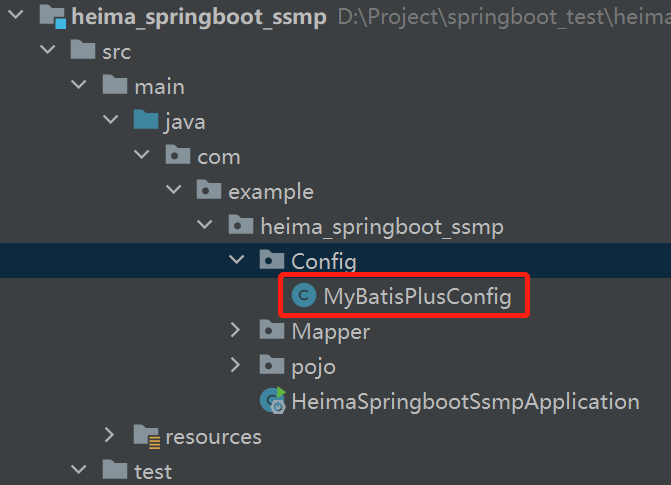
1 2 3 4 5 6 7 8 9 10 11 12 13 @Configuration public class MybatisPlusConfig { @Bean public MybatisPlusInterceptor mybatisPlusInterceptor () { MybatisPlusInterceptor interceptor = new MybatisPlusInterceptor (); interceptor.addInnerInterceptor(new PaginationInnerInterceptor ()); return interceptor; } }
1 2 3 4 5 6 7 8 9 10 11 @Test void testGetPage () { IPage page = new Page (1 , 5 ); bookDao.selectPage(page, null ); System.out.println(page.getCurrent()); System.out.println(page.getSize()); System.out.println(page.getPages()); System.out.println(page.getTotal()); System.out.println(page.getRecords()); }
小结:
使用IPage封装分页数据
分页操作依赖MyBatisPlus分页拦截器实现功能
借助MyBatisPlus日志查阅执行SQL语句
业务层标准开发(基础CRUD) Service层接口定义与数据层接口定义具有较大区别,不要混用selectByUserNameAndPassword(String username,String password); 数据层接口login(String username,String password); Service层接口
1 2 3 4 5 6 7 8 9 10 11 12 13 14 15 public interface BookService { Boolean save (Book book) ; Boolean update (Book book) ; Boolean delete (Integer id) ; Book getById (Integer id) ; List<Book> getAll () ; IPage<Book> getPage (int currentPage,int pageSize) ; }
1 2 3 4 5 6 7 8 9 10 11 12 13 14 15 16 17 18 19 20 21 22 23 24 25 26 27 28 29 30 31 32 33 34 35 36 37 38 39 @Service public class BookServiceImpl implements BookService { @Autowired private BookDao bookDao; @Override public Boolean save (Book book) { return bookDao.insert(book) > 0 ; } @Override public Boolean update (Book book) { return bookDao.updateById(book) > 0 ; } @Override public Boolean delete (Integer id) { return bookDao.deleteById(id) > 0 ; } @Override public Book getById (Integer id) { return bookDao.selectById(id); } @Override public List<Book> getAll () { return bookDao.selectList(null ); } @Override public IPage<Book> getPage (int currentPage, int pageSize) { IPage page = new Page (currentPage, pageSize); bookDao.selectPage(page, null ); return page; } }
1 2 3 4 5 6 7 8 9 10 11 12 13 14 15 16 17 18 19 20 21 22 23 24 25 26 27 28 29 30 31 32 33 34 35 36 37 38 39 40 41 42 43 44 45 46 47 48 49 50 51 52 @SpringBootTest public class BookServiceTestCase { @Autowired private BookService bookService; @Test void testGetById () { System.out.println(bookService.getById(4 )); } @Test void testSave () { Book book = new Book (); book.setType("测试数据123" ); book.setName("测试数据123" ); book.setDescription("测试数据123" ); bookService.save(book); } @Test void testUpdate () { Book book = new Book (); book.setId(14 ); book.setType("测试数据asfd" ); book.setName("测试数据123" ); book.setDescription("测试数据123" ); bookService.update(book); } @Test void testDelete () { bookService.delete(14 ); } @Test void testGetAll () { System.out.println(bookService.getAll()); } @Test void testGetPage () { IPage<Book> page = bookService.getPage(2 , 5 ); System.out.println(page.getCurrent()); System.out.println(page.getSize()); System.out.println(page.getPages()); System.out.println(page.getTotal()); System.out.println(page.getRecords()); } }
小结:
Service接口名称定义成业务名称,并与Dao接口名称进行区分制作测试类测试Service功能是否有效
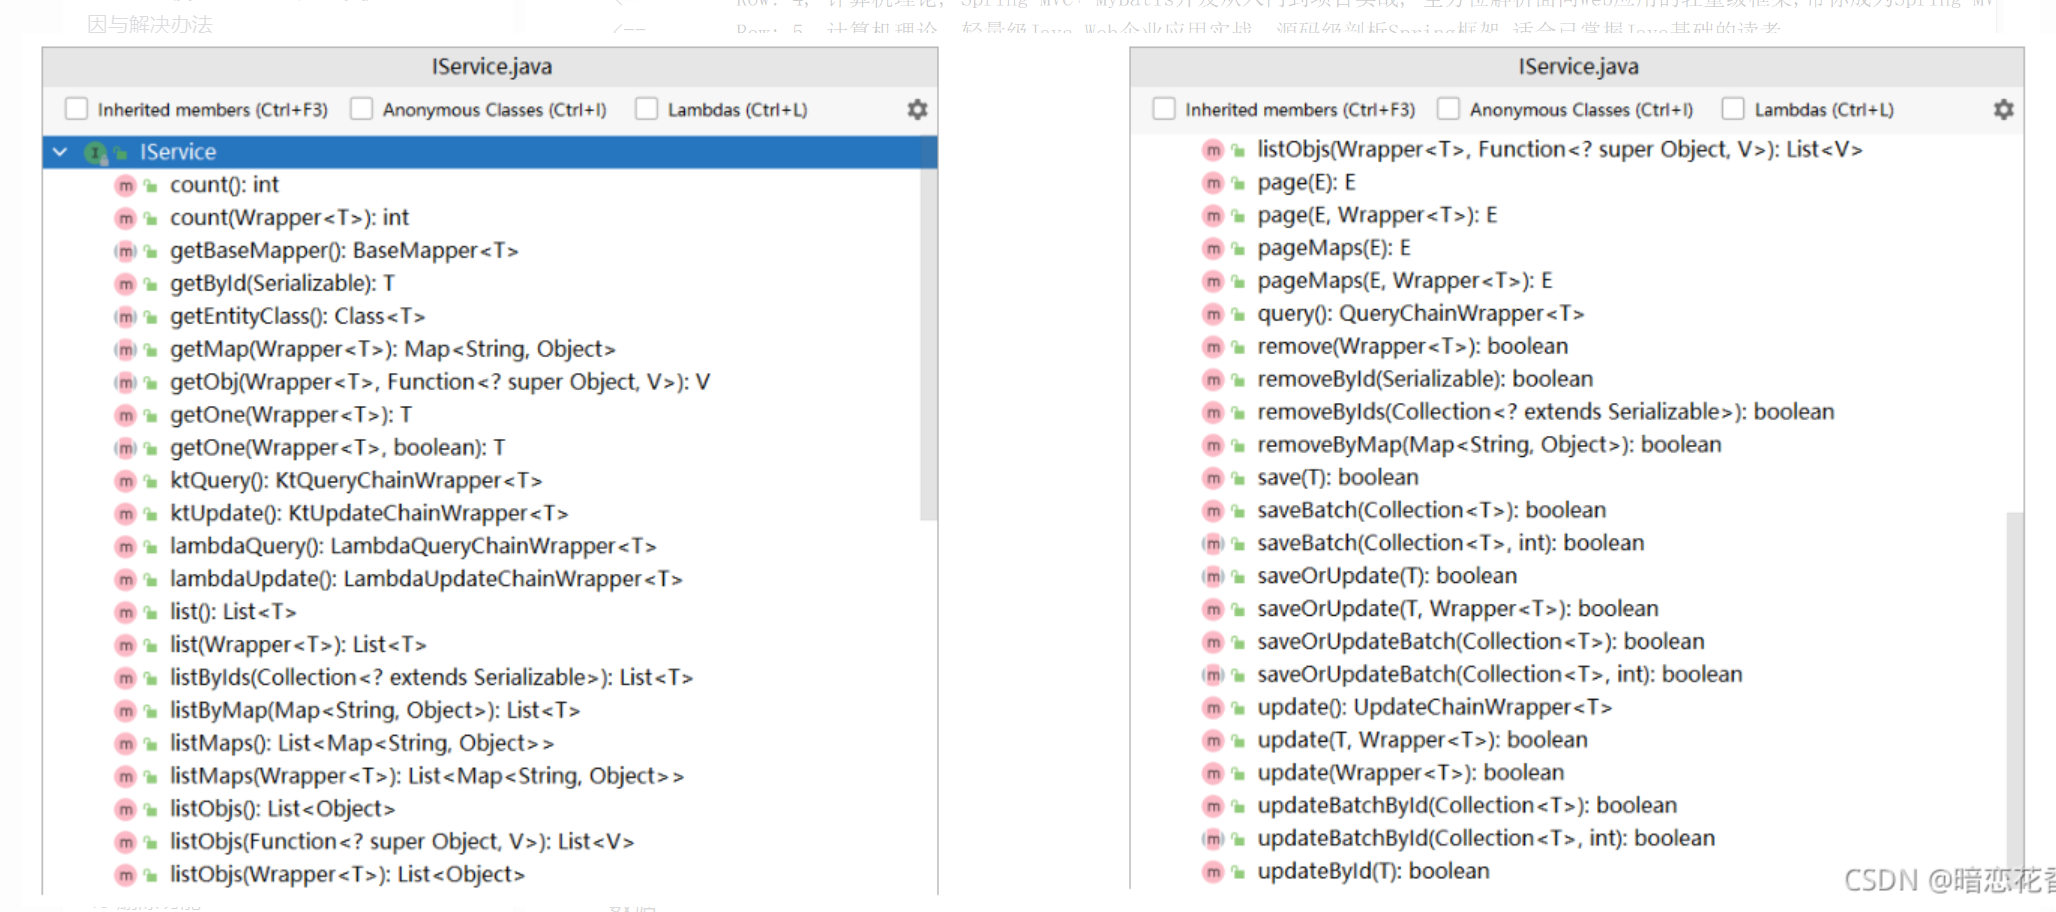
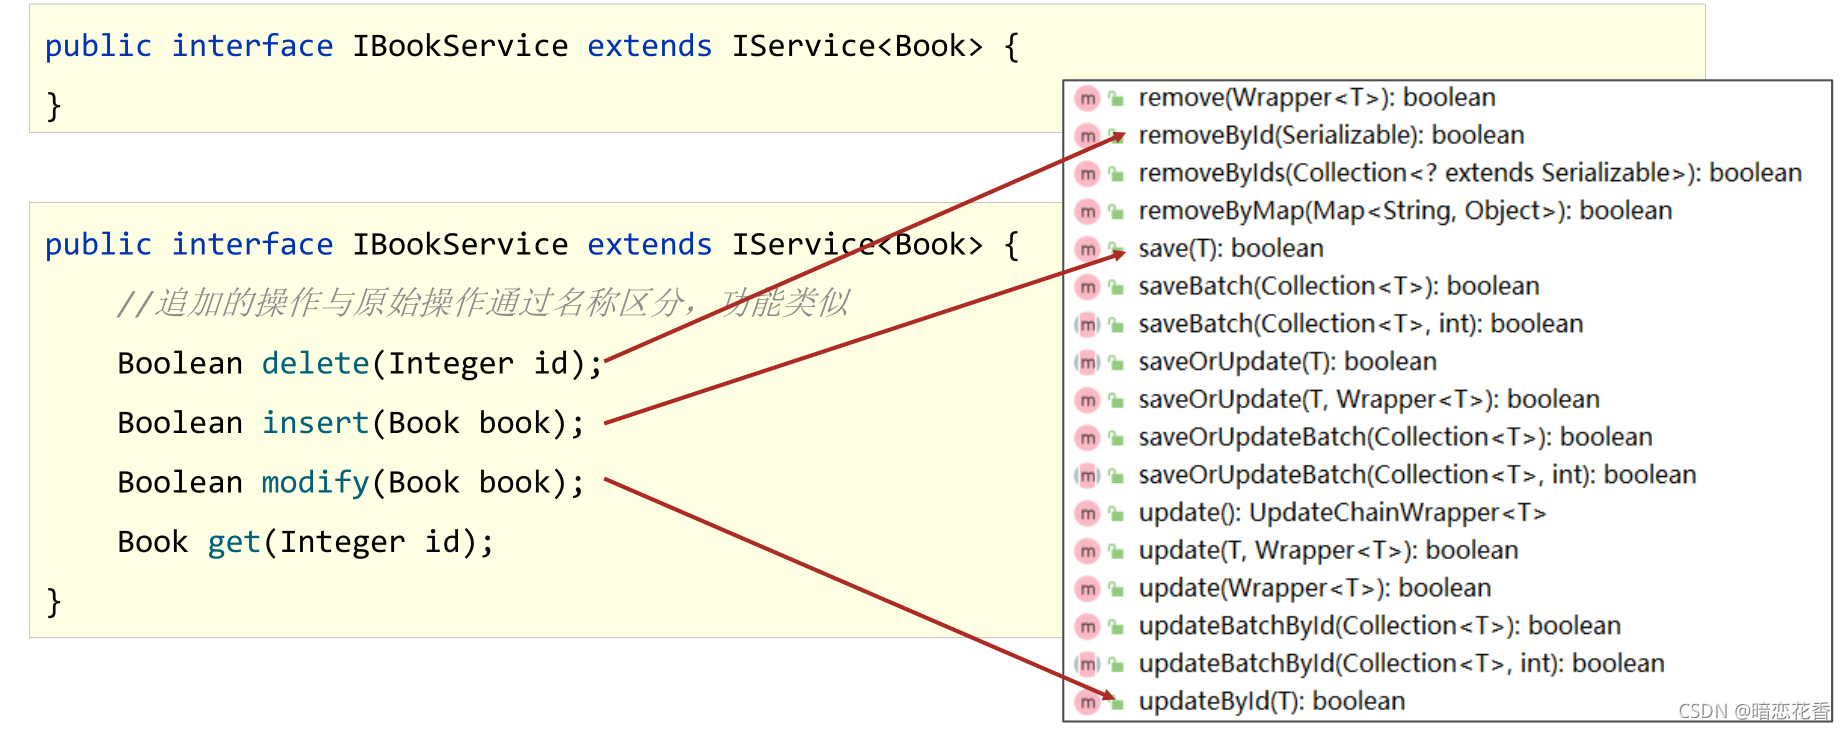
业务层快速开发(基于MyBatisPlus构建) 快速开发方案MyBatisPlus提供有业务层通用接口(ISerivce)与业务层通用实现类(ServiceImpl<M,T>)
1 2 public interface IBookService extends IService <Book> {}
1 2 3 4 5 6 7 8 9 10 11 12 public interface IBookService extends IService <Book> { Boolean delete (Integer id) ; Boolean insert (Book book) ; Boolean modify (Book book) ; Book get (Integer id) ; }
1 2 3 4 @Service public class BookServiceImpl extends ServiceImpl <BookDao, Book> implements IBookService {}
1 2 3 4 5 6 7 8 9 10 11 12 13 14 15 16 17 18 19 20 21 22 23 @Service public class BookServiceImpl extends ServiceImpl <BookDao, Book> implements IBookService { @Autowired private BookDao bookDao; public Boolean insert (Book book) { return bookDao.insert(book) > 0 ; } public Boolean modify (Book book) { return bookDao.updateById(book) > 0 ; } public Boolean delete (Integer id) { return bookDao.deleteById(id) > 0 ; } public Book get (Integer id) { return bookDao.selectById(id); } }
1 2 3 4 5 6 7 8 9 10 11 12 13 14 15 16 17 18 19 20 21 22 23 24 25 26 27 28 29 30 31 32 33 34 35 36 37 38 39 40 41 42 43 44 45 46 47 48 49 50 51 52 @SpringBootTest public class BookServiceTest { @Autowired private IBookService bookService; @Test void testGetById () { System.out.println(bookService.getById(4 )); } @Test void testSave () { Book book = new Book (); book.setType("测试数据123" ); book.setName("测试数据123" ); book.setDescription("测试数据123" ); bookService.save(book); } @Test void testUpdate () { Book book = new Book (); book.setId(14 ); book.setType("===========" ); book.setName("测试数据123" ); book.setDescription("测试数据123" ); bookService.updateById(book); } @Test void testDelete () { bookService.removeById(14 ); } @Test void testGetAll () { System.out.println(bookService.list()); } @Test void testGetPage () { IPage<Book> page = new Page <>(2 , 5 ); bookService.page(page); System.out.println(page.getCurrent()); System.out.println(page.getSize()); System.out.println(page.getPages()); System.out.println(page.getTotal()); System.out.println(page.getRecords()); } }
小结:
使用通用接口(ISerivce)快速开发Service
使用通用实现类(ServiceImpl<M,T>)快速开发ServiceImpl
可以在通用接口基础上做功能重载或功能追加
注意重载时不要覆盖原始操作,避免原始提供的功能丢失
表现层标准开发
基于Restful进行表现层接口开发
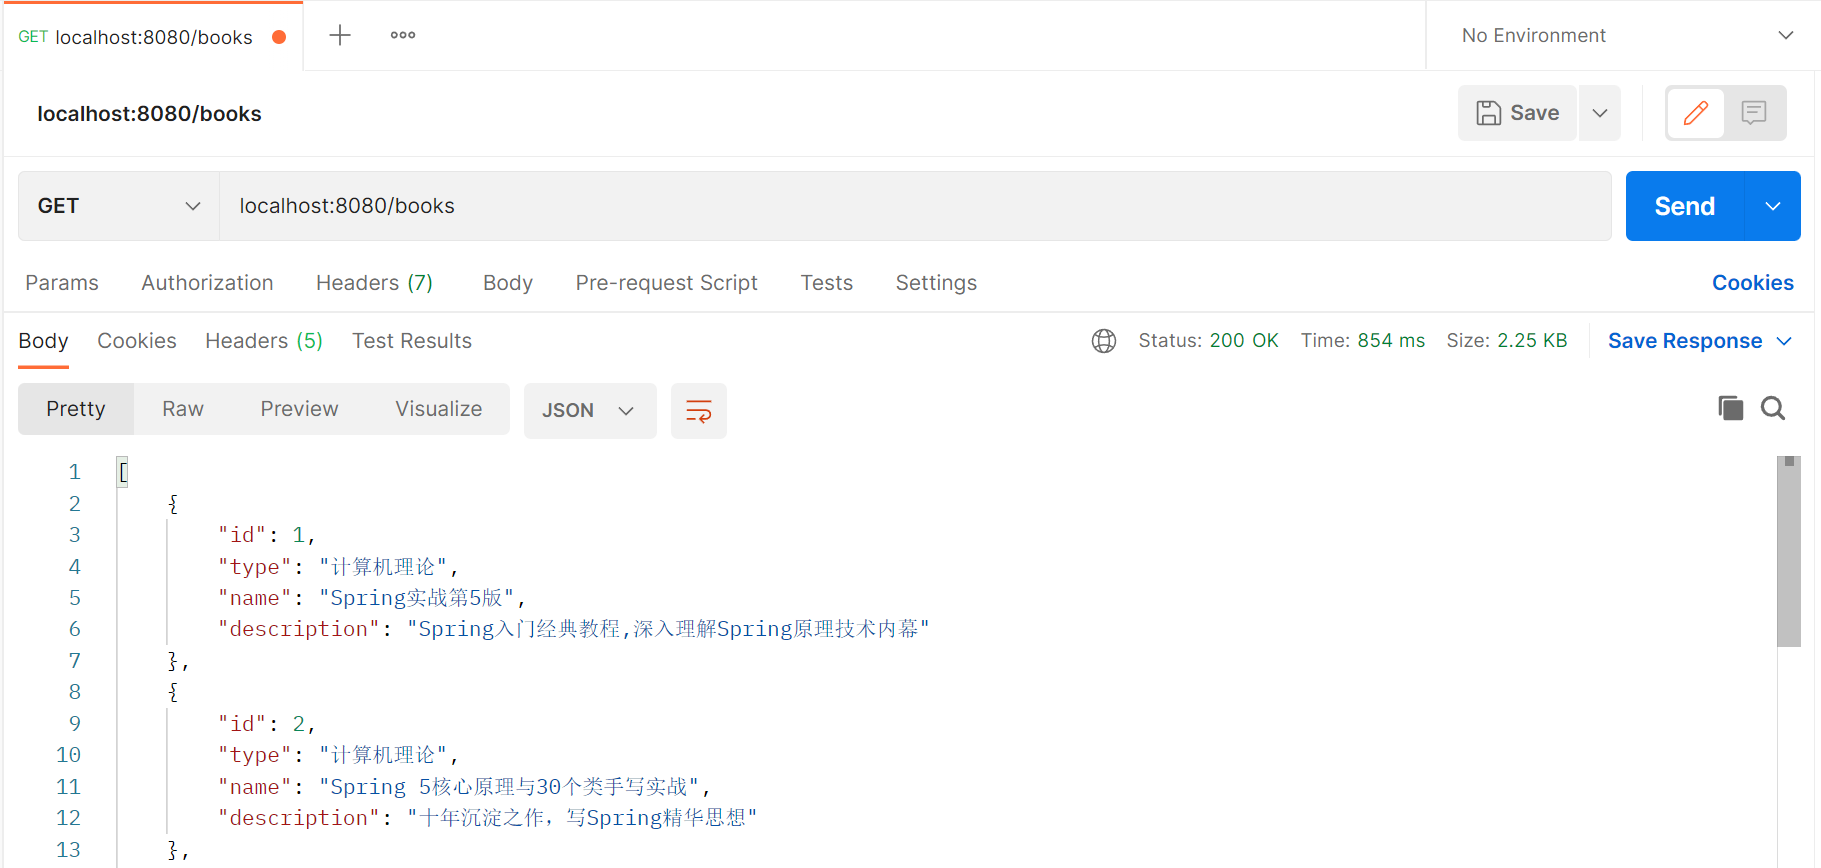
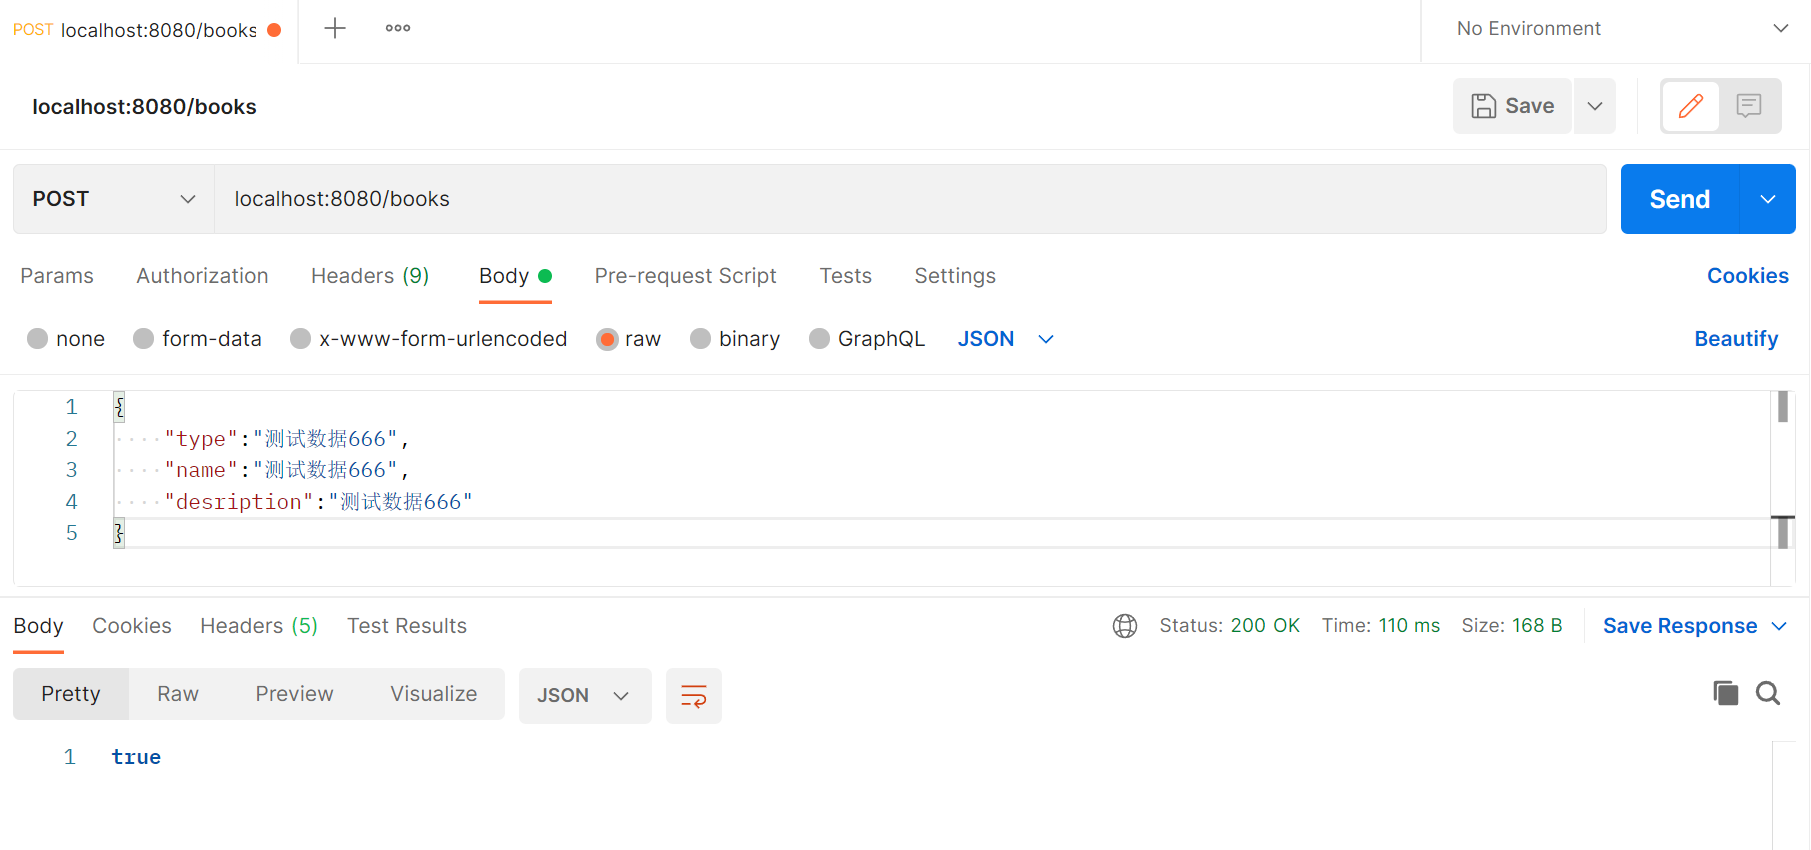
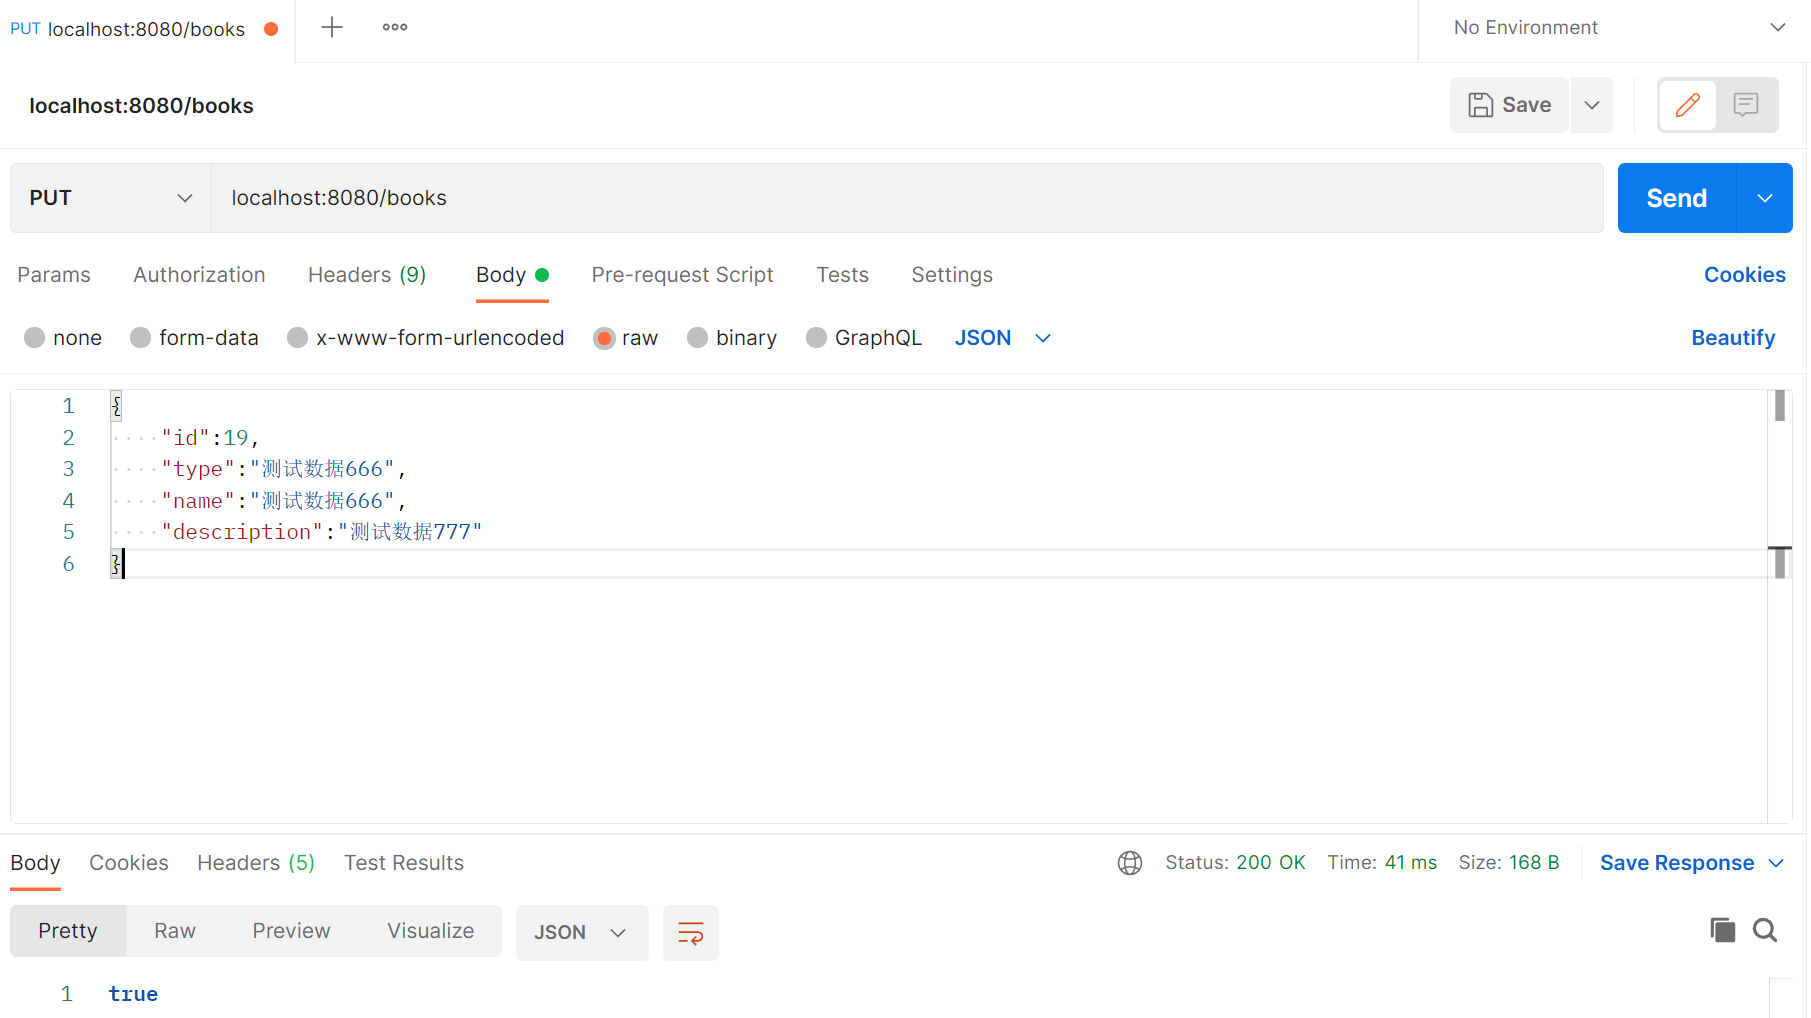
使用Postman测试表现层接口功能
表现层开发
1 2 3 4 5 6 7 8 9 10 11 12 13 14 15 16 17 18 19 20 21 22 23 24 25 26 27 28 29 30 31 32 33 34 35 36 37 38 39 40 @RestController @RequestMapping("/books") public class BookController { @Autowired private IBookService bookService; @GetMapping public List<Book> getAll () { return bookService.list(); } @PostMapping public Boolean save (@RequestBody Book book) { return bookService.save(book); } @PutMapping public Boolean update (@RequestBody Book book) { return bookService.modify(book); } @DeleteMapping("{id}") public Boolean delete (@PathVariable Integer id) { return bookService.delete(id); } @GetMapping("{id}") public Book getById (@PathVariable Integer id) { return bookService.getById(id); } @GetMapping("{currentPage}/{pageSize}") public IPage<Book> getPage (@PathVariable Integer currentPage, @PathVariable int pageSize) { return bookService.getPage(currentPage, pageSize); } }
添加 分页的业务层方法
IBookService
1 IPage<Book> getPage (int currentPage,int pageSize) ;
IBookServiceImpl
1 2 3 4 5 6 7 8 @Override public IPage<Book> getPage (int currentPage, int pageSize) { IPage page = new Page (currentPage, pageSize); bookDao.selectPage(page, null ); return page; }
功能测试
1 2 @GetMapping public List<Book> getAll ()
1 2 @PostMapping public Boolean save (@RequestBody Book book)
1 2 @PutMapping public Boolean update (@RequestBody Book book)
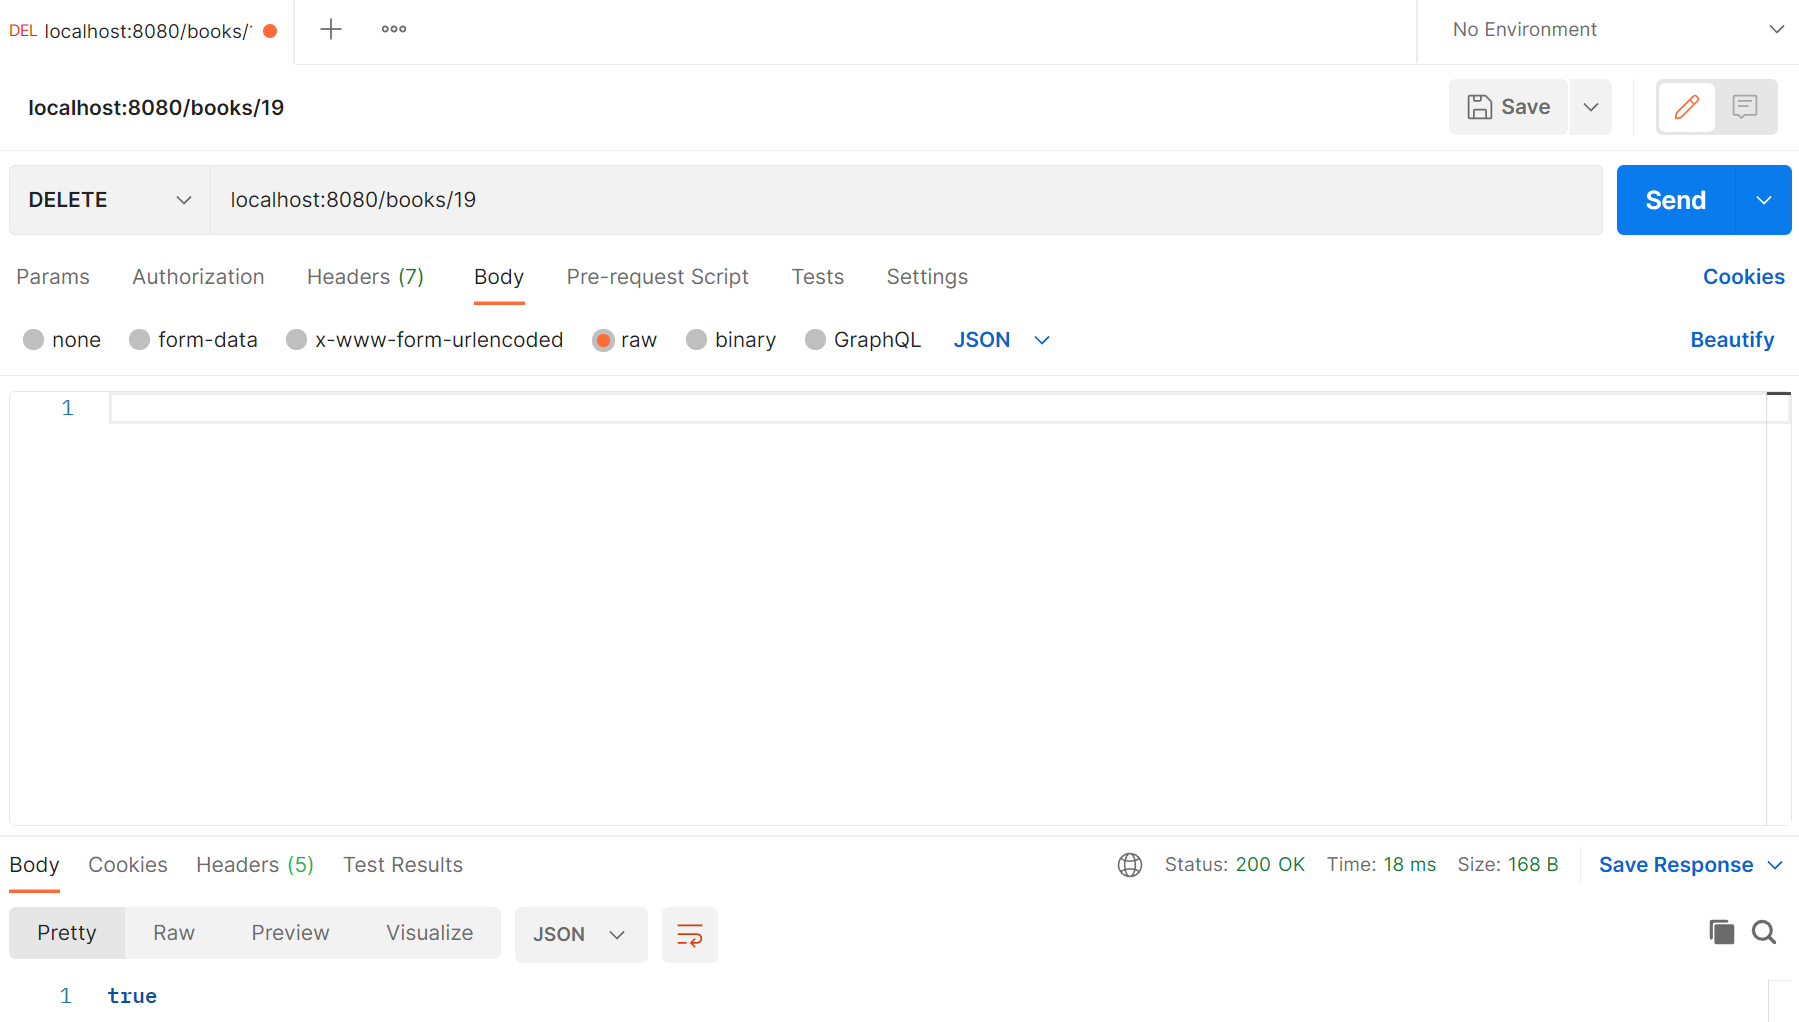
1 2 @DeleteMapping("{id}") public Boolean delete (@PathVariable Integer id)
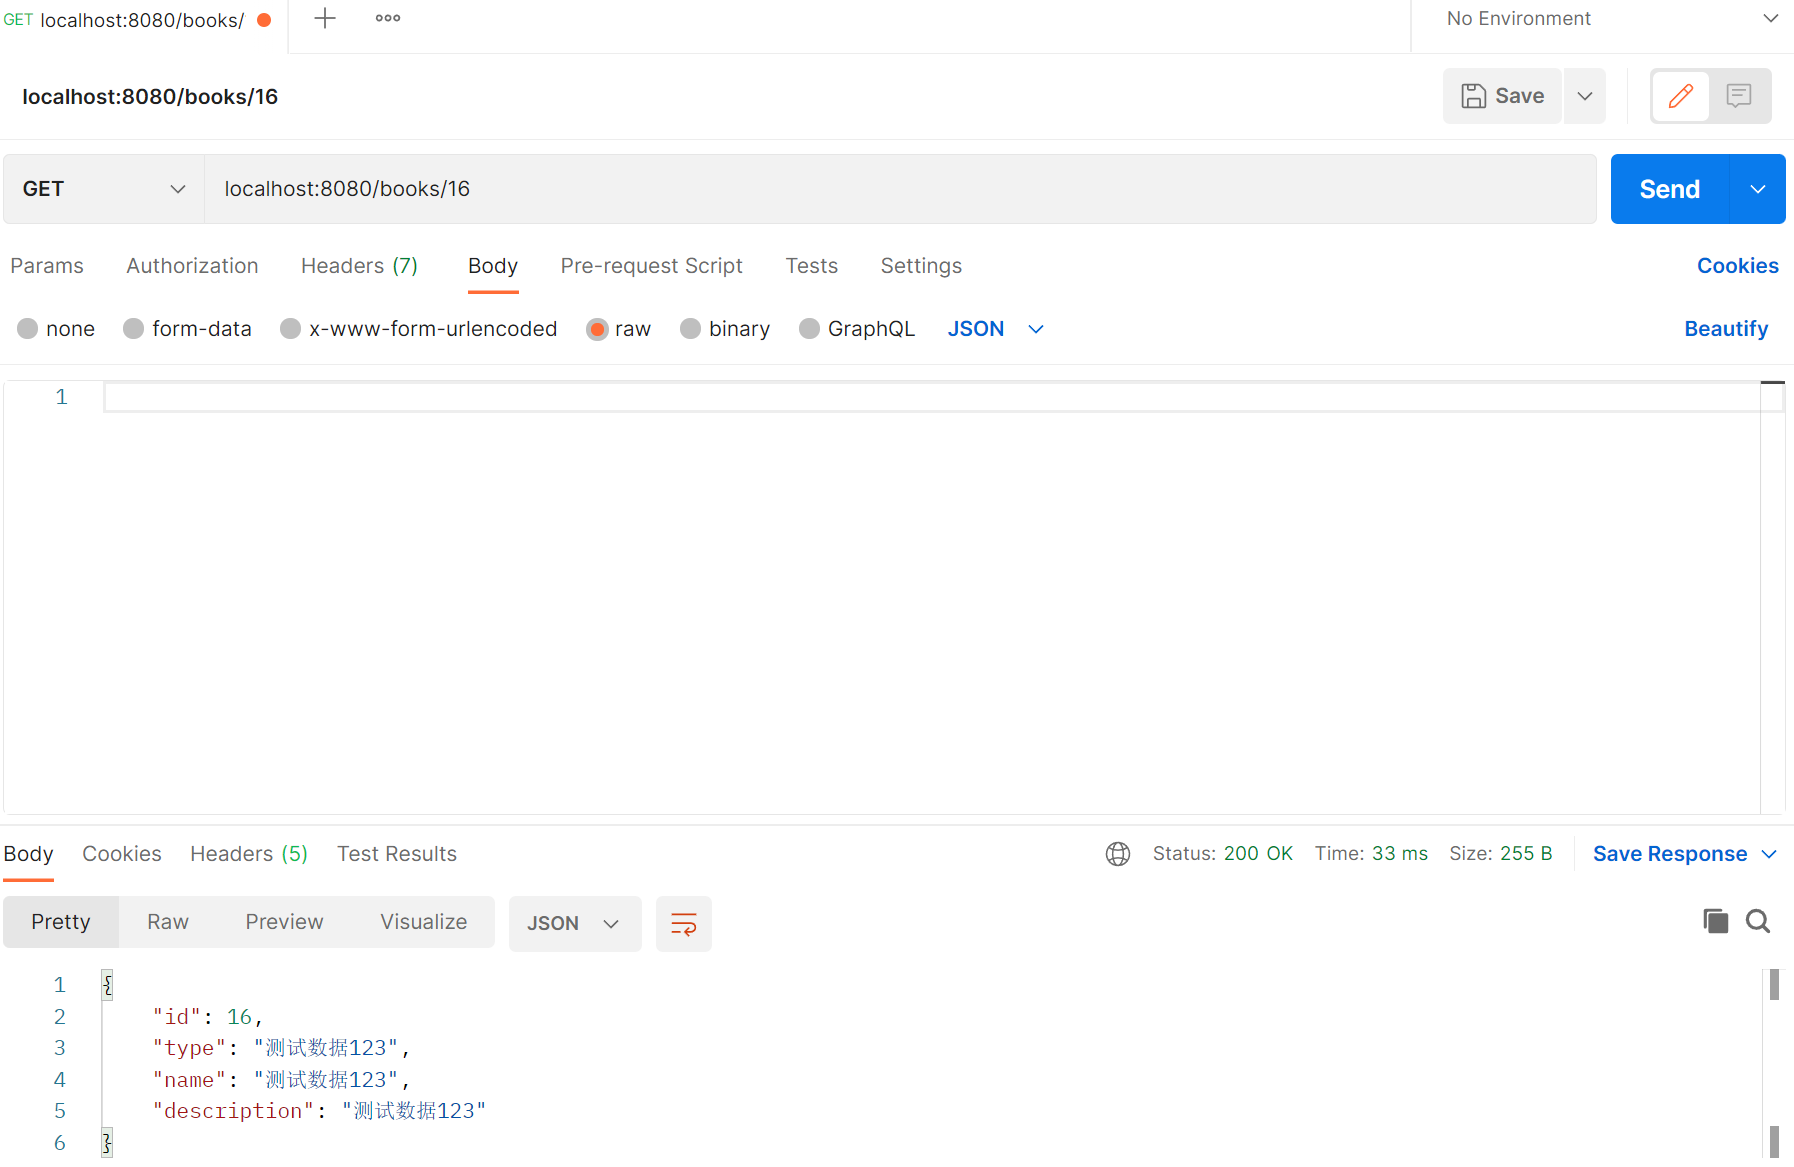
1 2 @GetMapping("{id}") public Book getById (@PathVariable Integer id)
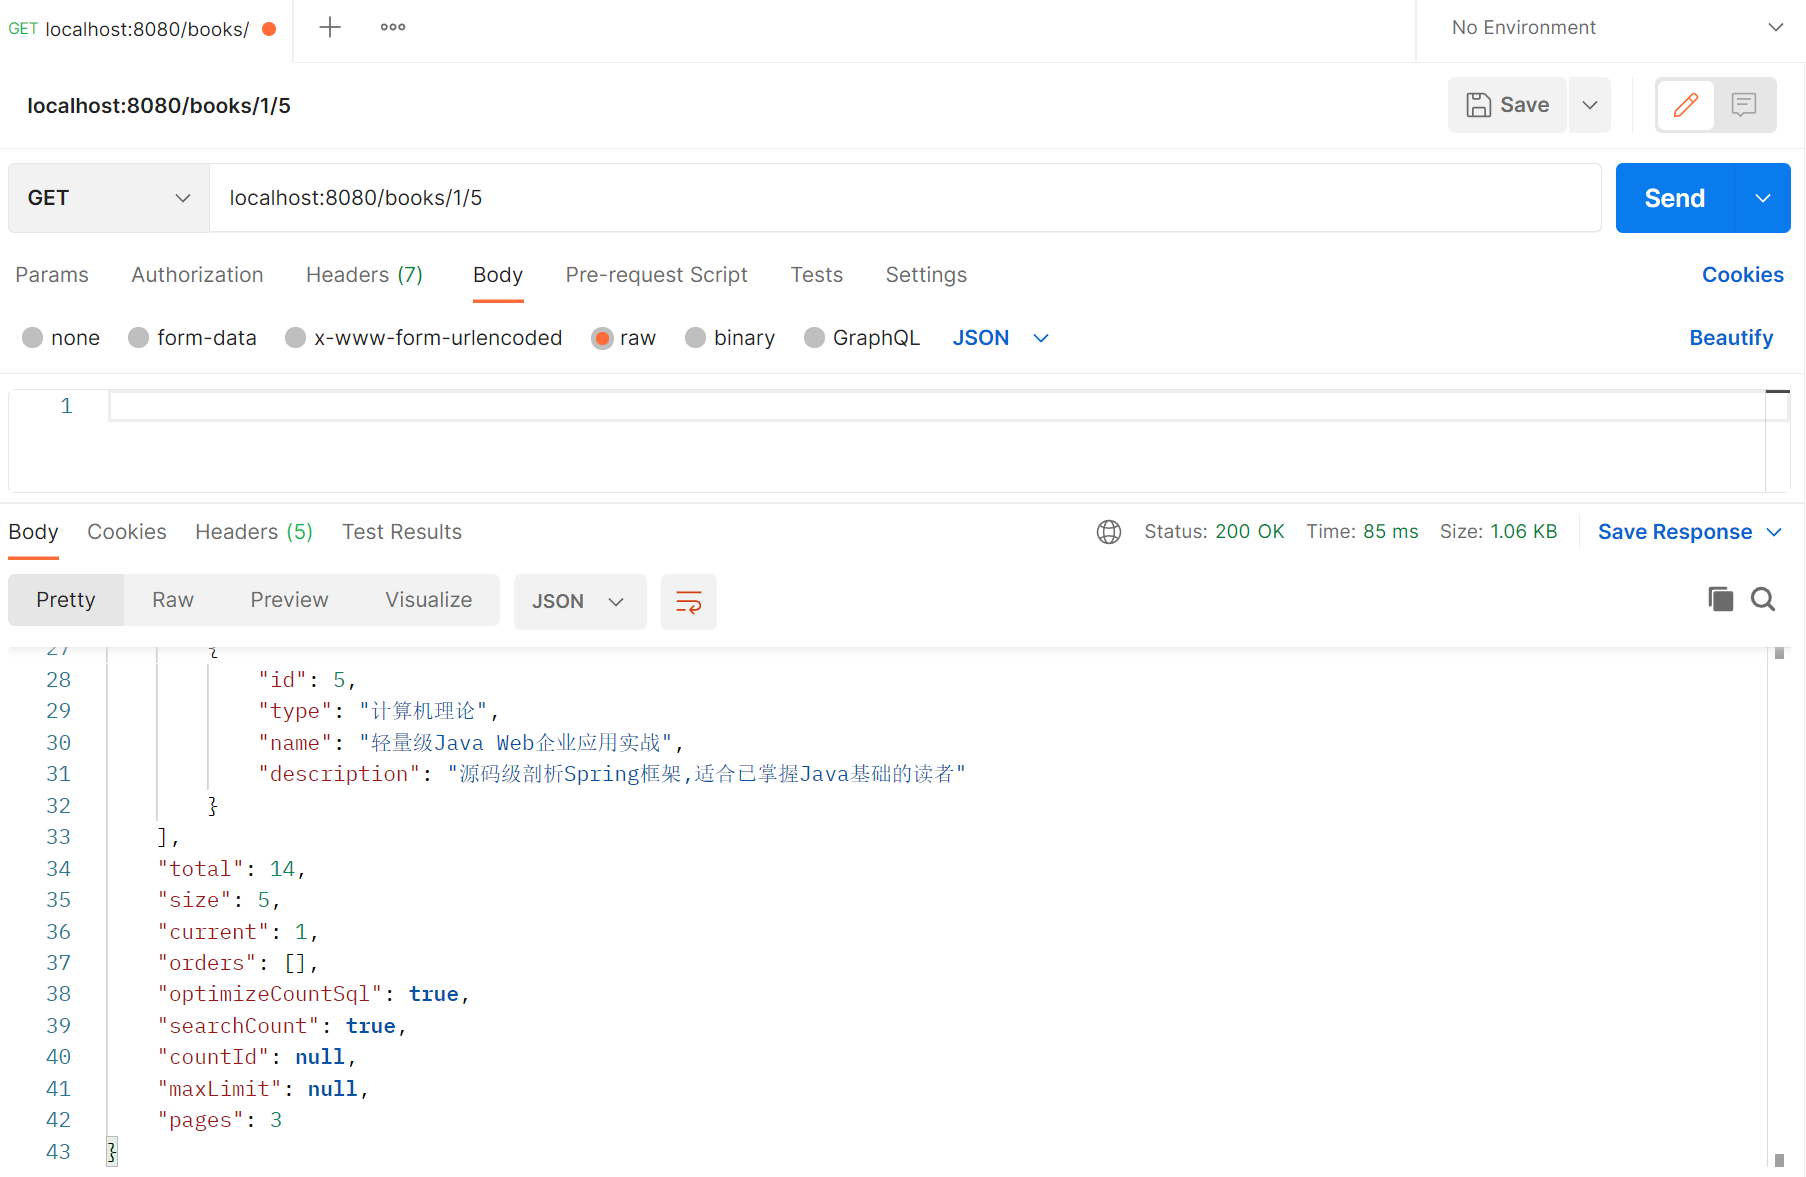
1 2 @GetMapping("{currentPage}/{pageSize}") public IPage<Book> getPage (@PathVariable Integer currentPage, @PathVariable int pageSize)
小结:
基于Restful制作表现层接口POSTDELETEPUTGET
接收参数@RequestBody@PathVariable
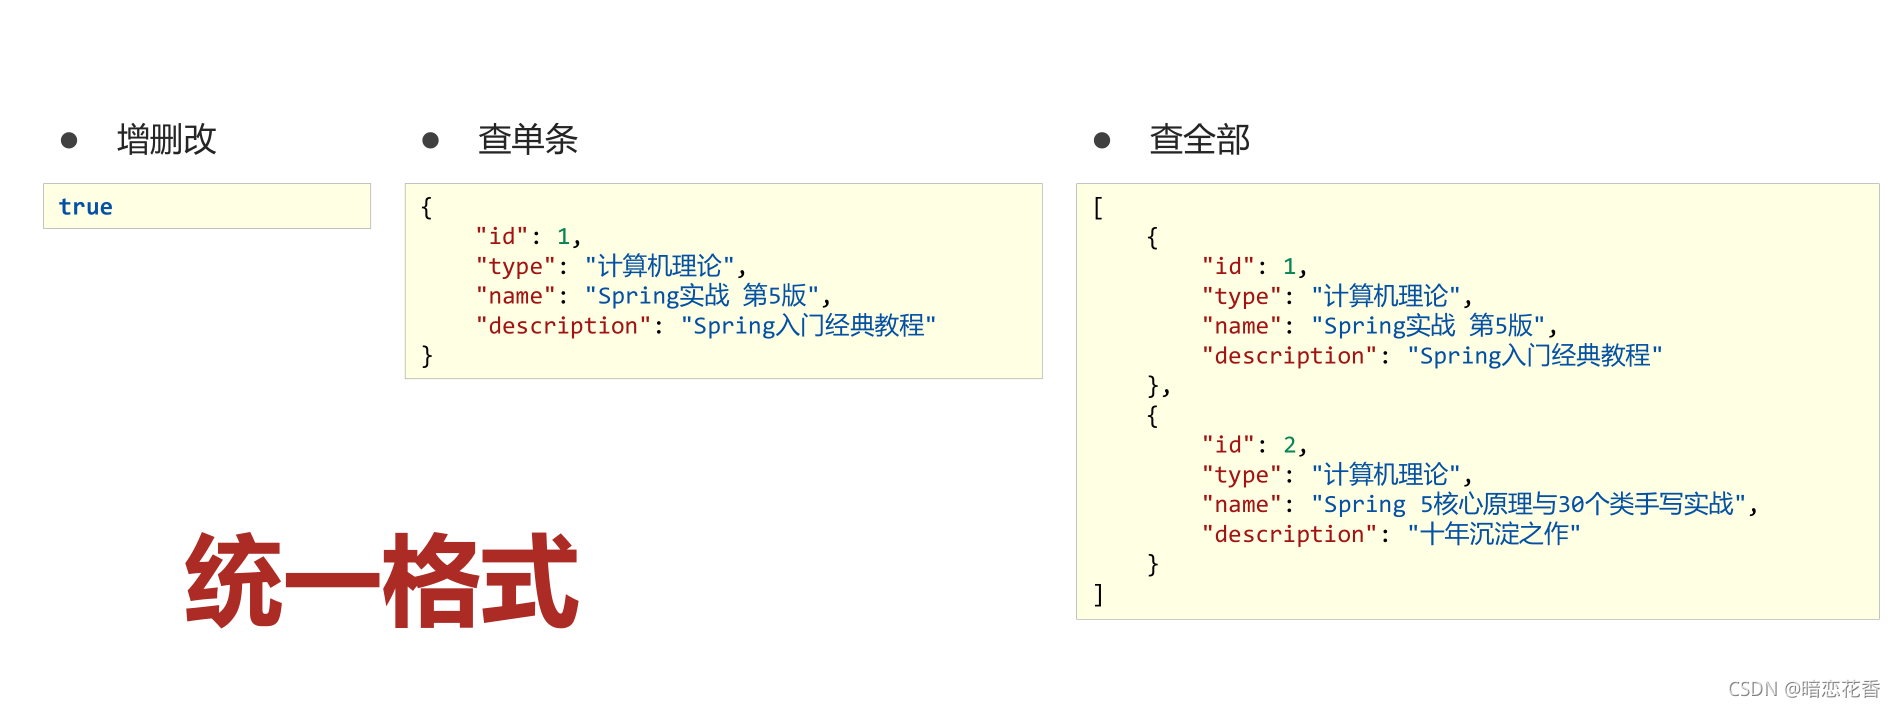
表现层数据一致性处理(R对象)
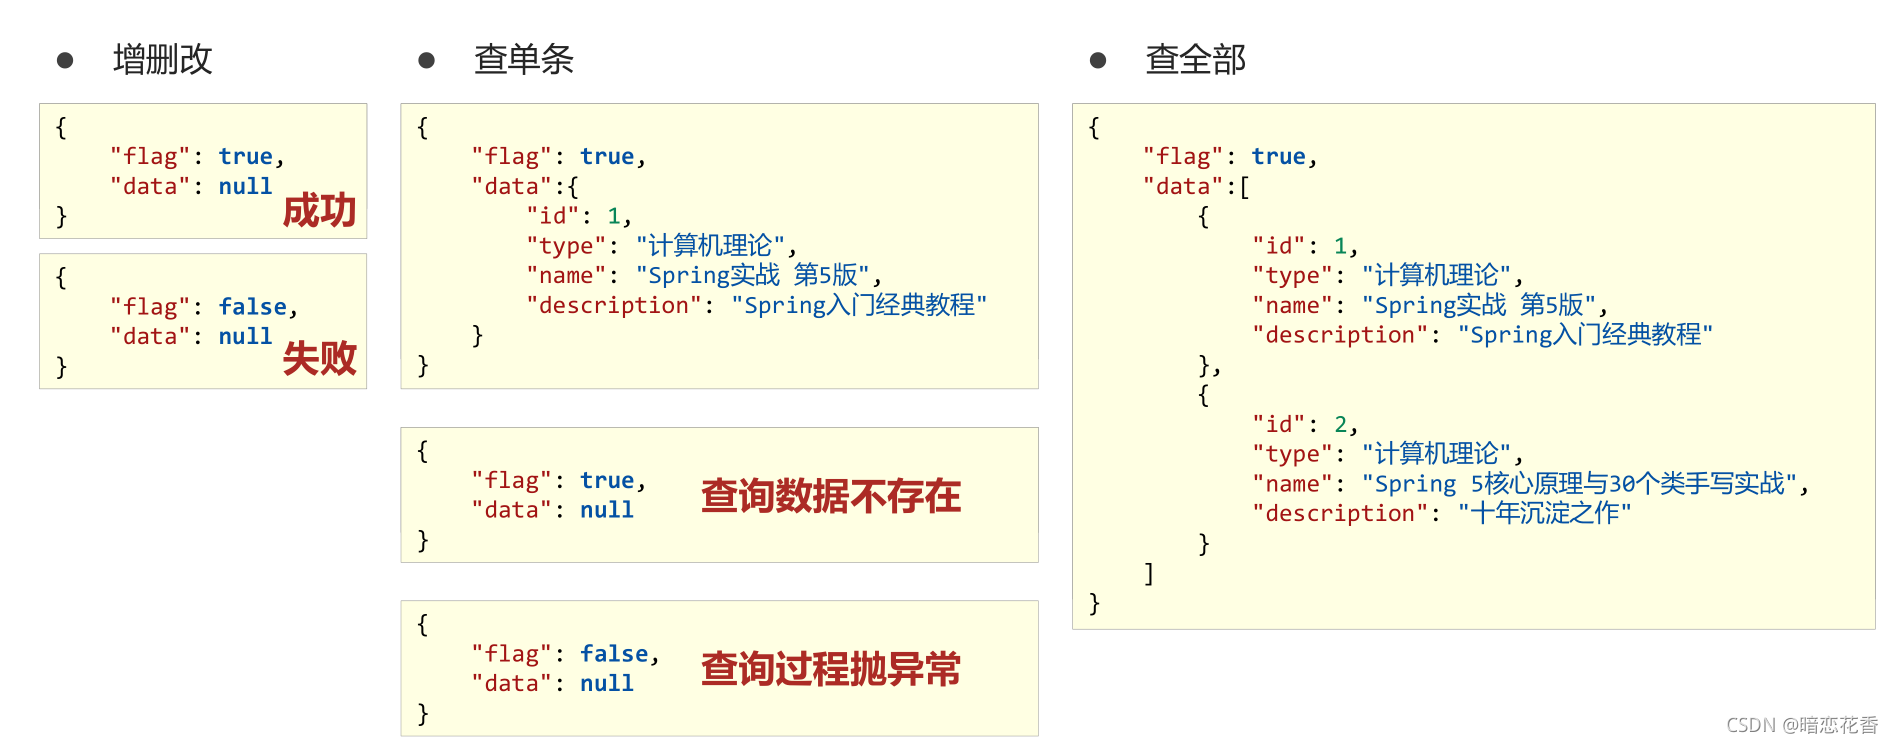
增加一个 data 属性,把数据全部封装到 data 里
当数据为 null 可能出现的问题
查询id不存在的数据,返回 null
查询过程中抛出异常,catch 中返回 null
增加 一个状态属性
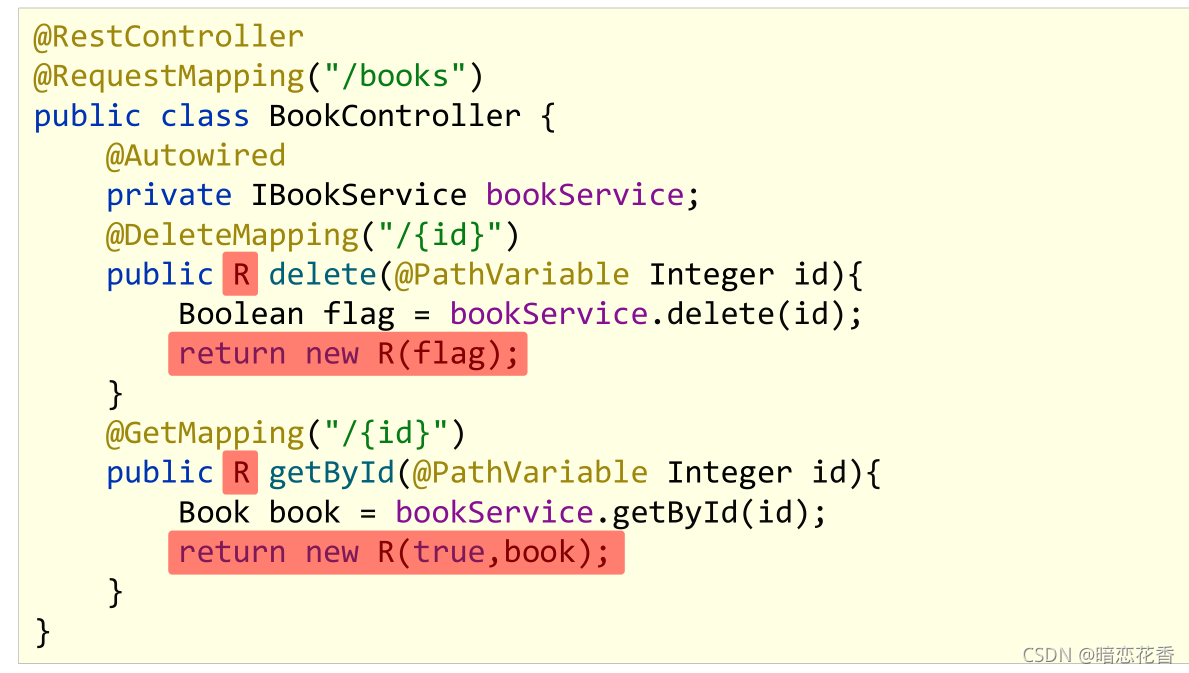
设计表现层返回结果的模型类,用于后端与前端进行数据格式统一,也称为前后端数据协议
1 2 3 4 5 6 7 8 9 10 11 12 13 14 15 16 17 18 19 20 21 22 23 24 25 26 27 28 29 @Data public class R { private Boolean flag; private Object data; public R () { } public R (Boolean flag) { this .flag = flag; } public R (Boolean flag, Object data) { this .flag = flag; this .data = data; } }
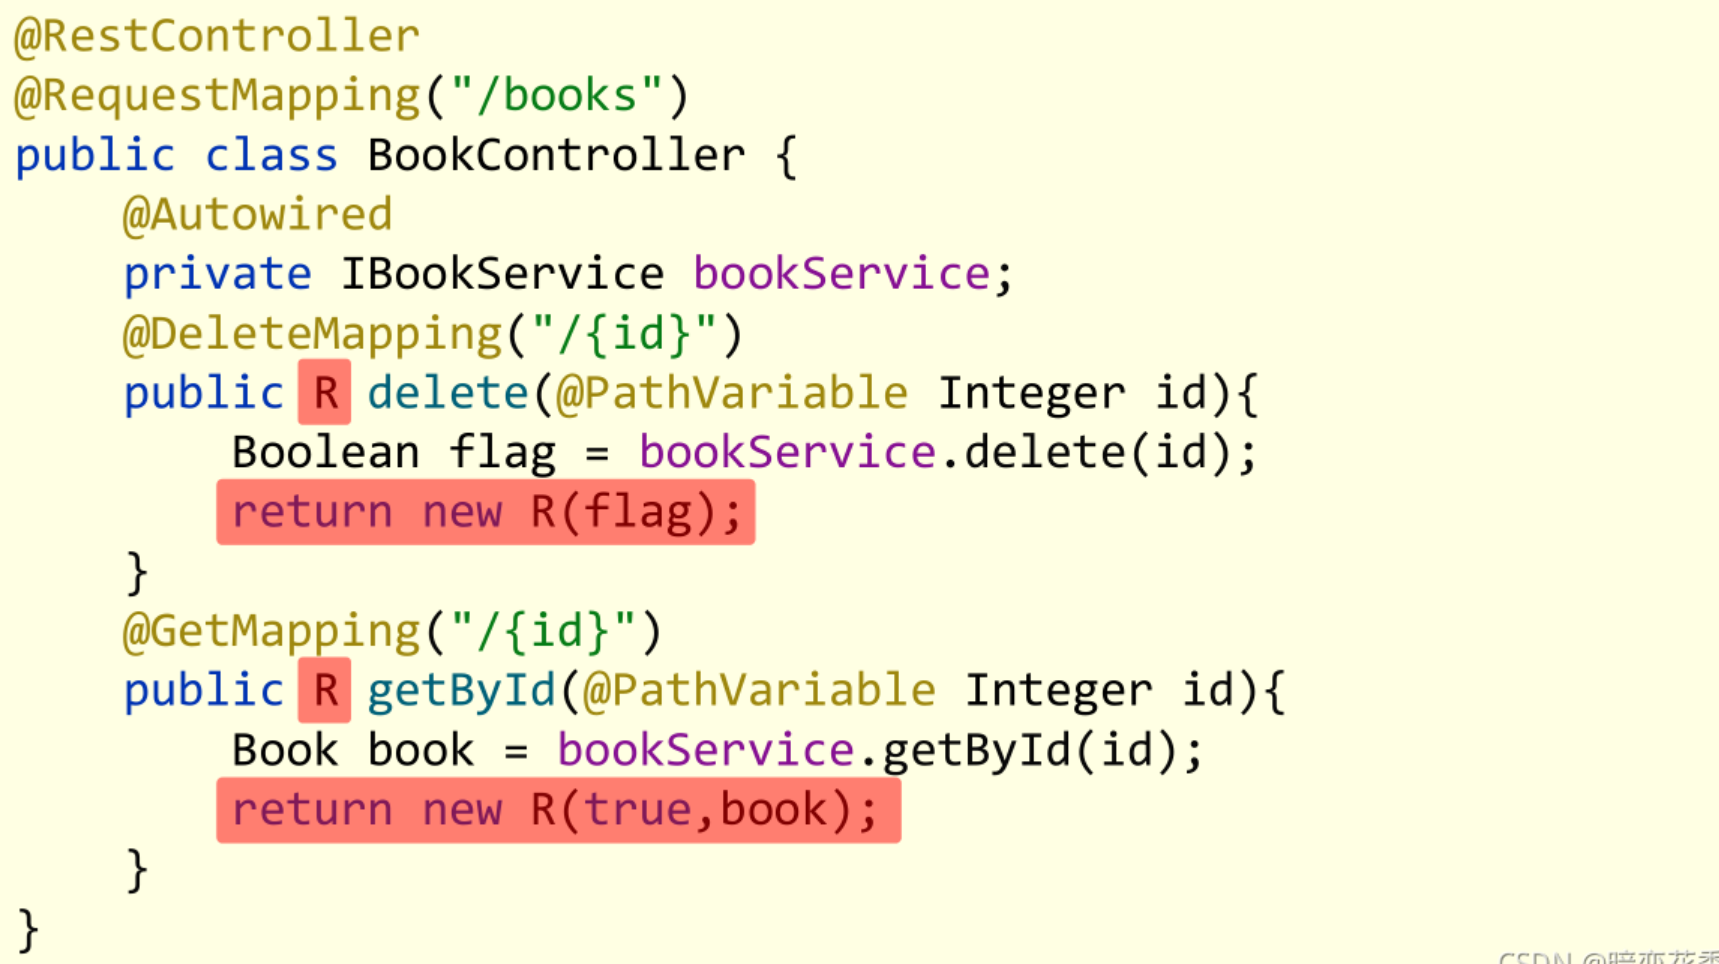
1 2 3 4 5 6 7 8 9 10 11 12 13 14 15 16 17 18 19 20 21 22 23 24 25 26 27 28 29 30 31 32 33 34 35 36 37 38 39 40 @RestController @RequestMapping("/books") public class BookController { @Autowired private IBookService bookService; @GetMapping public R getAll () { return new R (true , bookService.list()); } @PostMapping public R save (@RequestBody Book book) { return new R (bookService.save(book)); } @PutMapping public R update (@RequestBody Book book) { return new R (bookService.modify(book)); } @DeleteMapping("{id}") public R delete (@PathVariable Integer id) { return new R (bookService.delete(id)); } @GetMapping("{id}") public R getById (@PathVariable Integer id) { return new R (true , bookService.getById(id)); } @GetMapping("{currentPage}/{pageSize}") public R getPage (@PathVariable Integer currentPage, @PathVariable int pageSize) { return new R (true , bookService.getPage(currentPage, pageSize)); } }
小结:
设计统一的返回值结果类型便于前端开发读取数据
返回值结果类型可以根据需求自行设定,没有固定格式
返回值结果模型类用于后端与前端进行数据格式统一,也称为前后端数据协议
前后端调用(axios发送异步请求) 使用VUE的方法时提示报错:
表示:该方法定义的缺陷是不支持当前的JavaScript版本,虽然可以程序可以正常运行,但是这个方法会出现红色的波浪线,很不爽打开 File -> Settings -> Languages & Frameworks -> Javascript
前后端分离结构设计中页面归属前端服务器
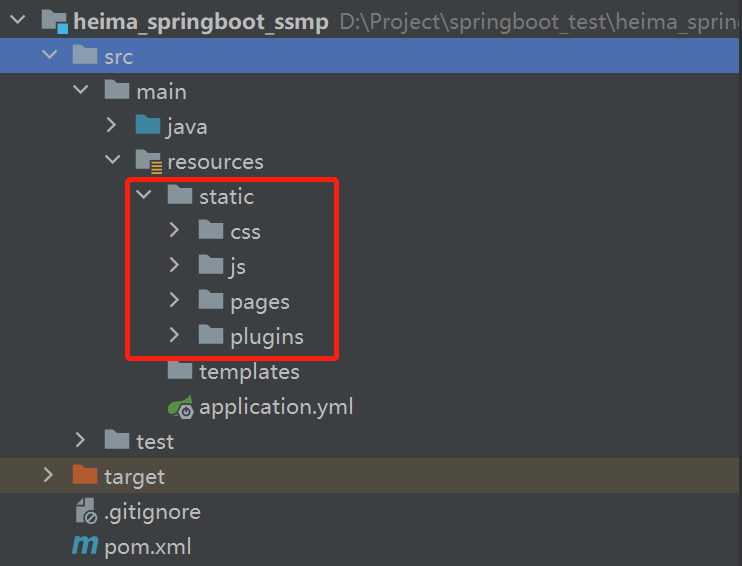
单体工程中页面放置在resources目录下的static目录中(建议执行clean)
前端发送异步请求,调用后端接口
1 2 3 4 5 created ( this .getAll (); },
1 2 3 4 5 6 7 8 getAll ( axios.get ("/books" ).then ((res )=> { console .log (res.data ); }) },
小结:
单体项目中页面放置在resources/static目录下
created钩子函数用于初始化页面时发起调用页面使用axios发送异步请求获取数据后确认前后端是否联通
列表功能
1 2 3 4 5 6 7 8 9 getAll ( axios.get ("/books" ).then ((res ) => { this .dataList = res.data .data ; }) },
小结:
将查询数据返回到页面,利用前端数据双向绑定进行数据展示
添加功能
1 2 3 4 handleCreate ( this .dialogFormVisible = true ; },
1 2 3 4 resetForm ( this .formData = {}; },
1 2 3 4 5 handleCreate ( this .dialogFormVisible = true ; this .resetForm (); },
1 2 3 4 5 6 7 8 9 10 11 12 13 14 15 16 17 handleAdd ( axios.post ("/books" , this .formData ).then ((res ) => { if (res.data .flag ) { this .dialogFormVisible = false ; this .$message .success ("添加成功" ); } else { this .$message .error ("添加失败" ); } }).finally (() => { this .getAll (); }) },
1 2 3 4 5 6 7 cancel ( this .dialogFormVisible = false ; this .$message .info ("当前操作取消" ); },
小结:
请求方式使用POST调用后台对应操作
添加操作结束后动态刷新页面加载数据
根据操作结果不同,显示对应的提示信息
弹出添加Div时清除表单数据
删除功能
1 2 3 4 5 6 7 8 9 10 11 12 13 handleDelete (row ) { axios.delete ("/books/" + row.id ).then ((res ) => { if (res.data .flag ) { this .$message .success ("删除成功" ); } else { this .$message .error ("删除失败" ); } }).finally (() => { this .getAll (); }); }
1 2 3 4 5 6 7 8 9 10 11 12 13 14 15 16 17 18 19 20 21 22 23 handleDelete (row ) { this .$confirm("些操作永久删除当前信息,是否继续?" , "提示" , {type : "info" }).then (() => { axios.delete ("/books/" + row.id ).then ((res ) => { if (res.data .flag ) { this .$message .success ("删除成功" ); } else { this .$message .error ("删除失败" ); } }).finally (() => { this .getAll (); }) }).catch (() => { this .$message .info ("取消操作" ); }); },
小结:
请求方式使用Delete调用后台对应操作
删除操作需要传递当前行数据对应的id值到后台
删除操作结束后动态刷新页面加载数据
根据操作结果不同,显示对应的提示信息
删除操作前弹出提示框避免误操作
修改功能(加载数据)
1 2 3 4 5 6 7 8 9 10 11 12 13 14 15 16 handleUpdate (row ) { axios.get ("/books/" + row.id ).then ((res ) => { if (res.data .flag && res.data .data != null ) { this .dialogFormVisible4Edit = true ; this .formData = res.data .data ; } else { this .$message .error ("数据同步失败,自动刷新" ); } }).finally (() => { this .getAll (); }); },
1 2 3 4 5 6 7 8 9 10 11 12 13 14 15 16 17 18 19 20 21 22 23 handleDelete (row ) { this .$confirm("些操作永久删除当前信息,是否继续?" , "提示" , {type : "info" }).then (() => { axios.delete ("/books/" + row.id ).then ((res ) => { if (res.data .flag ) { this .$message .success ("删除成功" ); } else { this .$message .error ("数据同步失败,自动刷新" ); } }).finally (() => { this .getAll (); }); }).catch (() => { this .$message .info ("取消操作" ); }); },
小结:
加载要修改数据通过传递当前行数据对应的id值到后台查询数据
利用前端数据双向绑定将查询到的数据进行回显
修改功能
1 2 3 4 5 6 7 8 9 10 11 12 13 14 15 16 17 handleEdit ( axios.put ("/books" , this .formData ).then ((res ) => { if (res.data .flag ) { this .dialogFormVisible4Edit = false ; this .$message .success ("修改成功" ); } else { this .$message .error ("修改失败" ); } }).finally (() => { this .getAll (); }); },
1 2 3 4 5 6 7 8 9 cancel ( this .dialogFormVisible = false ; this .dialogFormVisible4Edit = false ; this .$message .info ("当前操作取消" ); },
小结:
请求方式使用PUT调用后台对应操作
修改操作结束后动态刷新页面加载数据(同新增)
根据操作结果不同,显示对应的提示信息(同新增)
异常消息处理
1 2 3 4 5 6 7 8 9 10 { "flag" : true , "data" : null } { "flag" : false , "data" : null }
1 2 3 4 5 6 { "timestamp" : "2021-11-07T12:44:29.343+00:00" , "status" : 500 , "error" : "Internal Server Error" , "path" : "/books" }
1 2 3 4 5 6 7 8 9 10 11 12 13 14 @RestControllerAdvice public class ProjectExceptionAdvice { @ExceptionHandler(Exception.class) public R doException (Exception ex) { ex.printStackTrace(); return new R (false , null , "系统错误,请稍后再试!" ); } }
修改表现层返回结果的模型类,封装出现异常后对应的信息flag:false Data: null 消息(msg): 要显示信息
1 2 3 4 5 6 7 8 9 10 11 12 @Data public class R { private Boolean flag; private Object data; private String msg; public R (Boolean flag,Object data,String msg) { this .flag = flag; this .data = data; this .msg = msg; } }
页面消息处理,没有传递消息加载默认消息,传递消息后加载指定消息
1 2 3 4 5 6 7 8 9 10 11 12 13 14 15 16 17 handleAdd() { axios.post("/books" , this .formData).then((res) => { if (res.data.flag) { this .dialogFormVisible = false ; this .$message.success("添加成功" ); } else { this .$message.error(res.data.msg); } }).finally (() => { this .getAll(); }) },
可以在表现层Controller中进行消息统一处理
1 2 3 4 5 6 @PostMapping public R save (@RequestBody Book book) throws IOException { boolean flag = bookService.save(book); return new R (flag, flag ? "添加成功^_^" : "添加失败-_-!" ); }
1 2 3 4 5 6 7 8 9 10 11 12 13 14 15 16 17 handleAdd() { axios.post("/books" , this .formData).then((res) => { if (res.data.flag) { this .dialogFormVisible = false ; this .$message.success(res.data.msg); } else { this .$message.error(res.data.msg); } }).finally (() => { this .getAll(); }) },
小结:
使用注解@RestControllerAdvice定义SpringMVC异常处理器用来处理异常的
异常处理器必须被扫描加载,否则无法生效
表现层返回结果的模型类中添加消息属性用来传递消息到页面
分页
1 2 3 4 5 6 7 8 9 10 11 12 13 14 15 16 17 18 19 20 21 <div class ="pagination-container" > <el-pagination class ="pagiantion" @current-change ="handleCurrentChange" :current-page ="pagination.currentPage" :page-size ="pagination.pageSize" layout ="total, prev, pager, next, jumper" :total ="pagination.total" > </el-pagination > </div >
1 2 3 4 5 6 7 data : { pagination : { currentPage : 1 , pageSize : 10 , total : 0 , } },
1 2 3 getAll ( axios.get ("/books/" + this .pagination .currentPage + "/" + this .pagination .pageSize ).then ((res ) => {}); },
分页查询
1 2 3 4 @GetMapping("{currentPage}/{pageSize}") public R getPage (@PathVariable Integer currentPage, @PathVariable int pageSize) { return new R (true , bookService.getPage(currentPage, pageSize)); }
1 2 3 4 5 6 7 8 9 10 11 12 13 getAll ( axios.get ("/books/" + this .pagination .currentPage + "/" + this .pagination .pageSize ).then ((res ) => { this .pagination .currentPage = res.data .data .current ; this .pagination .pageSize = res.data .data .size ; this .pagination .total = res.data .data .total ; this .dataList = res.data .data .records ; }) },
1 2 3 4 5 6 7 8 handleCurrentChange (currentPage ) { this .pagination .currentPage = currentPage; this .getAll (); },
小结:
使用el分页组件
定义分页组件绑定的数据模型
异步调用获取分页数据
分页数据页面回显
分页功能维护(删除BUG)
对查询结果进行校验,如果当前页码值大于最大页码值,使用最大页码值作为当前页码值重新查询
1 2 3 4 5 6 7 8 9 @GetMapping("{currentPage}/{pageSize}") public R getPage (@PathVariable Integer currentPage, @PathVariable int pageSize) { IPage<Book> page = bookService.getPage(currentPage, pageSize); if (currentPage > page.getPages()) { page = bookService.getPage((int ) page.getPages(), pageSize); } return new R (true , page); }
小结:
基于业务需求维护删除功能
条件查询
1 2 3 4 5 6 7 8 pagination: { currentPage: 1 , pageSize: 10 , total: 0 , type: "" , name: "" , description: "" }
1 2 3 4 5 6 7 <div class ="filter-container" > <el-input placeholder ="图书类别" v-model ="pagination.type" class ="filter-item" /> <el-input placeholder ="图书名称" v-model ="pagination.name" class ="filter-item" /> <el-input placeholder ="图书描述" v-model ="pagination.description" class ="filter-item" /> <el-button @click ="getAll()" class ="dalfBut" > 查询</el-button > <el-button type ="primary" class ="butT" @click ="handleCreate()" > 新建</el-button > </div >
1 2 3 4 5 6 7 8 9 10 11 12 13 14 15 16 17 18 19 20 21 22 getAll ( console .log (this .pagination .type ); param = "?name=" + this .pagination .name ; param += "&type=" + this .pagination .type ; param += "&description=" + this .pagination .description ; axios.get ("/books/" + this .pagination .currentPage + "/" + this .pagination .pageSize + param).then ((res ) => { this .pagination .currentPage = res.data .data .current ; this .pagination .pageSize = res.data .data .size ; this .pagination .total = res.data .data .total ; this .dataList = res.data .data .records ; }) },
条件参数组织可以通过条件判定书写的更简洁
Controller接收参数
1 2 3 4 5 6 @GetMapping("{currentPage}/{pageSize}") public R getAll (@PathVariable int currentPage,@PathVariable int pageSize,Book book) { System.out.println("参数=====>" +book); IPage<Book> pageBook = bookService.getPage(currentPage,pageSize); return new R (null != pageBook ,pageBook); }
1 2 3 4 5 6 7 8 9 10 IPage<Book> getPage (Integer currentPage, int pageSize, Book book) ;
1 2 3 4 5 6 7 8 9 10 11 12 13 14 15 @Override public IPage<Book> getPage (Integer currentPage, int pageSize, Book book) { LambdaQueryWrapper<Book> lambdaQueryWrapper = new LambdaQueryWrapper <>(); lambdaQueryWrapper.like(Strings.isNotEmpty(book.getType()), Book::getType, book.getType()); lambdaQueryWrapper.like(Strings.isNotEmpty(book.getName()), Book::getName, book.getName()); lambdaQueryWrapper.like(Strings.isNotEmpty(book.getDescription()), Book::getDescription, book.getDescription()); IPage page = new Page (currentPage, pageSize); bookDao.selectPage(page, lambdaQueryWrapper); return page; }
1 2 3 4 5 6 7 8 9 10 11 12 13 @GetMapping("{currentPage}/{pageSize}") public R getPage (@PathVariable Integer currentPage, @PathVariable int pageSize, Book book) { IPage<Book> page = bookService.getPage(currentPage, pageSize, book); if (currentPage > page.getPages()) { page = bookService.getPage((int ) page.getPages(), pageSize, book); } return new R (true , page); }
1 2 3 4 5 6 7 8 9 10 11 12 13 14 15 16 17 18 19 20 21 22 getAll ( console .log (this .pagination .type ); param = "?name=" + this .pagination .name ; param += "&type=" + this .pagination .type ; param += "&description=" + this .pagination .description ; axios.get ("/books/" + this .pagination .currentPage + "/" + this .pagination .pageSize + param).then ((res ) => { this .pagination .currentPage = res.data .data .current ; this .pagination .pageSize = res.data .data .size ; this .pagination .total = res.data .data .total ; this .dataList = res.data .data .records ; }) },
小结:
定义查询条件数据模型(当前封装到分页数据模型中)
异步调用分页功能并通过请求参数传递数据到后台
基础篇完结 基于SpringBoot的SSMP整合案例
pom.xml application.yml dao BaseMapper、设置@Mapperdao测试类 service MyBatis-Plus提供的接口快速开发service测试类 controller Restful开发,使用Postman测试跑通功能页面resources目录下的static目录中
实用篇
运维实用篇 运维篇内容介绍与课程目标 内容介绍
课程目标:
能够掌握SpringBoot程序多环境开发
能够基于Linux系统发布SpringBoot工程
能够解决线上灵活配置SpringBoot工程的需求
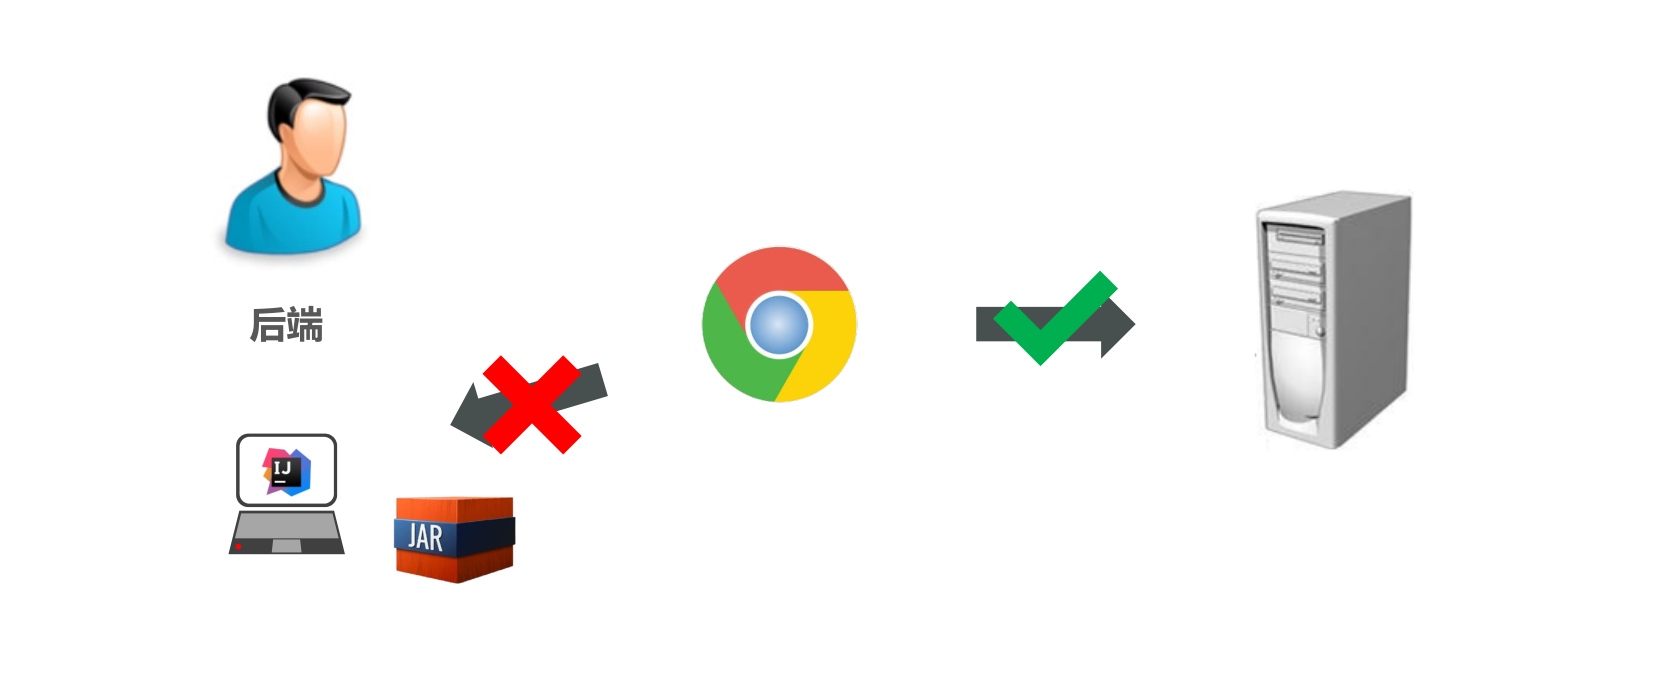
工程打包与运行 程序为什么要打包
将程序部署在独立的服务器上
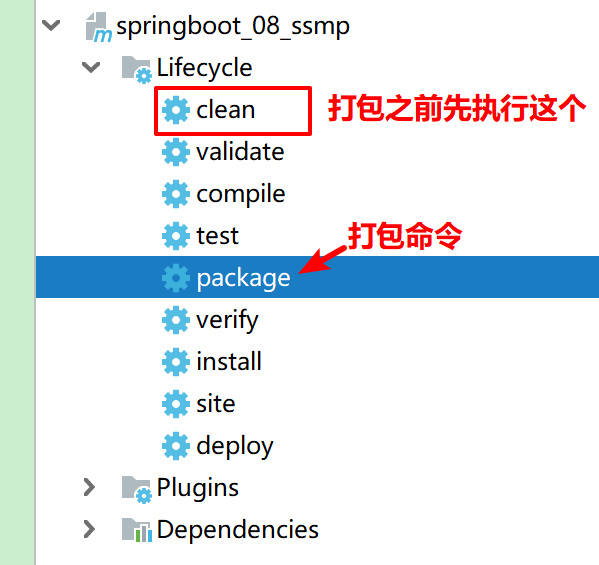
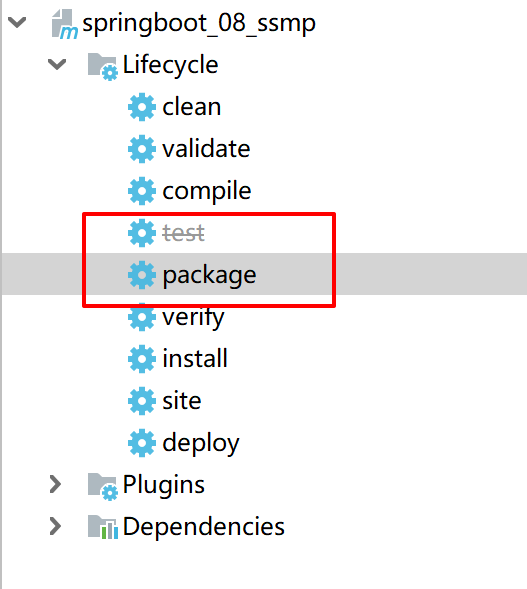
SpringBoot项目快速启动(Windows版) 步骤 ①:对SpringBoot项目打包(执行Maven构建指令package)执行 package 打包命令之前 先执行 mvn clean 删除 target 目录及内容
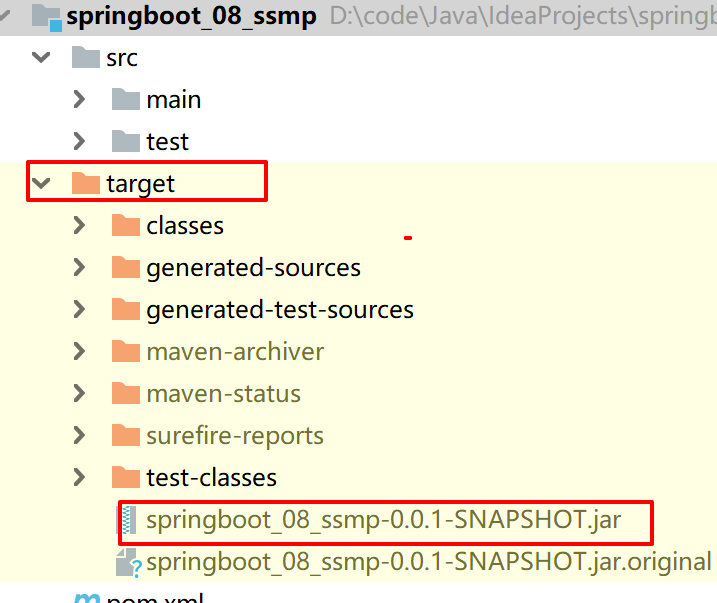
打包完成 生成对应的 jar 文件
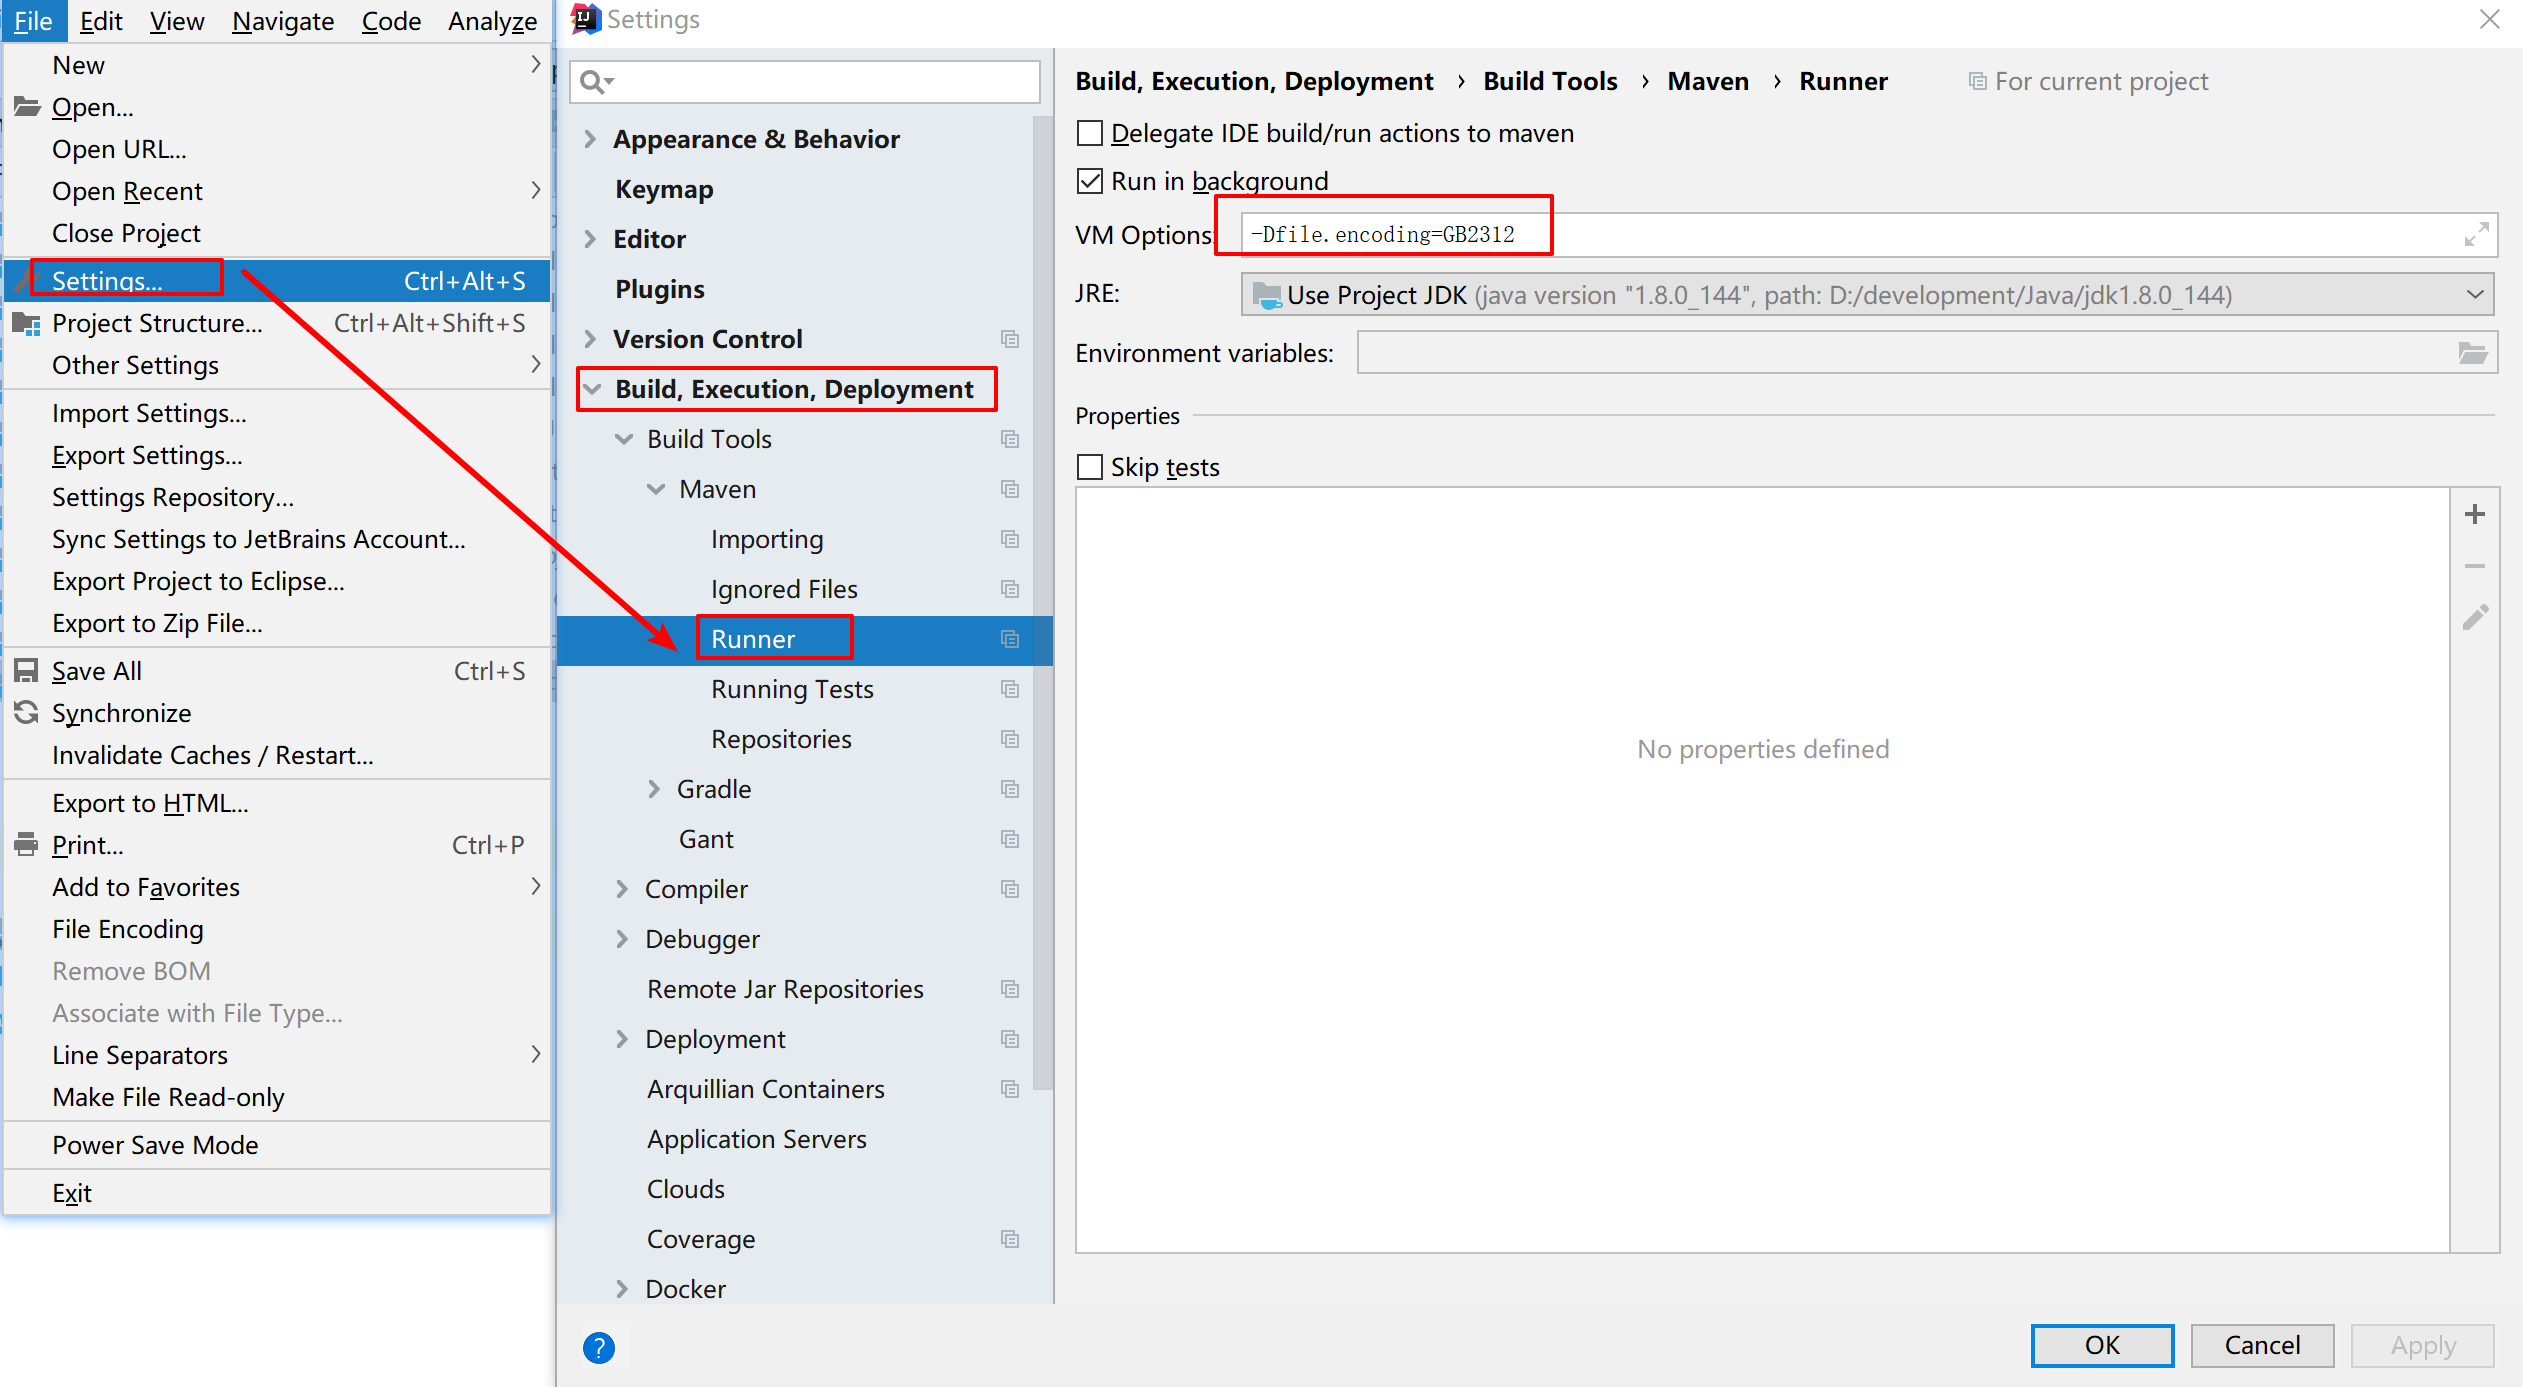
可能出现的问题: IDEA下 执行 Maven 命令控制台中文乱码
Ctr+Alt+S 打开设置,在Build,Execution ,Deployment找到Build Tools下Maven项下的Runner ,在VM Options 添加-Dfile.encoding=GB2312 ,点击OK。
②:运行项目(执行启动指令) java -jar <打包文件名>
1 java –jar springboot.jar
注意事项:jar支持命令行启动需要依赖maven插件支持,请确认打包时是否具有SpringBoot对应的maven插件
1 2 3 4 5 6 7 8 <build > <plugins > <plugin > <groupId > org.springframework.boot</groupId > <artifactId > spring-boot-maven-plugin</artifactId > </plugin > </plugins > </build >
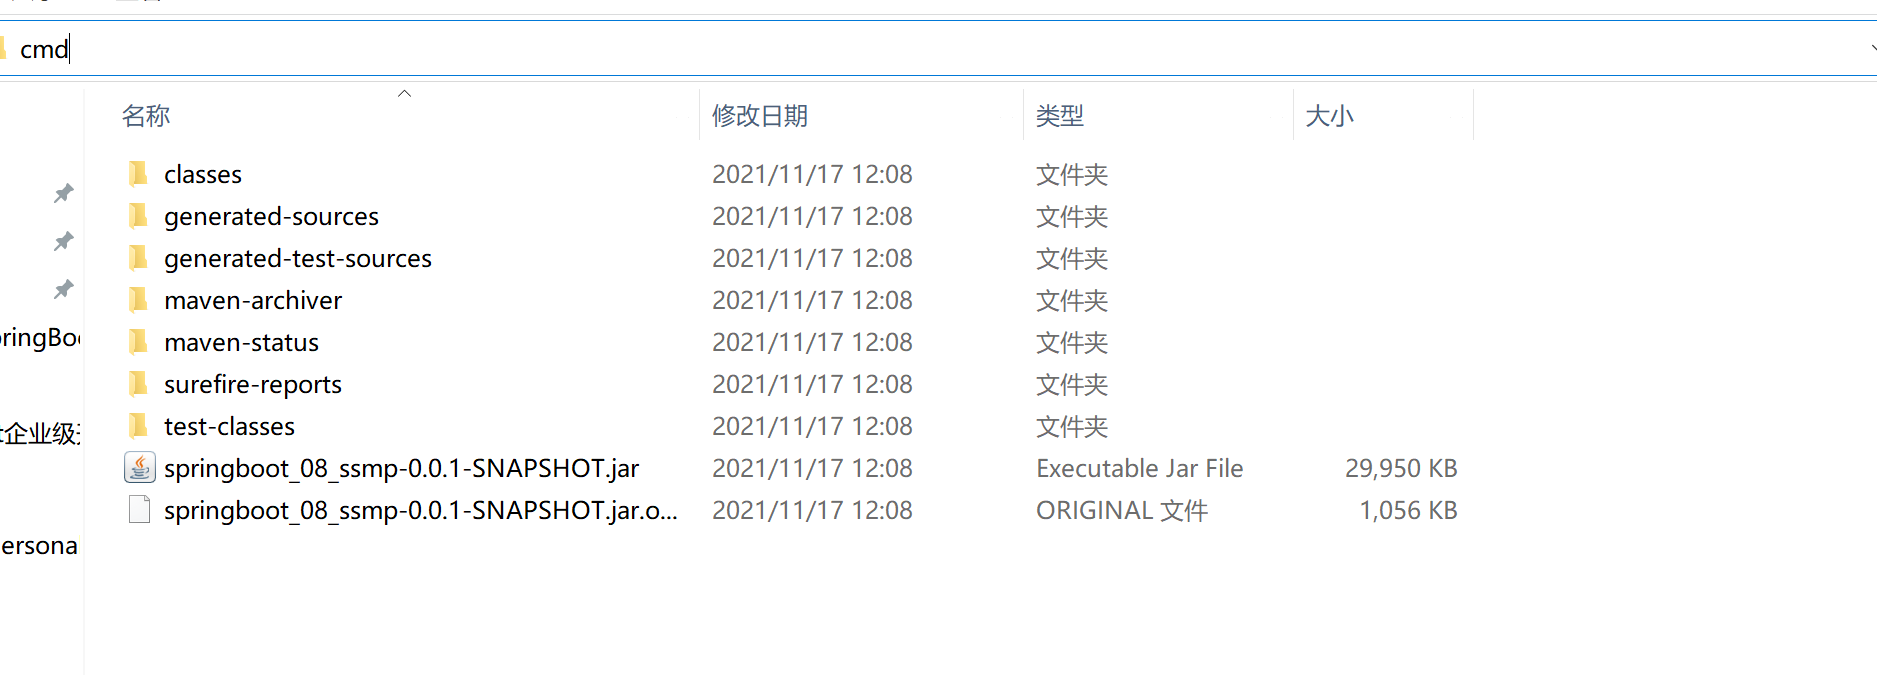
地址栏输入 cmd 回车
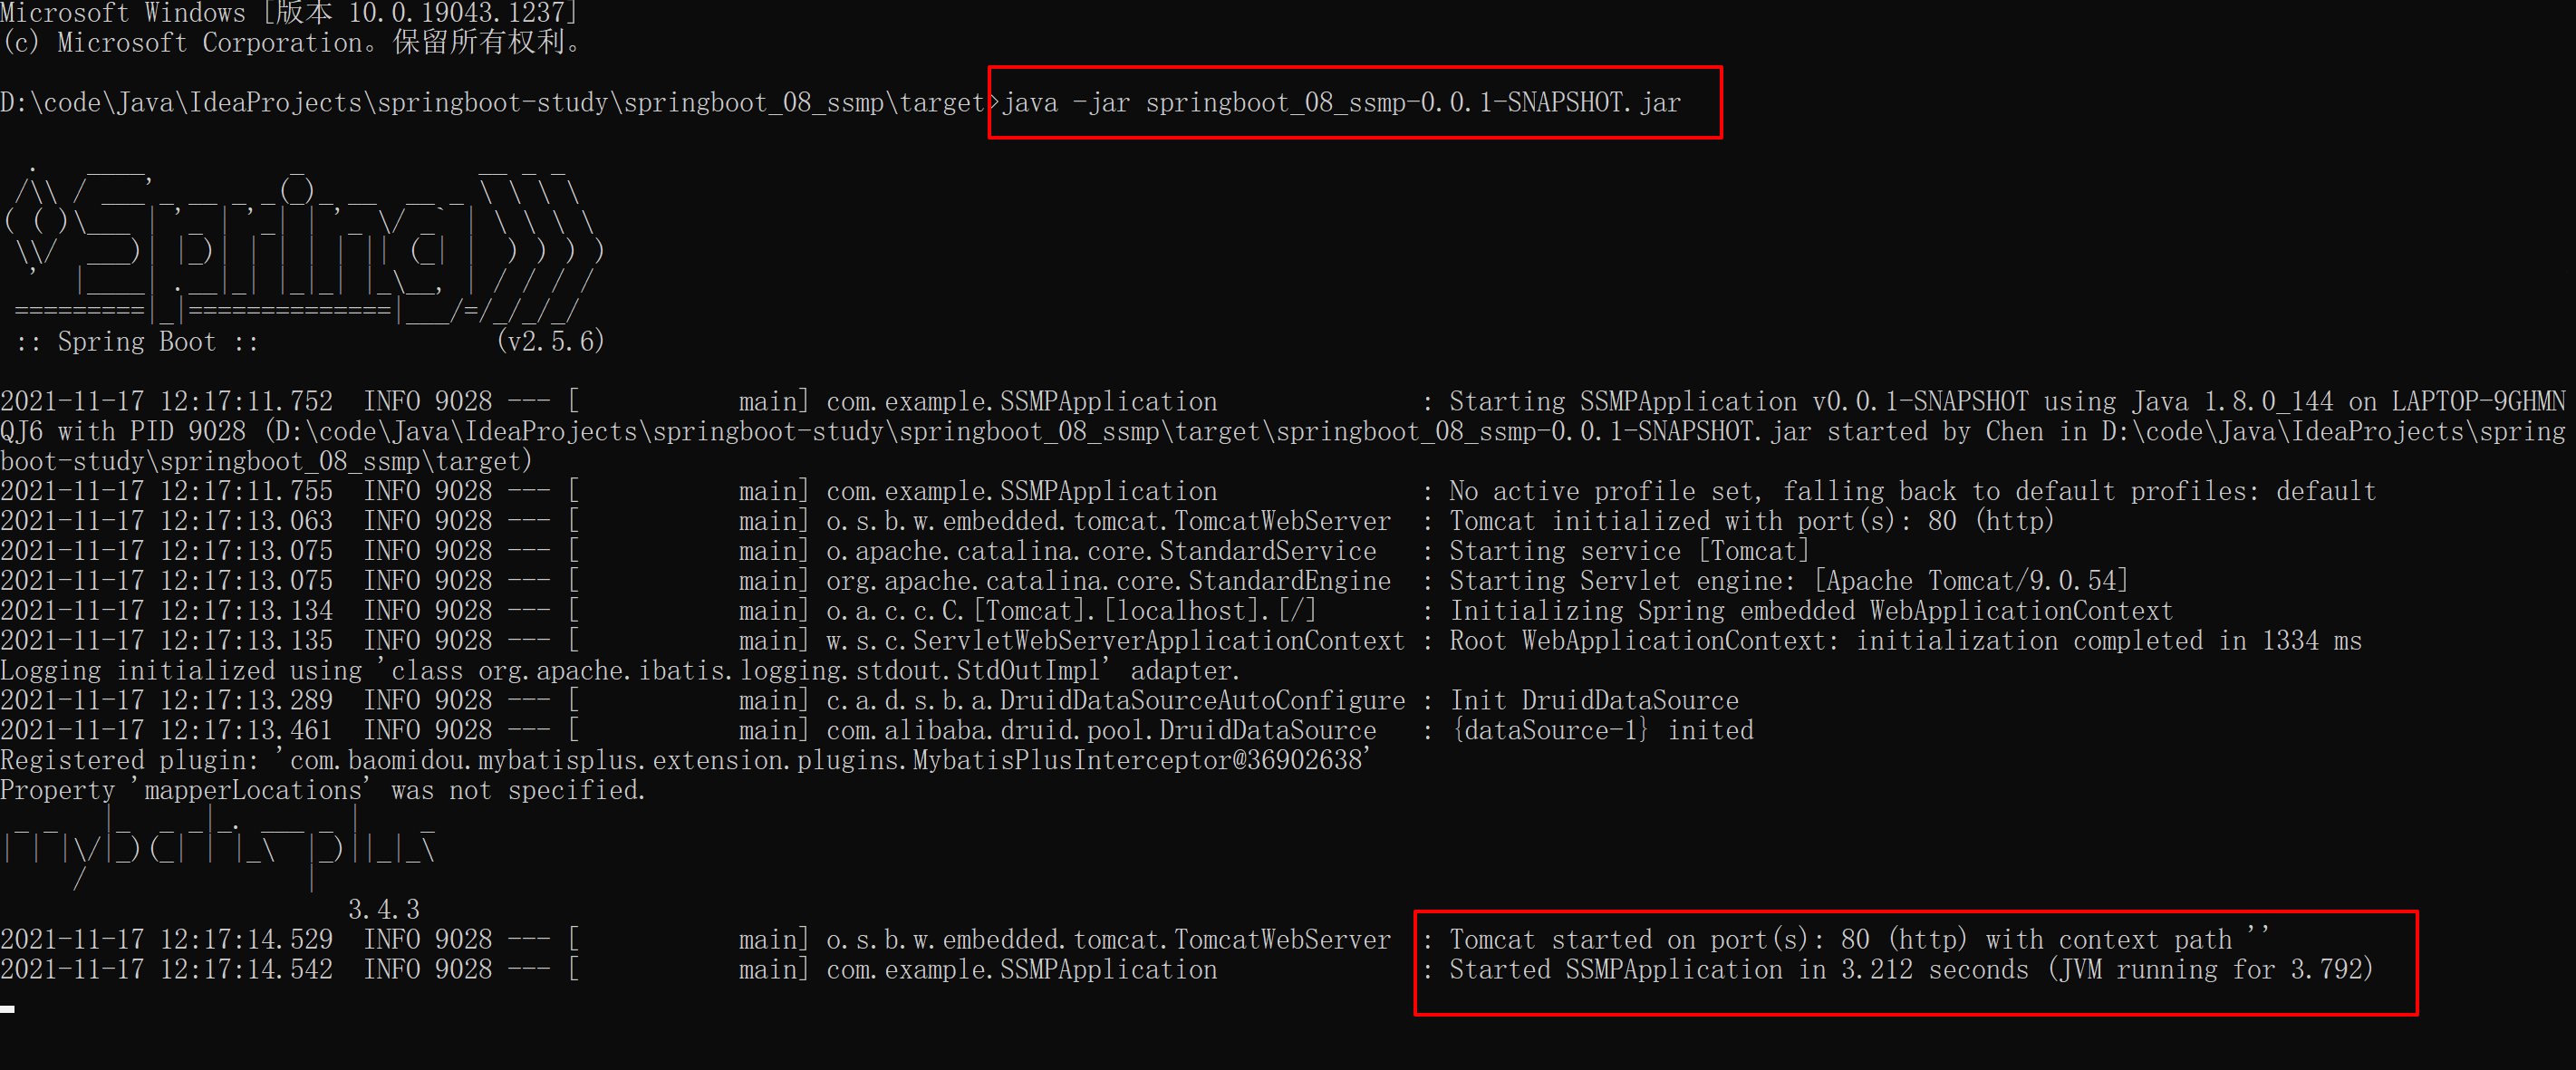
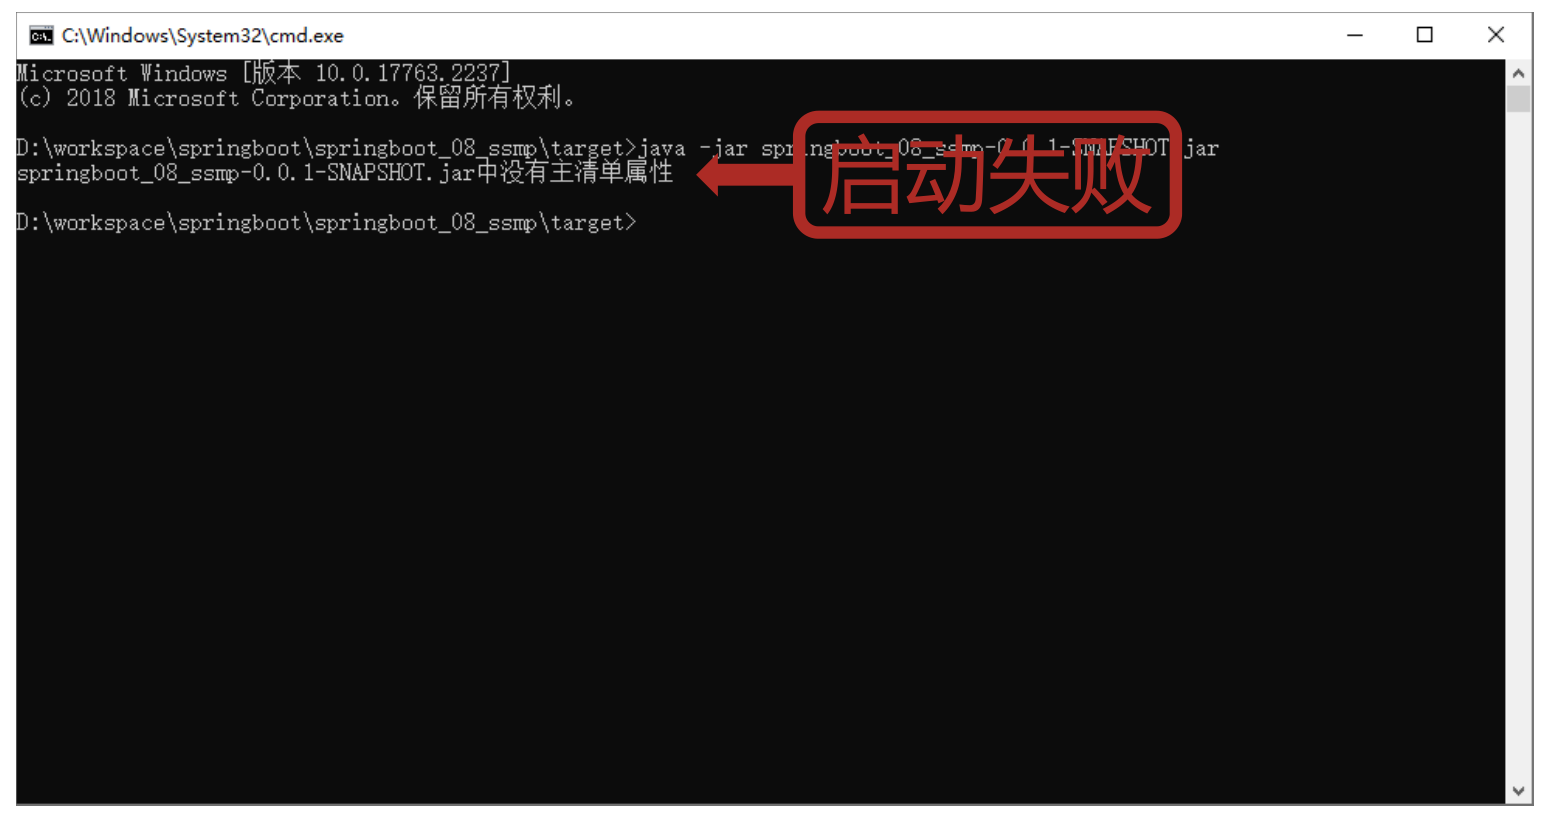
执行 java -jar springboot_08_ssmp-0.0.1-SNAPSHOT.jar
③:浏览器访问: http://localhost/pages/books.html
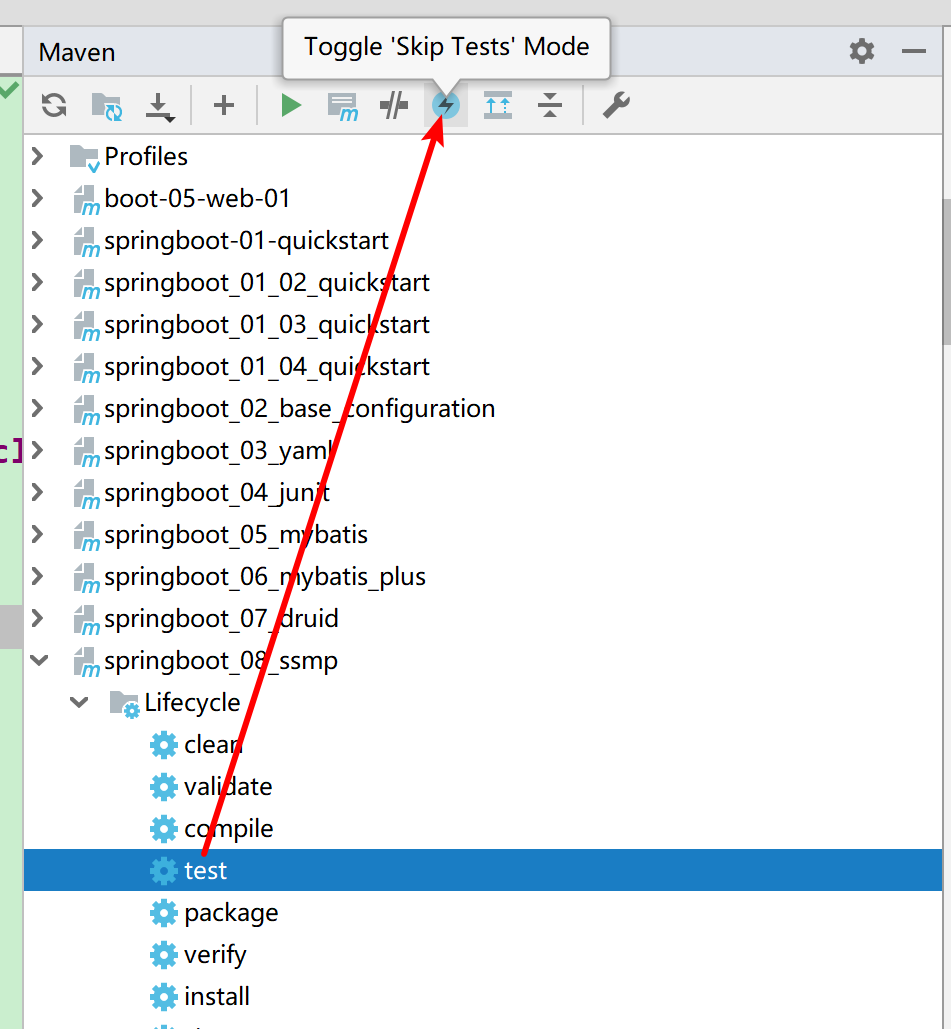
打包优化:跳过 test 生命周期
小结:
SpringBoot工程可以基于java环境下独立运行jar文件启动服务SpringBoot工程执行mvn命令package进行打包执行jar命令:java –jar 工程名.jar
打包插件 如果没有配制spring boot 打包插件可能遇到下面的问题:
使用SpringBoot提供的maven插件可以将工程打包成可执行jar包
1 2 3 4 5 6 7 8 <build > <plugins > <plugin > <groupId > org.springframework.boot</groupId > <artifactId > spring-boot-maven-plugin</artifactId > </plugin > </plugins > </build >
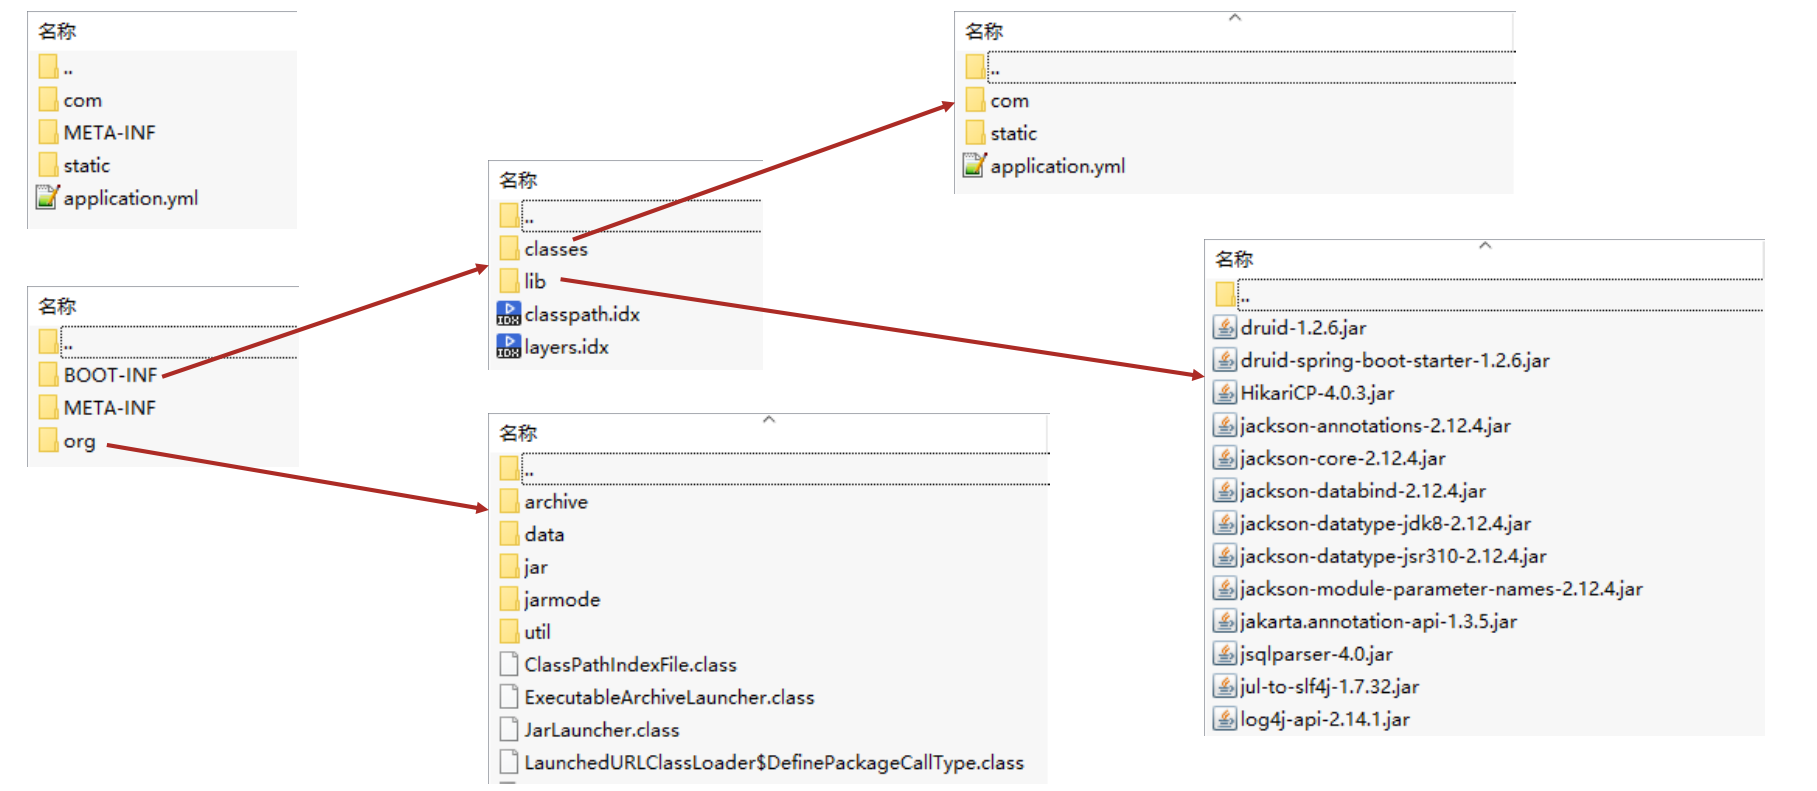
可执行jar包目录结构
jar包描述文件(MANIFEST.MF) 1 2 3 4 5 Manifest-Version: 1.0 Implementation-Title: springboot_08_ssmp Implementation-Version: 0.0.1-SNAPSHOT Build-Jdk-Spec: 1.8 Created-By: Maven Jar Plugin 3.2.0
基于spring-boot-maven-plugin打包的工程
1 2 3 4 5 6 7 8 9 10 11 12 Manifest-Version: 1.0 Spring-Boot-Classpath-Index: BOOT-INF/classpath.idx Implementation-Title: springboot_08_ssmp Implementation-Version: 0.0.1-SNAPSHOT Spring-Boot-Layers-Index: BOOT-INF/layers.idx Start-Class: com.example.SSMPApplication 启动类 Spring-Boot-Classes: BOOT-INF/classes/ Spring-Boot-Lib: BOOT-INF/lib/ Build-Jdk-Spec: 1.8 Spring-Boot-Version: 2.5.6 Created-By: Maven Jar Plugin 3.2.0 Main-Class: org.springframework.boot.loader.JarLauncher jar启动器
命令行启动常见问题及解决方案
1 2 3 4 5 6 7 8 9 10 netstat -ano netstat -ano |findstr "端口号" tasklist |findstr "进程PID号" taskkill /F /PID "进程PID号" taskkill -f -t -im "进程名称"
1 2 3 4 5 6 7 8 9 10 11 12 13 14 15 16 17 18 19 20 21 22 23 24 25 26 27 28 29 30 31 32 33 34 35 36 37 38 39 40 41 42 43 44 45 46 47 48 49 50 51 52 53 54 55 D:\code\Java\IdeaProjects\springboot-study \springboot_08_ssmp\target>netstat -ano 活动连接 协议 本地地址 外部地址 状态 PID TCP 0.0 .0.0 :80 0.0 .0.0 :0 LISTENING 30988 TCP 0.0 .0.0 :135 0.0 .0.0 :0 LISTENING 1792 TCP 0.0 .0.0 :443 0.0 .0.0 :0 LISTENING 9400 TCP 0.0 .0.0 :445 0.0 .0.0 :0 LISTENING 4 TCP 0.0 .0.0 :902 0.0 .0.0 :0 LISTENING 6188 TCP 0.0 .0.0 :912 0.0 .0.0 :0 LISTENING 6188 D:\code\Java\IdeaProjects\springboot-study \springboot_08_ssmp\target>netstat -ano |findstr "80" TCP 0.0 .0.0 :80 0.0 .0.0 :0 LISTENING 30988 TCP 0.0 .0.0 :7680 0.0 .0.0 :0 LISTENING 4864 TCP 0.0 .0.0 :8680 0.0 .0.0 :0 LISTENING 7976 TCP 192.168 .1.102 :9808 119.96 .138.240 :443 ESTABLISHED 20604 TCP [::]:80 [::]:0 LISTENING 30988 TCP [::]:7680 [::]:0 LISTENING 4864 UDP 127.0 .0.1 :65312 *:* 5680 UDP [fe80 ::2952 :170 d :f2f2 :1464 %16 ]:1900 *:* 2872 UDP [fe80 ::2952 :170 d :f2f2 :1464 %16 ]:60720 *:* 2872 UDP [fe80 ::4 c2b :9 d2f :a625 :8 b1c %6 ]:1900 *:* 2872 UDP [fe80 ::4 c2b :9 d2f :a625 :8 b1c %6 ]:60719 *:* 2872 UDP [fe80 ::e1e0 :a2c9 :200 :2 f34 %19 ]:1900 *:* 2872 UDP [fe80 ::e1e0 :a2c9 :200 :2 f34 %19 ]:60721 *:* 2872 D:\code\Java\IdeaProjects\springboot-study \springboot_08_ssmp\target>tasklist |findstr "30988" java.exe 30988 Console 3 273 ,388 K D:\code\Java\IdeaProjects\springboot-study \springboot_08_ssmp\target>tasklist 映像名称 PID 会话名 会话 ========================= ======== ================ =========== ============ System Idle Process 0 Services 0 8 K System 4 Services 0 1 ,500 K Registry 172 Services 0 94 ,584 K smss.exe 648 Services 0 1 ,084 K csrss.exe 1080 Services 0 5 ,888 K wininit.exe 1320 Services 0 6 ,868 K services.exe 1436 Services 0 9 ,264 K lsass.exe 1488 Services 0 11 ,932 K svchost.exe 1612 Services 0 17 ,804 K fontdrvhost.exe 1648 Services 0 488 K WUDFHost.exe 1688 Services 0 2 ,660 K svchost.exe 1792 Services 0 13 ,428 K WUDFHost.exe 1840 Services 0 2 ,628 K svchost.exe 1868 Services 0 3 ,460 K D:\code\Java\IdeaProjects\springboot-study \springboot_08_ssmp\target>taskkill /F /PID "30988" 成功: 已终止 PID 为 30988 的进程。
小结:
spring-boot-maven-plugin插件作用Windonws端口被占用
SpringBoot工程快速启动(Linux版)
基于Linux(CenterOS7)
安装JDK,且版本不低于打包时使用的JDK版本
安装 MySQL
安装包保存在/usr/local/自定义目录中或$HOME下
其他操作参照Windows版进行
启动成功无法访问
添加 80 端口
1 firewall-cmd --zone=public --permanent --add-port=80/tcp
1 systemctl restart firewalld
后台启动命令
1 nohup java -jar springboot_08_ssmp-0.0.1-SNAPSHOT.jar > server.log 2>&1 &
停止服务
1 2 3 ps -ef | grep “java -jar” kill -9 PID cat server.log (查看日志)
1 2 3 4 5 6 7 8 9 10 [root@cjbCentos01 app]# ps -ef | grep "java -jar" UID PID PPID C STIME TTY TIME CMD root 6848 6021 7 14:45 pts/2 00:00:19 java -jar springboot_08_ssmp-0.0.1-SNAPSHOT.jar root 6919 6021 0 14:49 pts/2 00:00:00 grep --color=auto java -jar [root@cjbCentos01 app]# kill -9 6848 [root@cjbCentos01 app]# ps -ef | grep "java -jar" root 7016 6021 0 14:52 pts/2 00:00:00 grep --color=auto java -jar [1]+ 已杀死 nohup java -jar springboot_08_ssmp-0.0.1-SNAPSHOT.jar > server.log 2>&1 [root@cjbCentos01 app]#
小结:
上传安装包
执行jar命令:java –jar 工程名.jar
总结:
Boot程序打包依赖SpringBoot对应的Maven插件即可打包出可执行的jar包
运行jar包使用jar命令进行
Windows与Linux下执行Boot打包程序流程相同,仅需确保运行环境有效即可
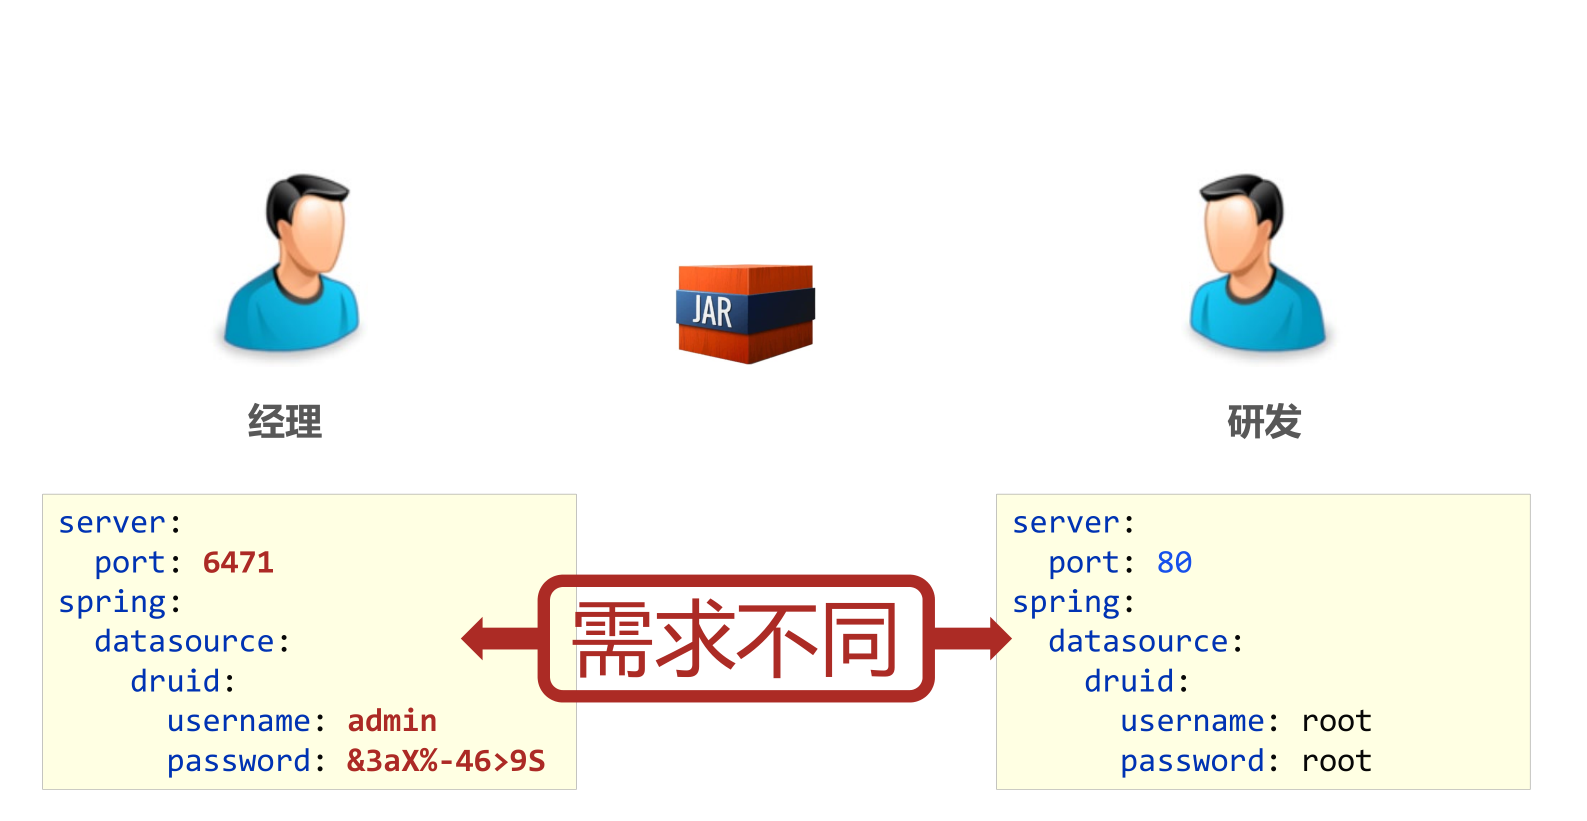
配置高级 临时属性
1 java -jar springboot_08_ssmp-0.0.1-SNAPSHOT.jar --server.port=8080
携带多个属性启动SpringBoot,属性间使用空格分隔
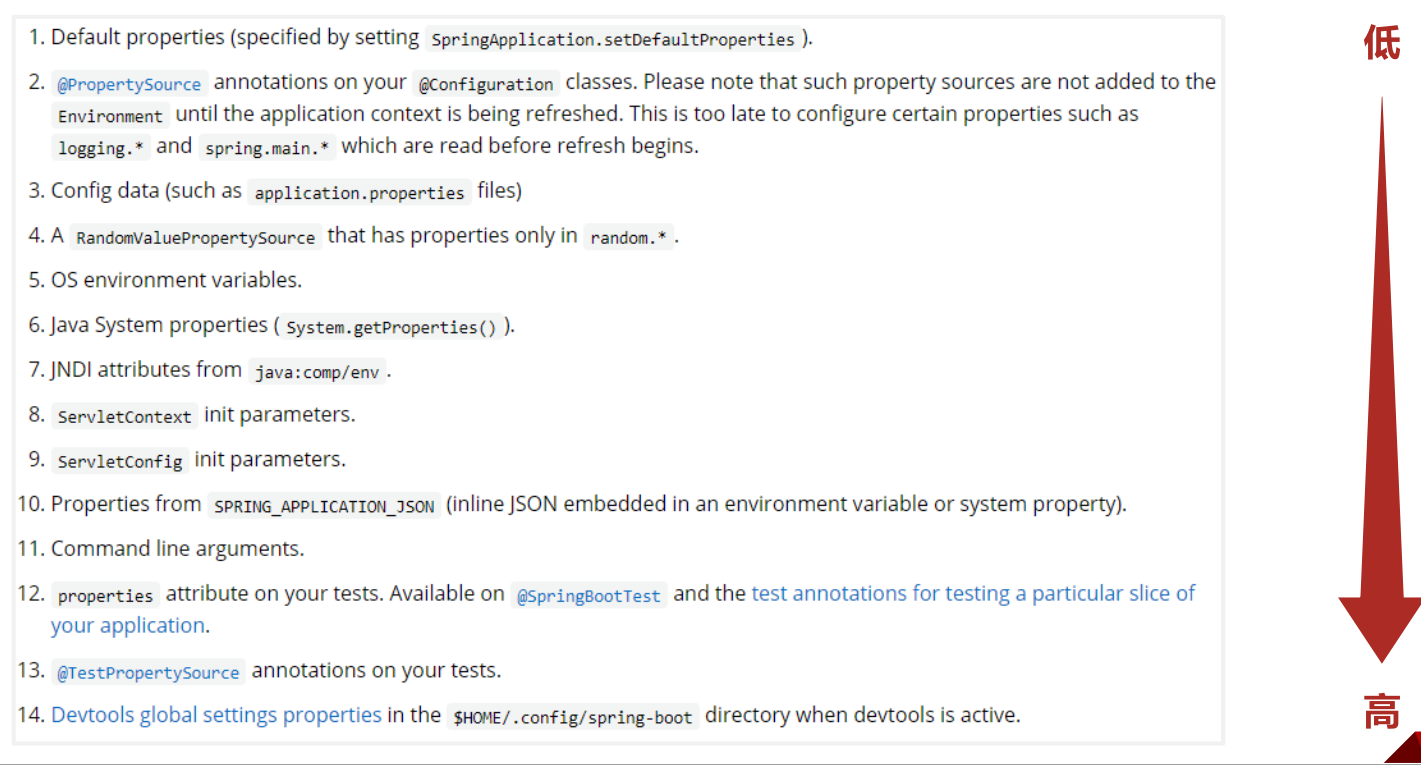
属性加载优先顺序
参看 https://docs.spring.io/spring-boot/docs/current/reference/html/spring-boot-features.html#boot-features-external-config
小结:
使用jar命令启动SpringBoot工程时可以使用临时属性替换配置文件中的属性
临时属性添加方式:java –jar 工程名.jar --属性名=值
多个临时属性之间使用空格分隔
临时属性必须是当前boot工程支持的属性,否则设置无效
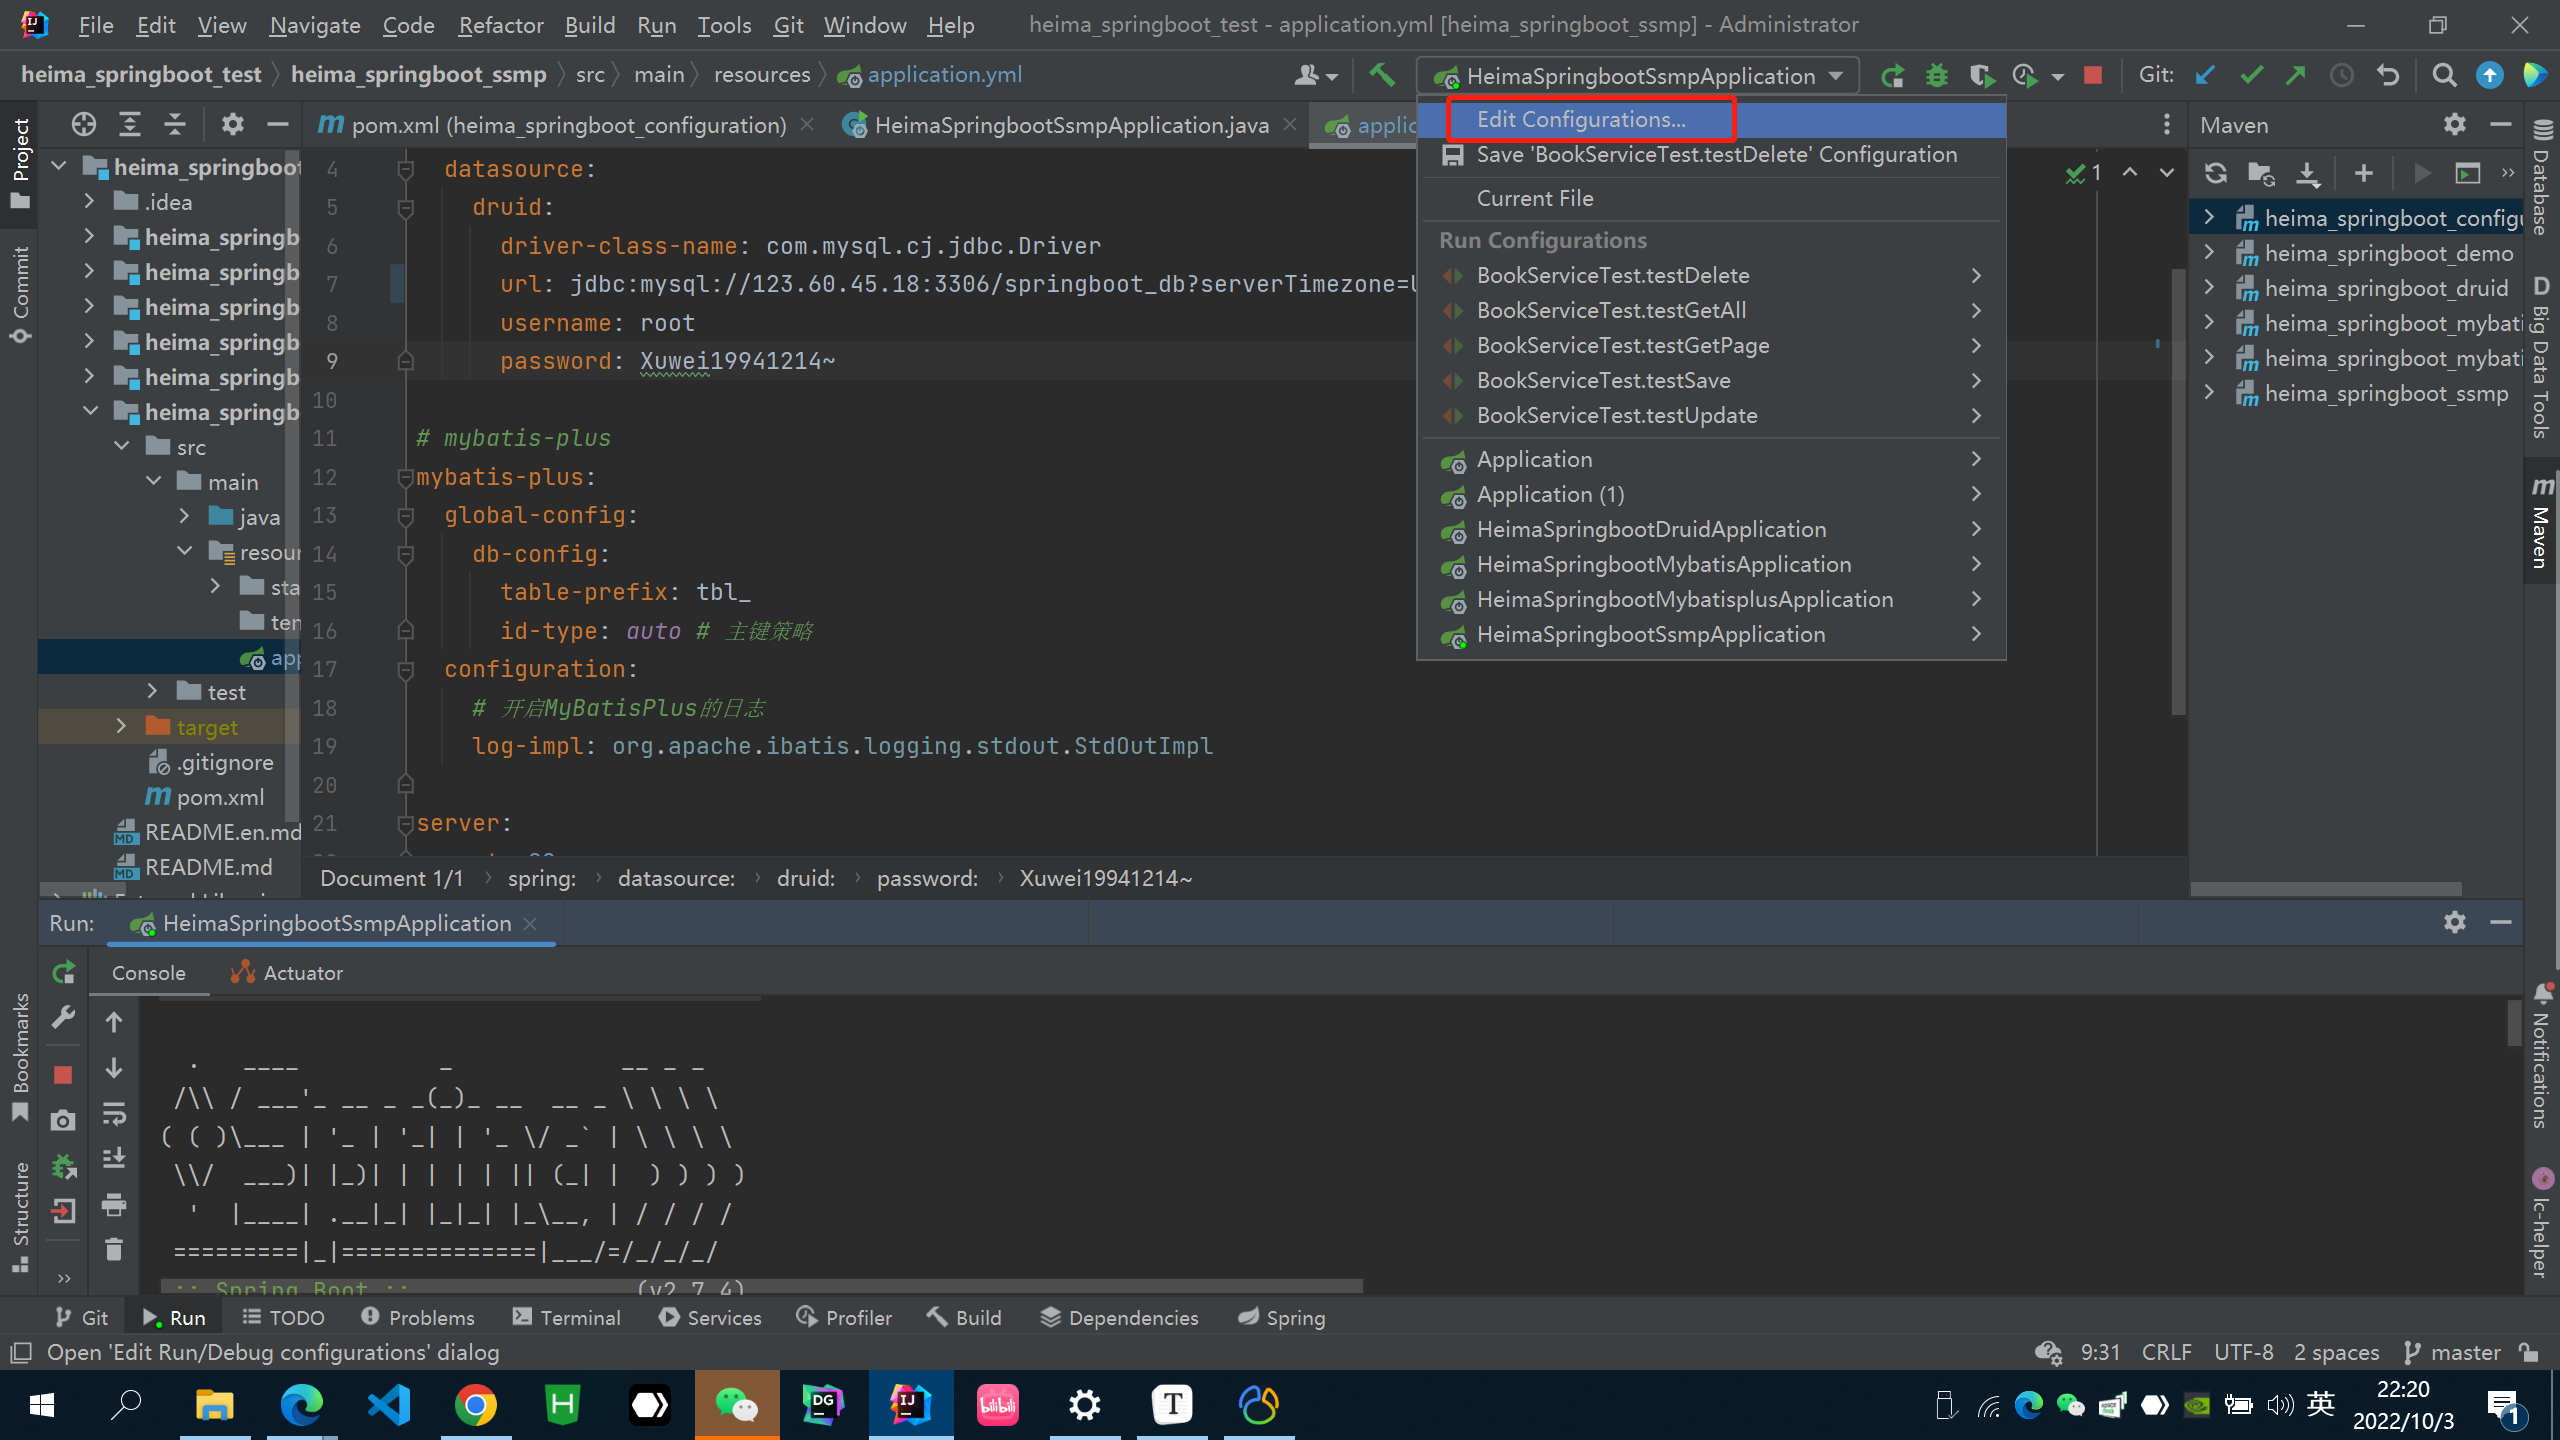
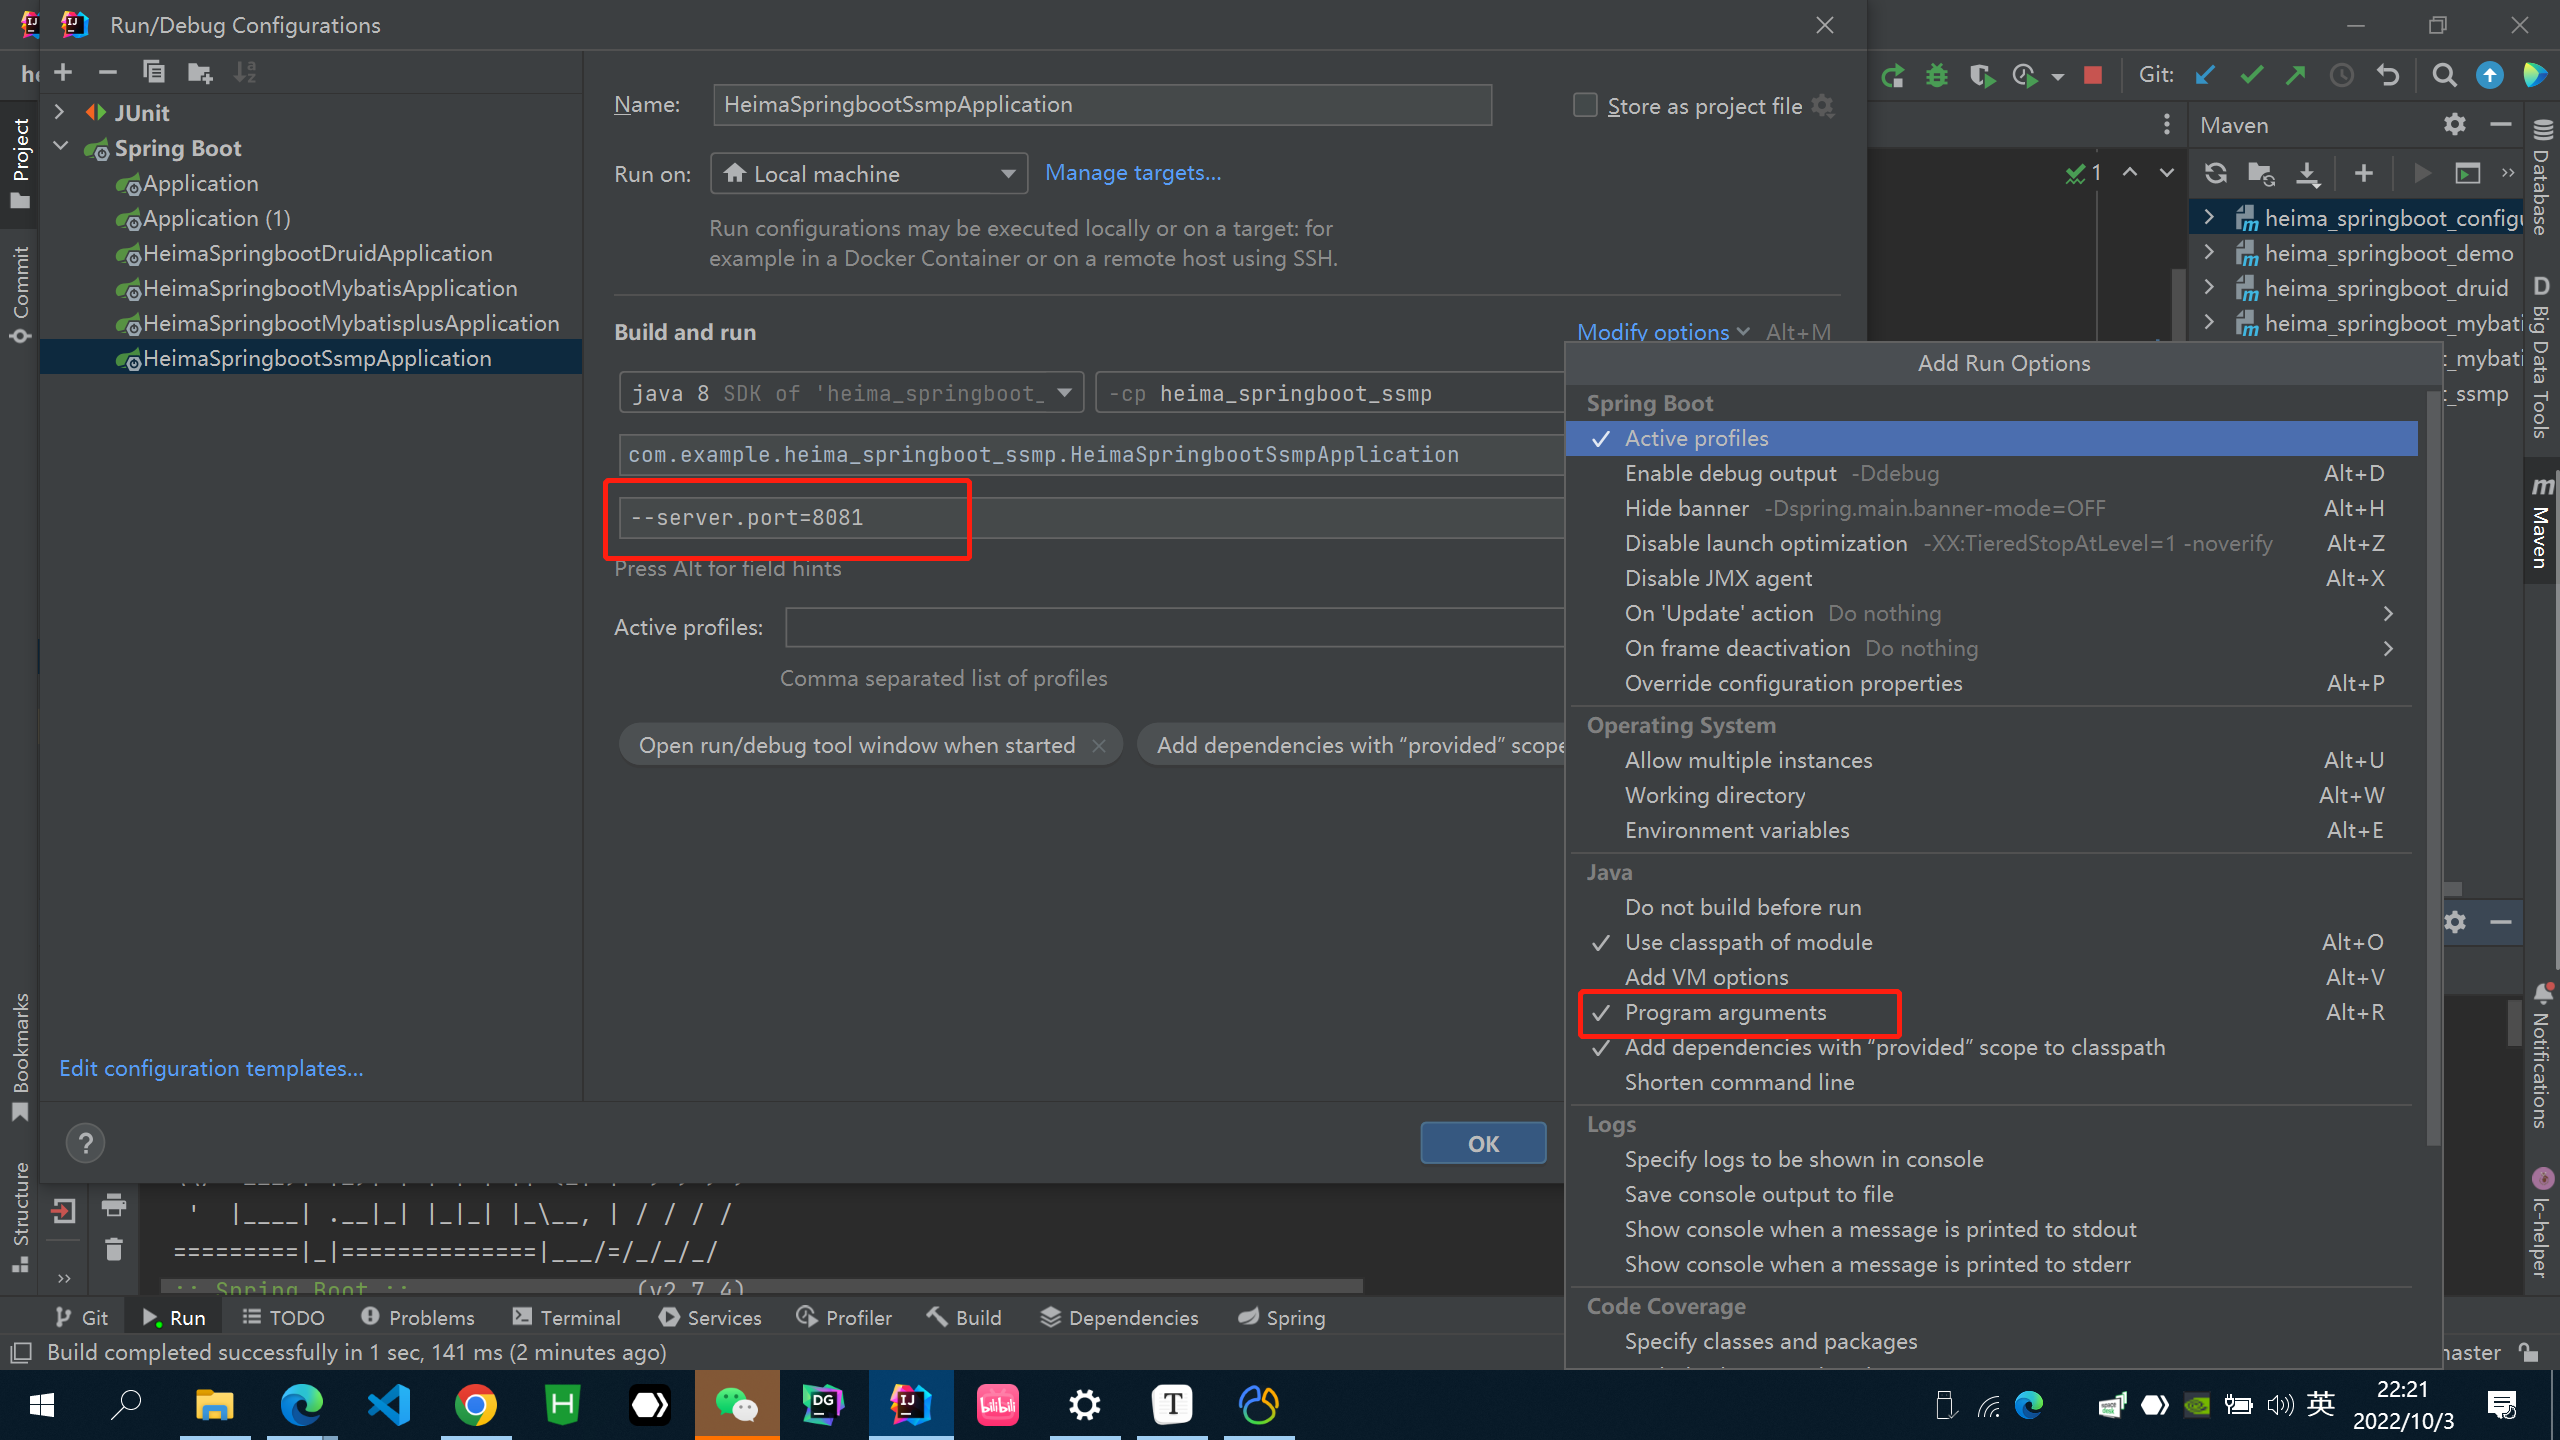
临时属性(开发环境)
带属性启动SpringBoot程序,为程序添加运行属性
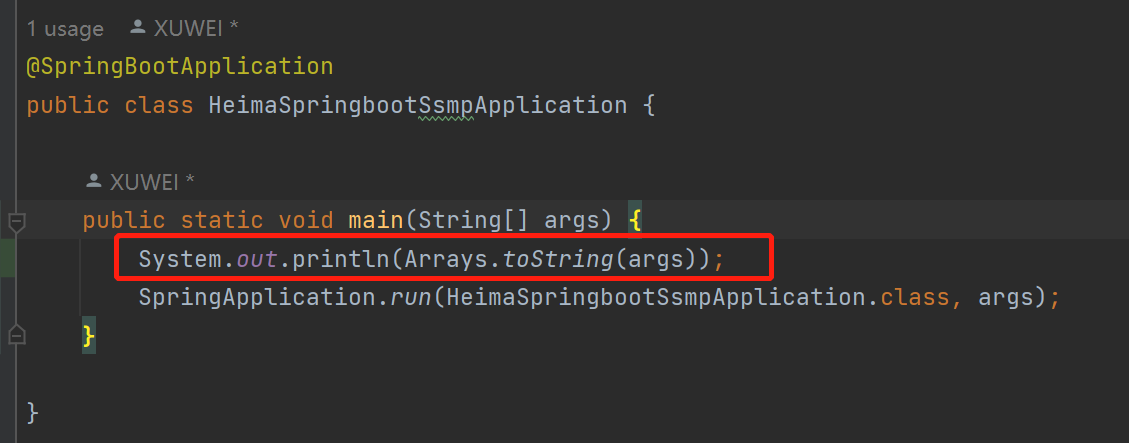
在启动类中 main 可以通过 System.out.println(Arrays.toString(args)); 查看配制的属性
通过编程形式带参数启动SpringBoot程序,为程序添加运行参数
1 2 3 4 5 public static void main (String[] args) { String[] arg = new String [1 ]; arg[0 ] = "--server.port=8080" ; SpringApplication.run(SSMPApplication.class, arg); }
1 2 3 4 public static void main (String[] args) { SpringApplication.run(SSMPApplication.class); }
小结:
启动SpringBoot程序时,可以选择是否使用命令行属性为SpringBoot程序传递启动属性
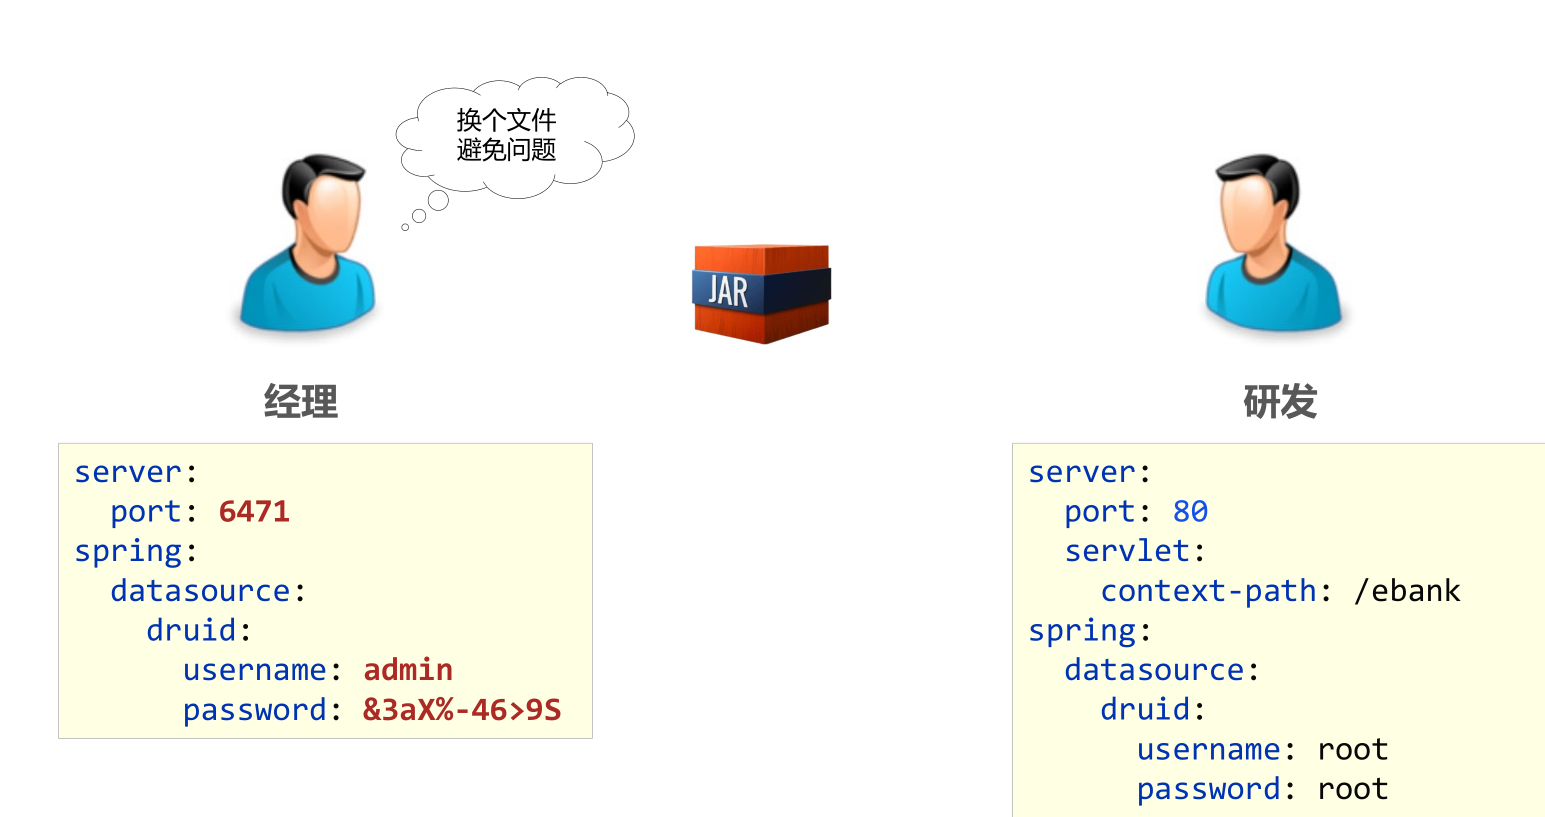
配置文件4级分类
配置文件分类
SpringBoot中4级配置文件
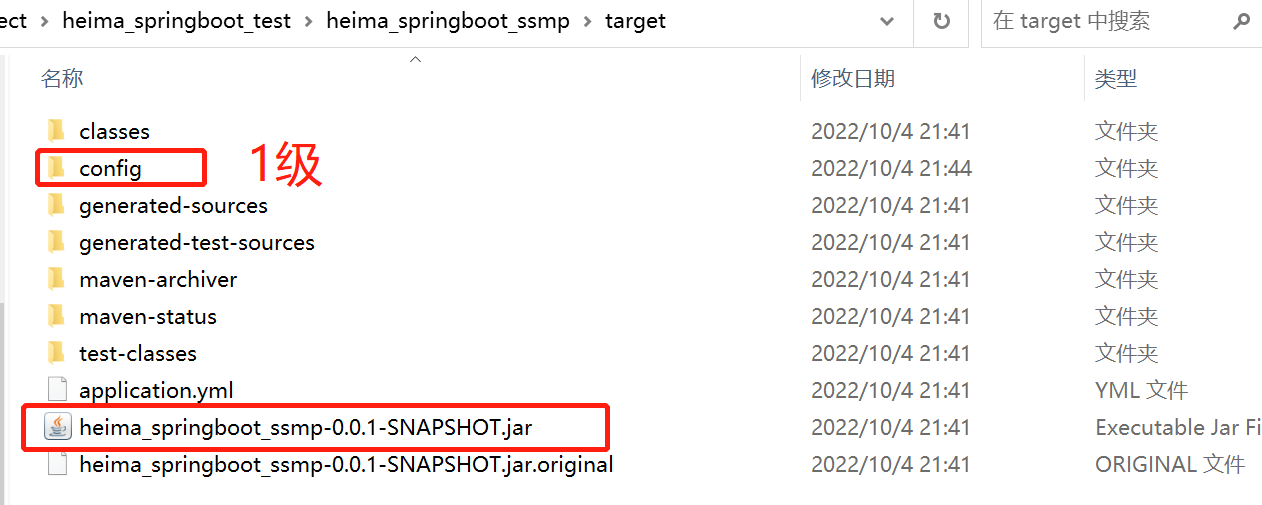
1级:file :config/application.yml 【最高】
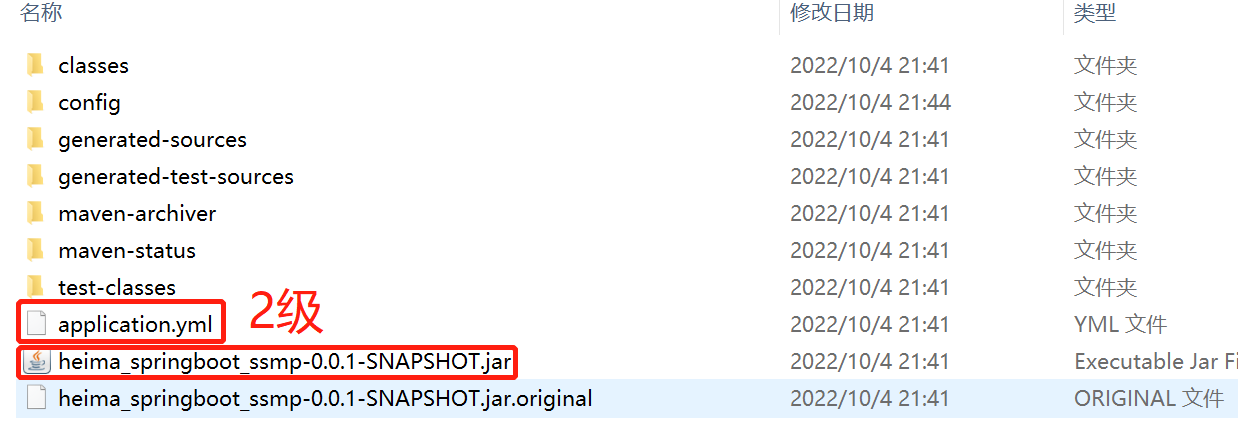
2级:file :application.yml
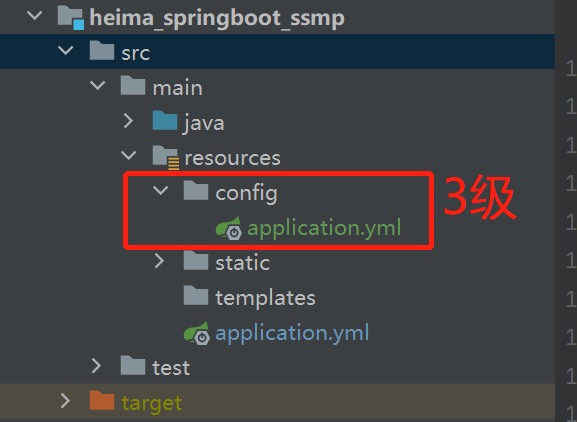
3级:classpath:config/application.yml
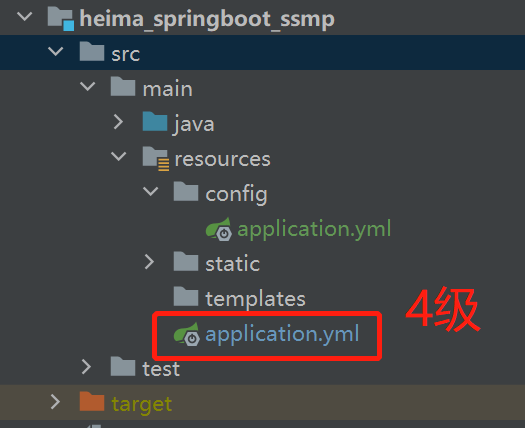
4级:classpath:application.yml 【最低】
作用:
1级与2级留做系统打包后设置通用属性,1级常用于运维经理进行线上整体项目部署方案调控
3级与4级用于系统开发阶段设置通用属性,3级常用于项目经理进行整体项目属性调控
思 考:yml与properties在不同层级中共存会是什么效果?application.properties属性是否覆盖文件系统config目录中application.yml属性properties文件的优先级大于yml文件 (properties文件会覆盖yml文件的配制)
小结:
自定义配置文件
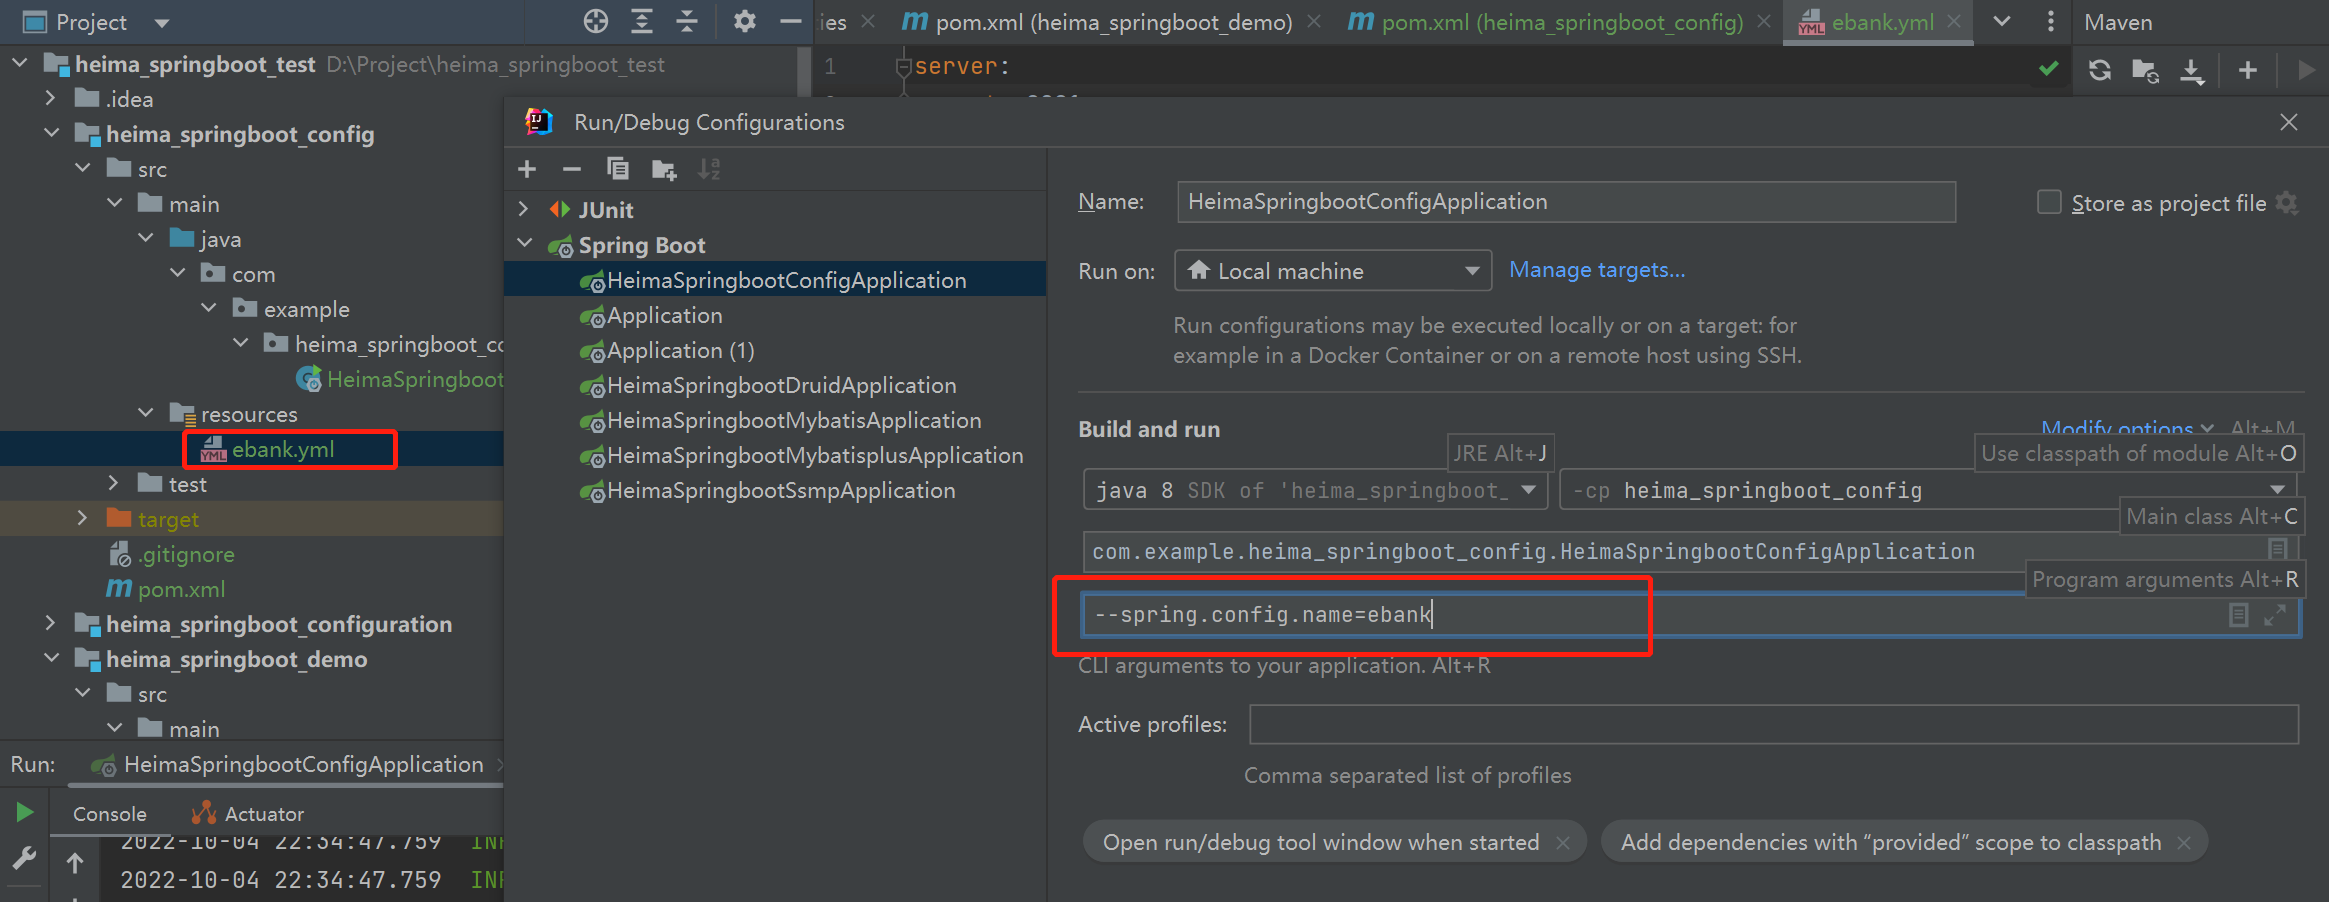
通过启动参数加载配置文件(无需书写配置文件扩展名) --spring.config.name=ebank
properties与yml文件格式均支持
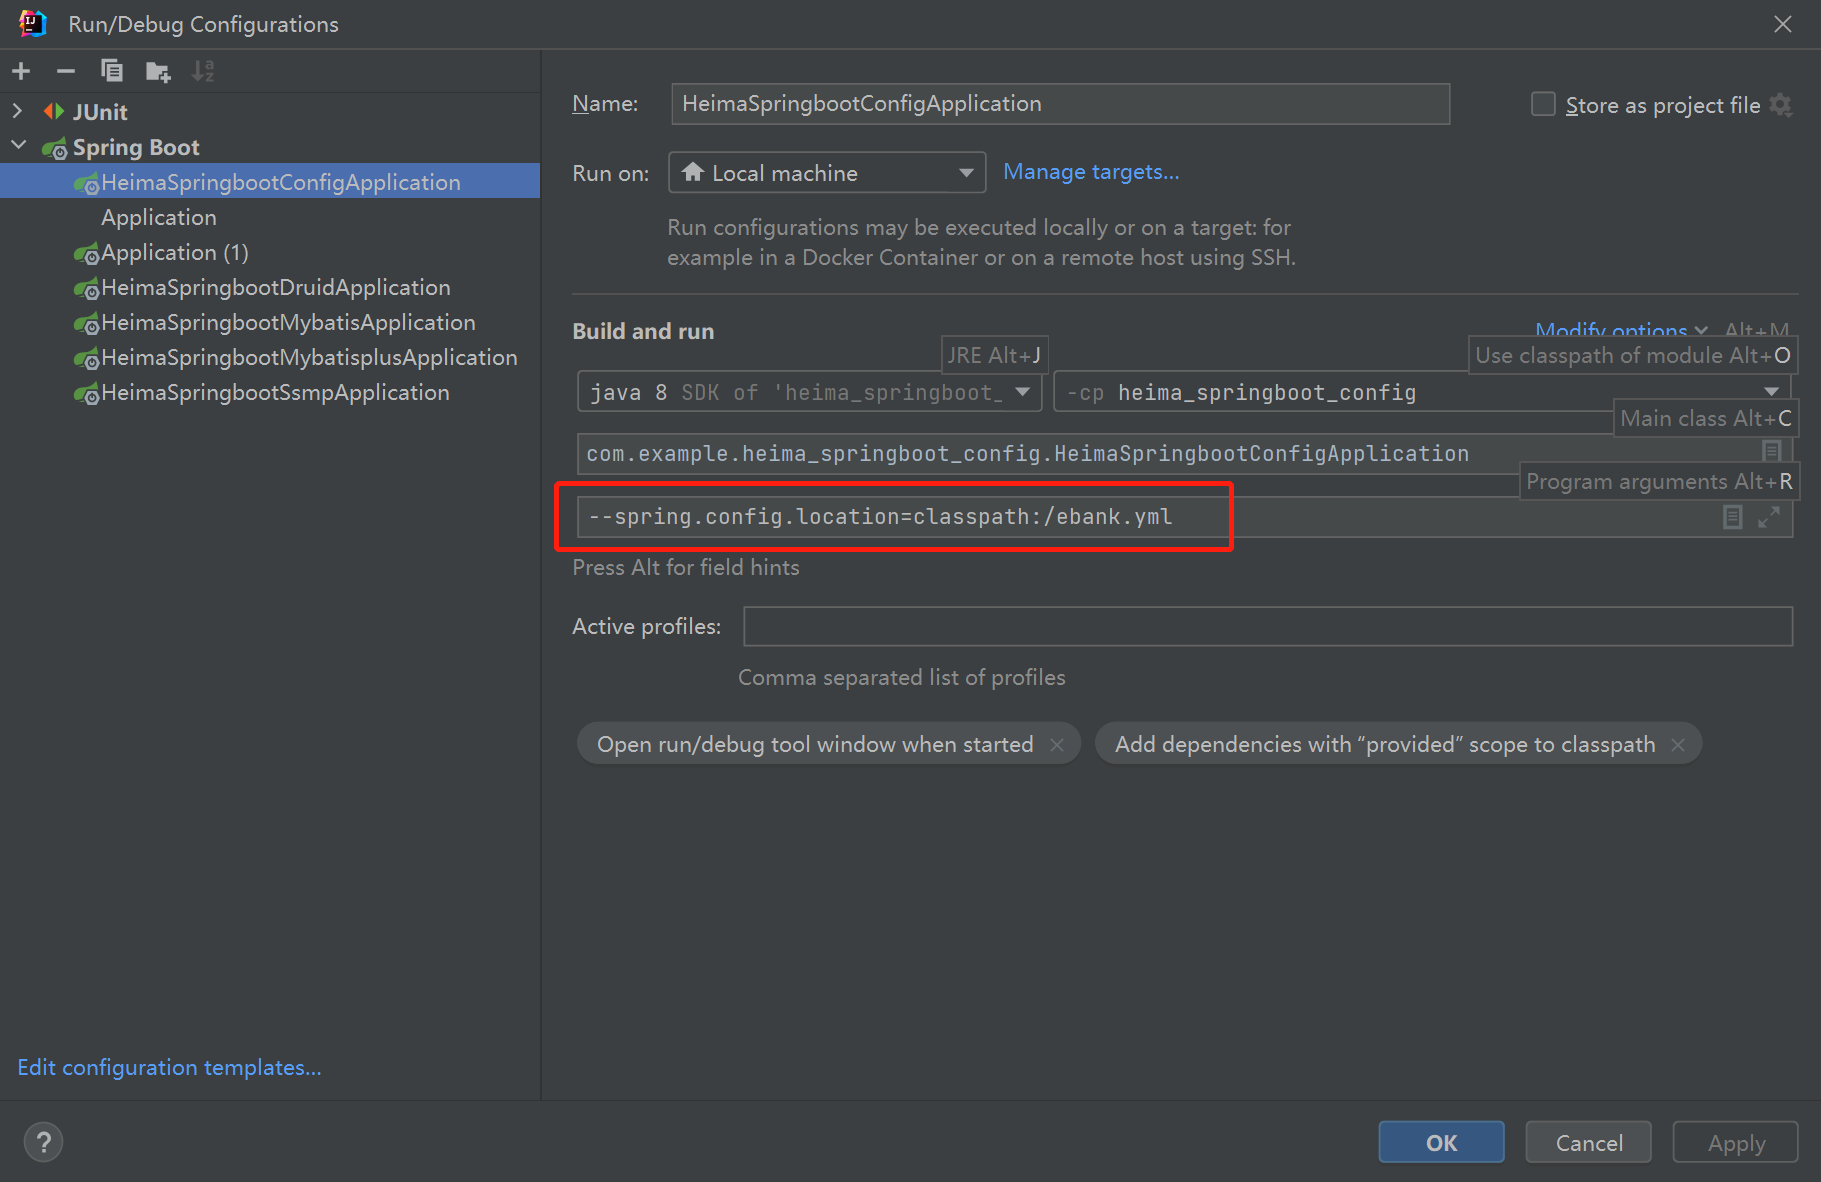
通过启动参数加载指定文件路径下的配置文件 --spring.config.location=classpath:/ebank.yml
properties与yml文件格式均支持
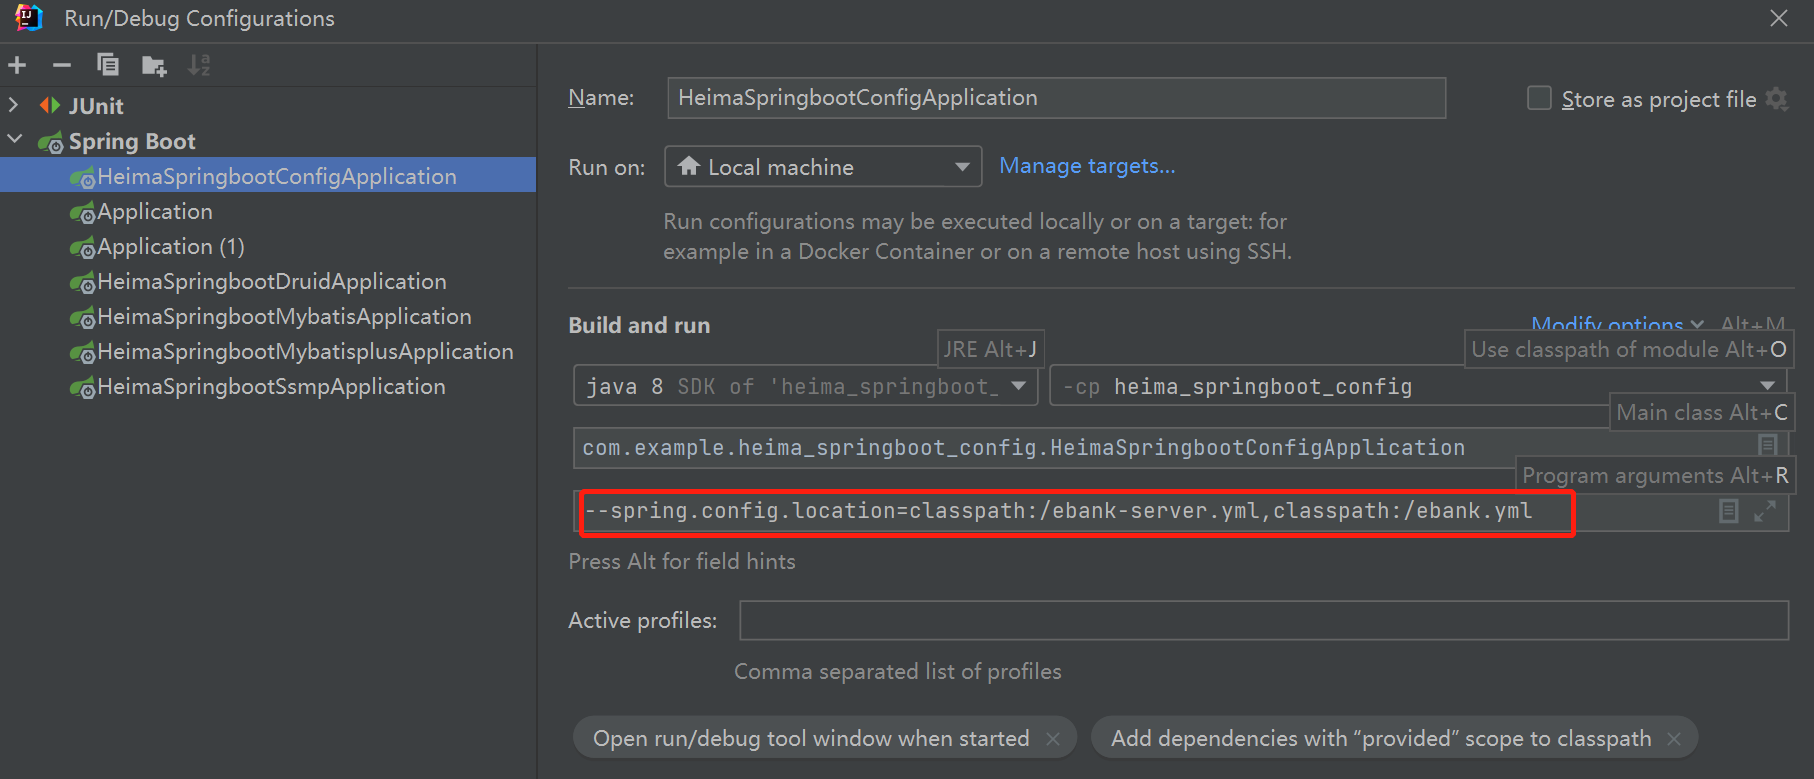
通过启动参数加载指定文件路径下的配置文件时可以加载多个配置,后面的会覆盖前面的
1 --spring.config.location=classpath:/ebank.yml,classpath:/ebank-server.yml
注意事项:
自定义配置文件——重要说明
单服务器项目:使用自定义配置文件需求较低
多服务器项目:使用自定义配置文件需求较高,将所有配置放置在一个目录中,统一管理
基于SpringCloud技术,所有的服务器将不再设置配置文件,而是通过配置中心进行设定,动态加载配置信息
小结:
配置文件可以修改名称,通过启动参数设定
配置文件可以修改路径,通过启动参数设定
微服务开发中配置文件通过配置中心进行设置
总结:
SpringBoot在开发和运行环境均支持使用临时参数修改工程配置
SpringBoot支持4级配置文件,应用于开发与线上环境进行配置的灵活设置
SpringBoot支持使用自定义配置文件的形式修改配置文件存储位置
基于微服务开发时配置文件将使用配置中心进行管理
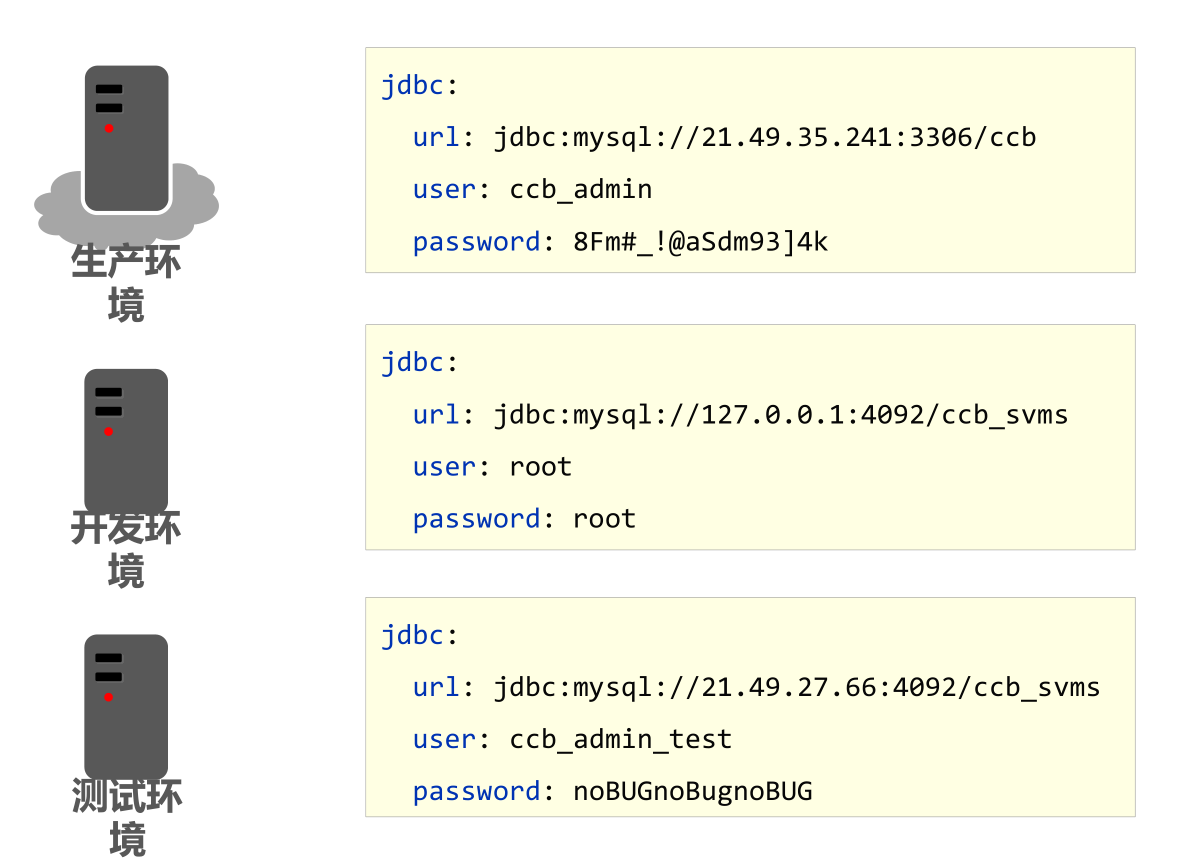
多环境开发 多环境开发(yaml版) 多环境
多环境开发(YAML版)
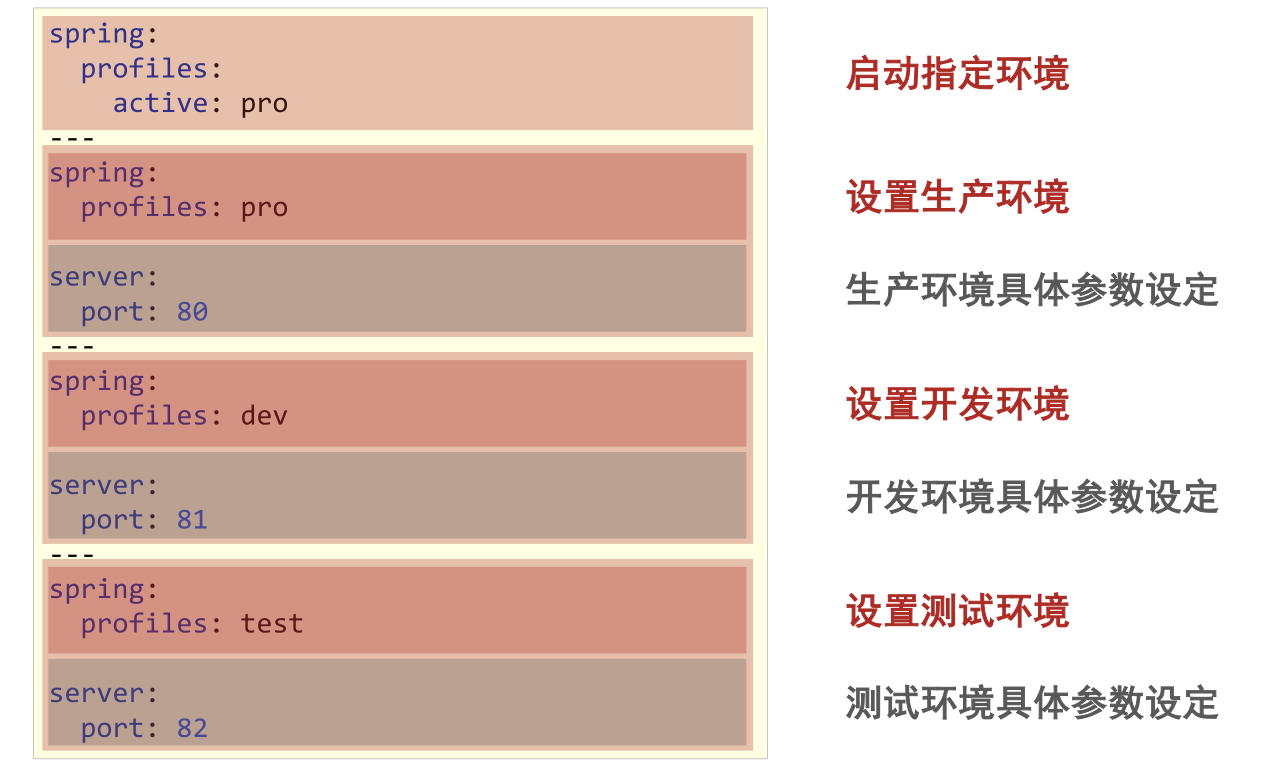
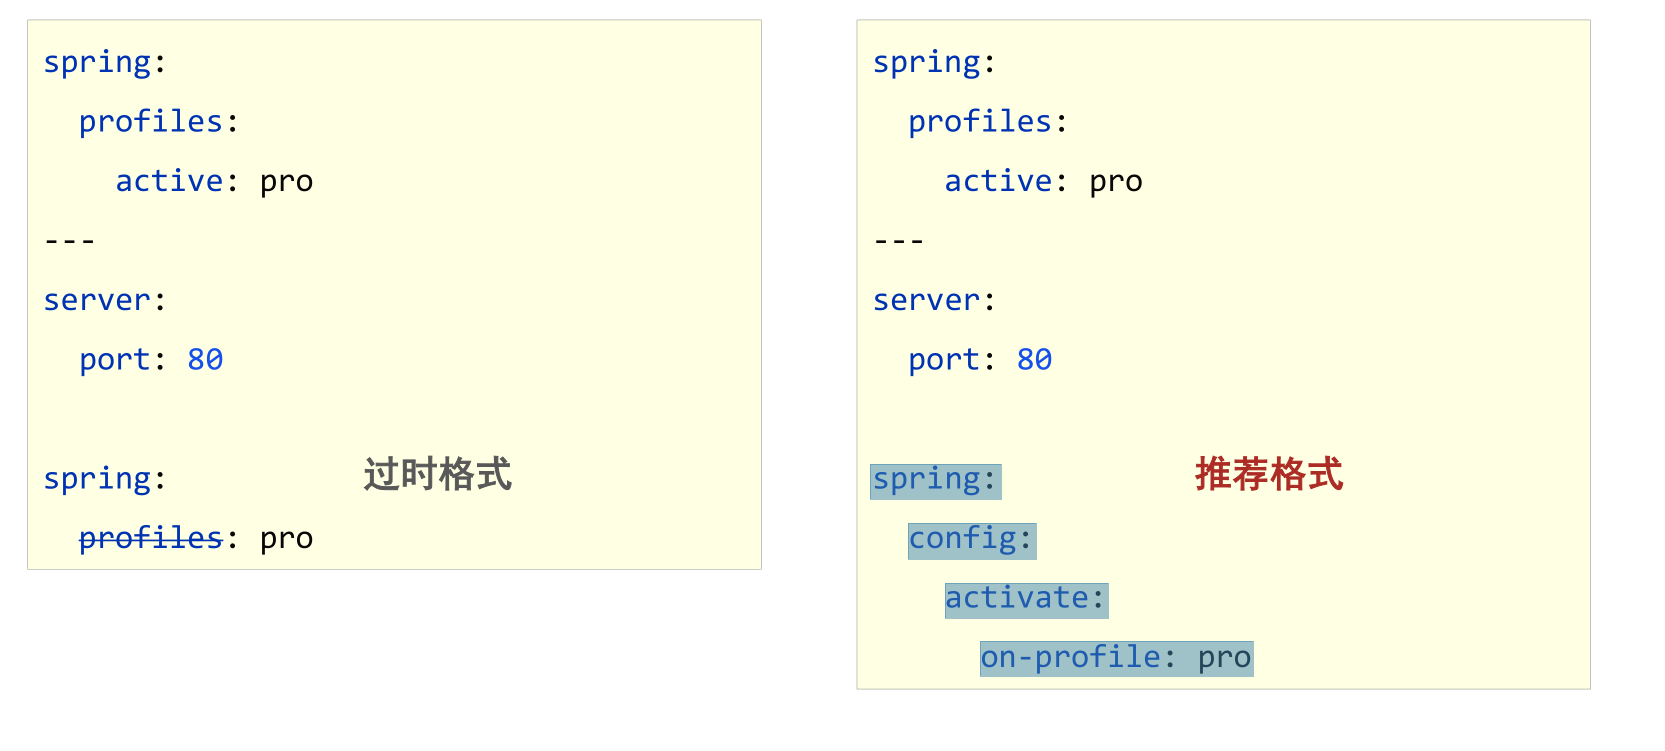
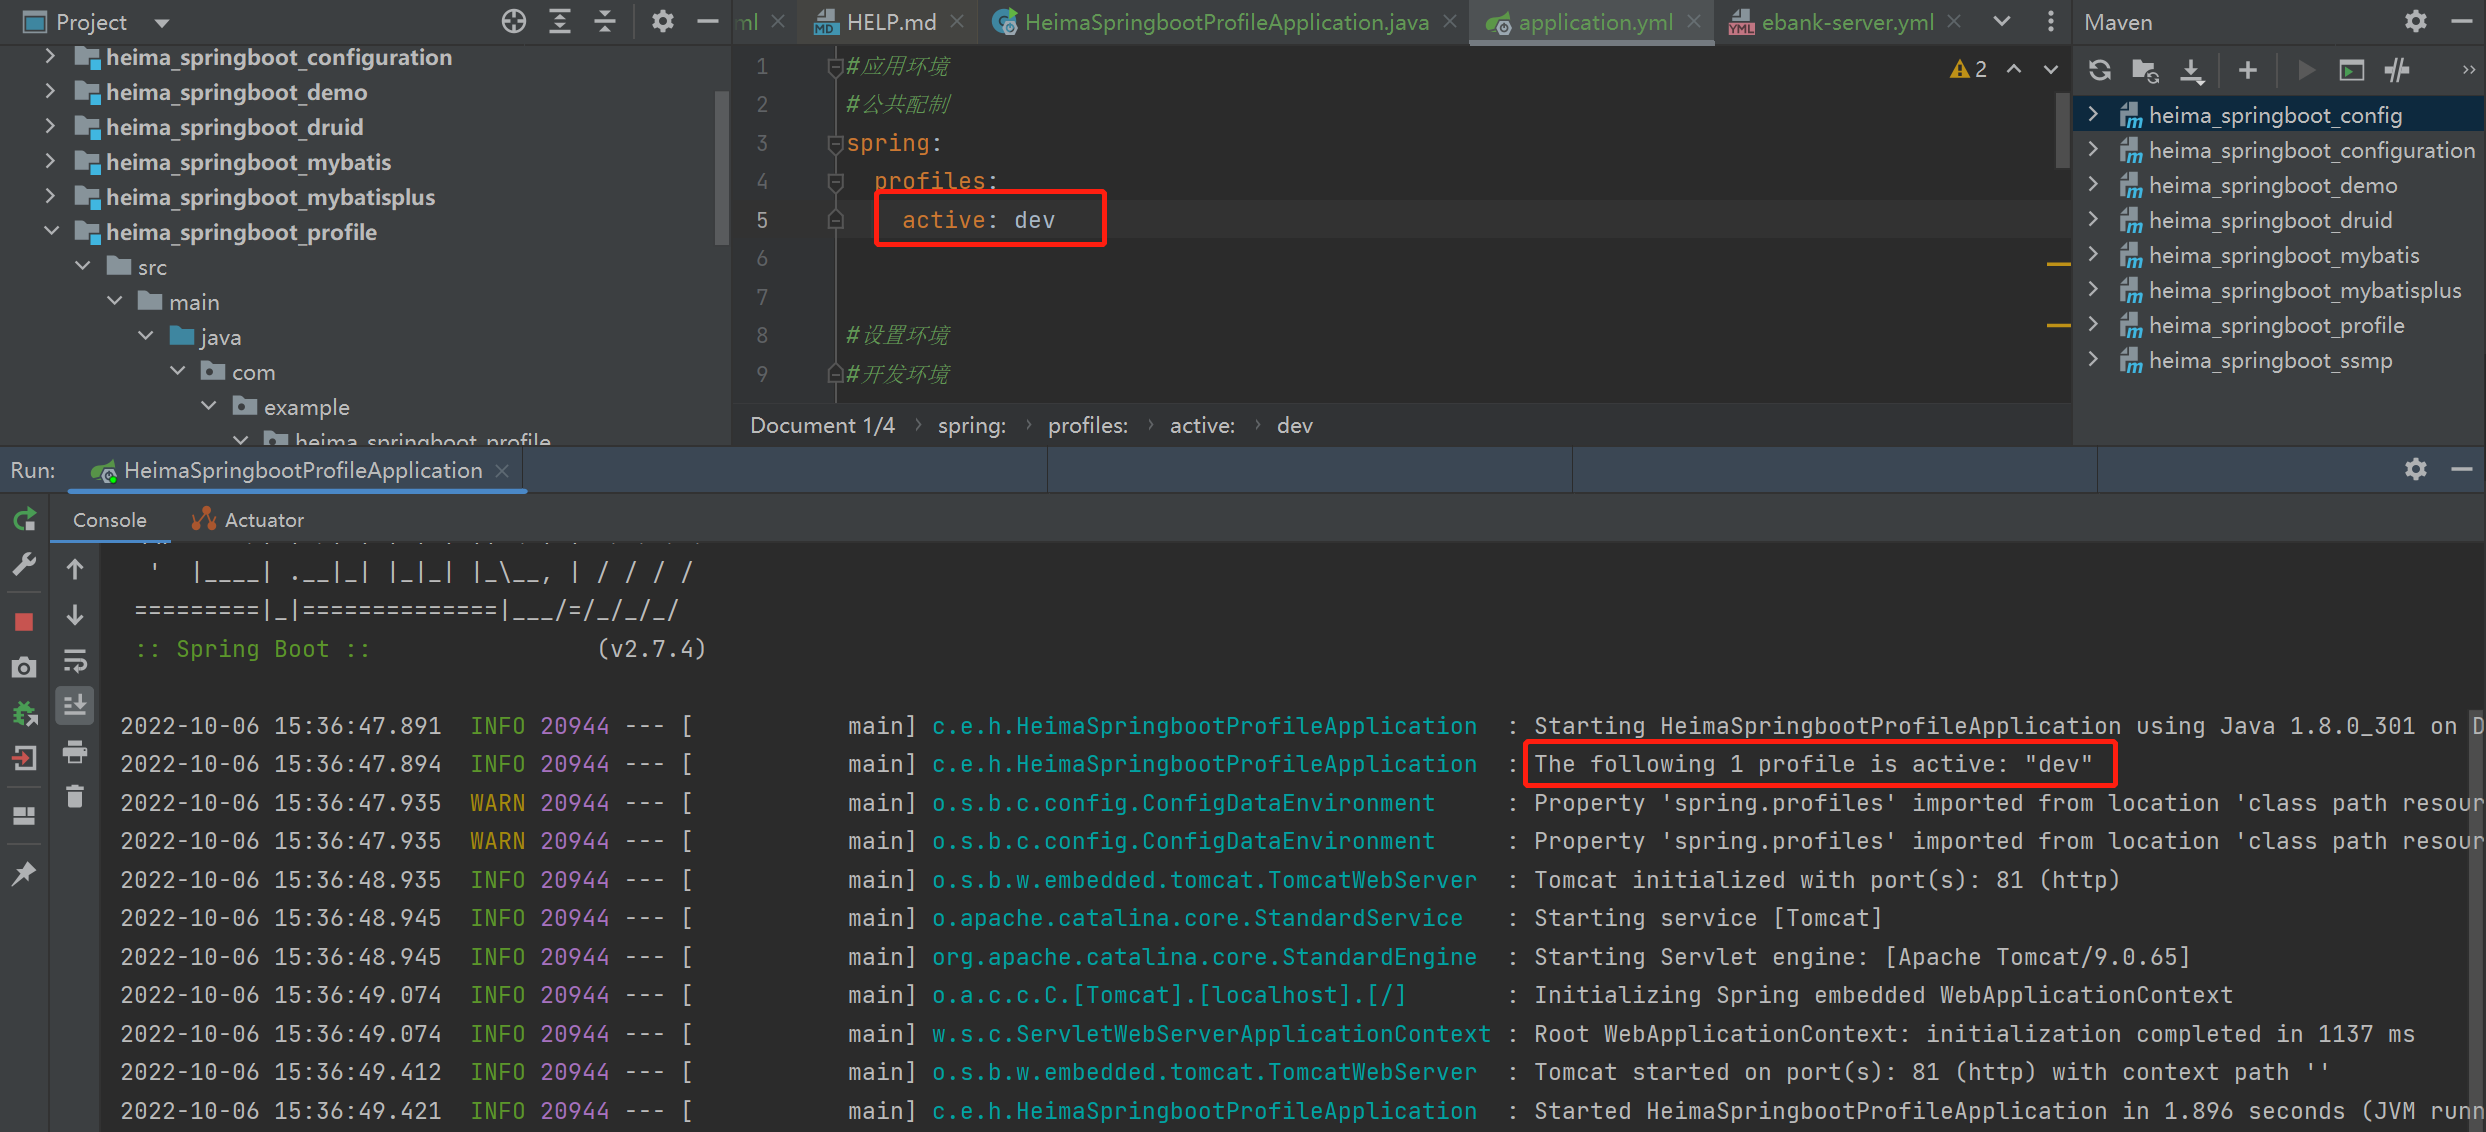
1 2 3 4 5 6 7 8 9 10 11 12 13 14 15 16 17 18 19 20 21 22 23 24 25 26 27 28 29 30 31 spring: profiles: active: dev --- spring: config: activate: on-profile: dev server: port: 81 --- spring: profiles: pro server: port: 80 --- spring: profiles: test server: port: 82
小结:
多环境开发需要设置若干种常用环境,例如开发、生产、测试环境
yaml格式中设置多环境使用—区分环境设置边界每种环境的区别在于加载的配置属性不同
启用某种环境时需要指定启动时使用该环境
多环境开发多文件版(yaml版)
多环境开发(yaml版)多配置文件格式
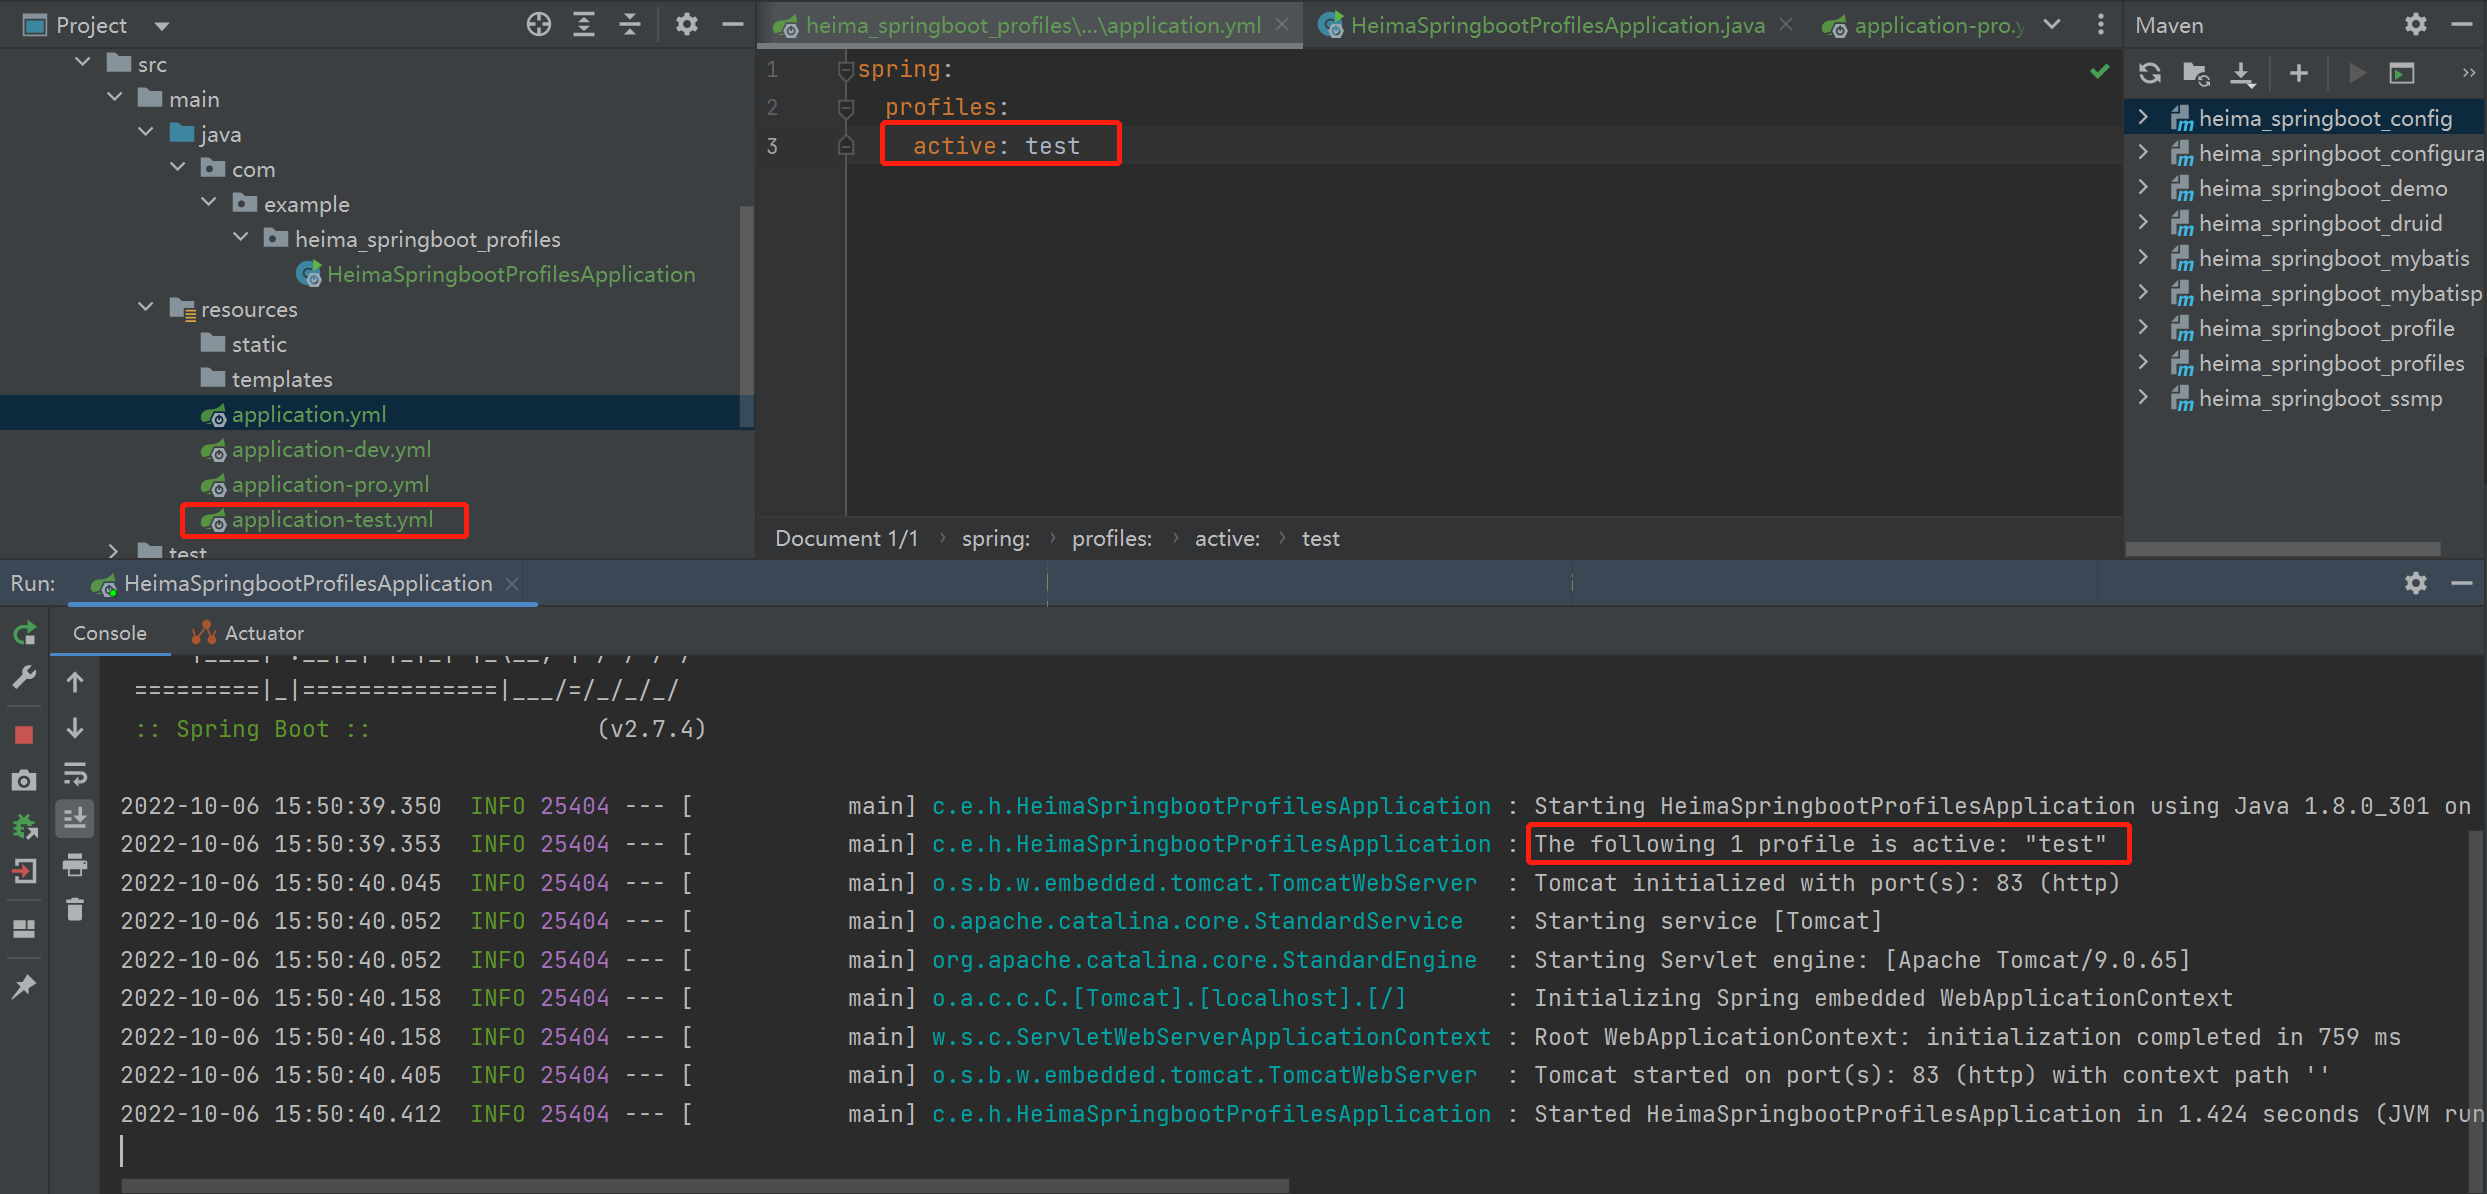
主启动配置文件application.yml
1 2 3 4 5 spring: profiles: active: test
环境分类配置文件application-pro.yml
环境分类配置文件application-dev.yml
环境分类配置文件application-test.yml
多环境开发配置文件书写技巧(一)
主配置文件中设置公共配置(全局)
环境分类配置文件中常用于设置冲突属性(局部)
小结:
可以使用独立配置文件定义环境属性
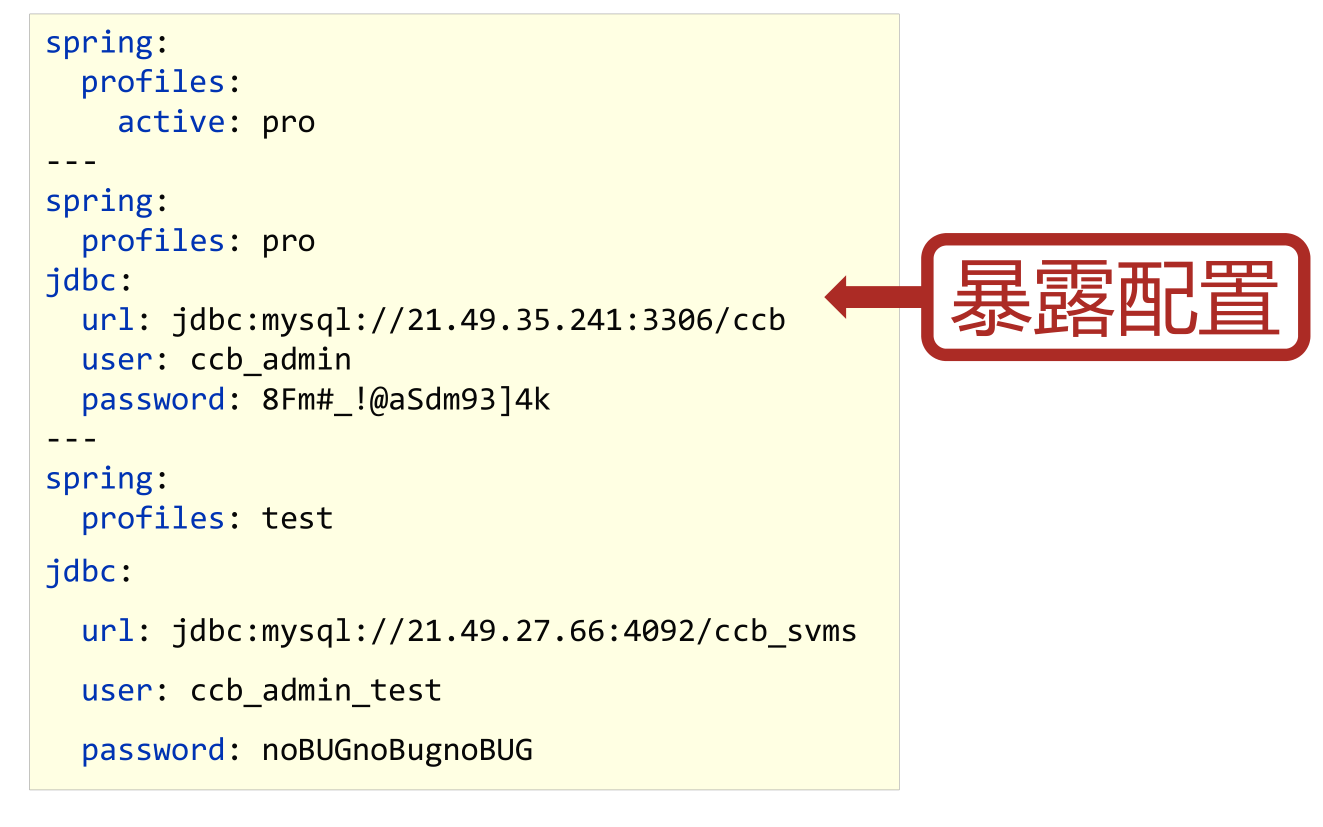
独立配置文件便于线上系统维护更新并保障系统安全性
多环境开发多文件版(properties版)
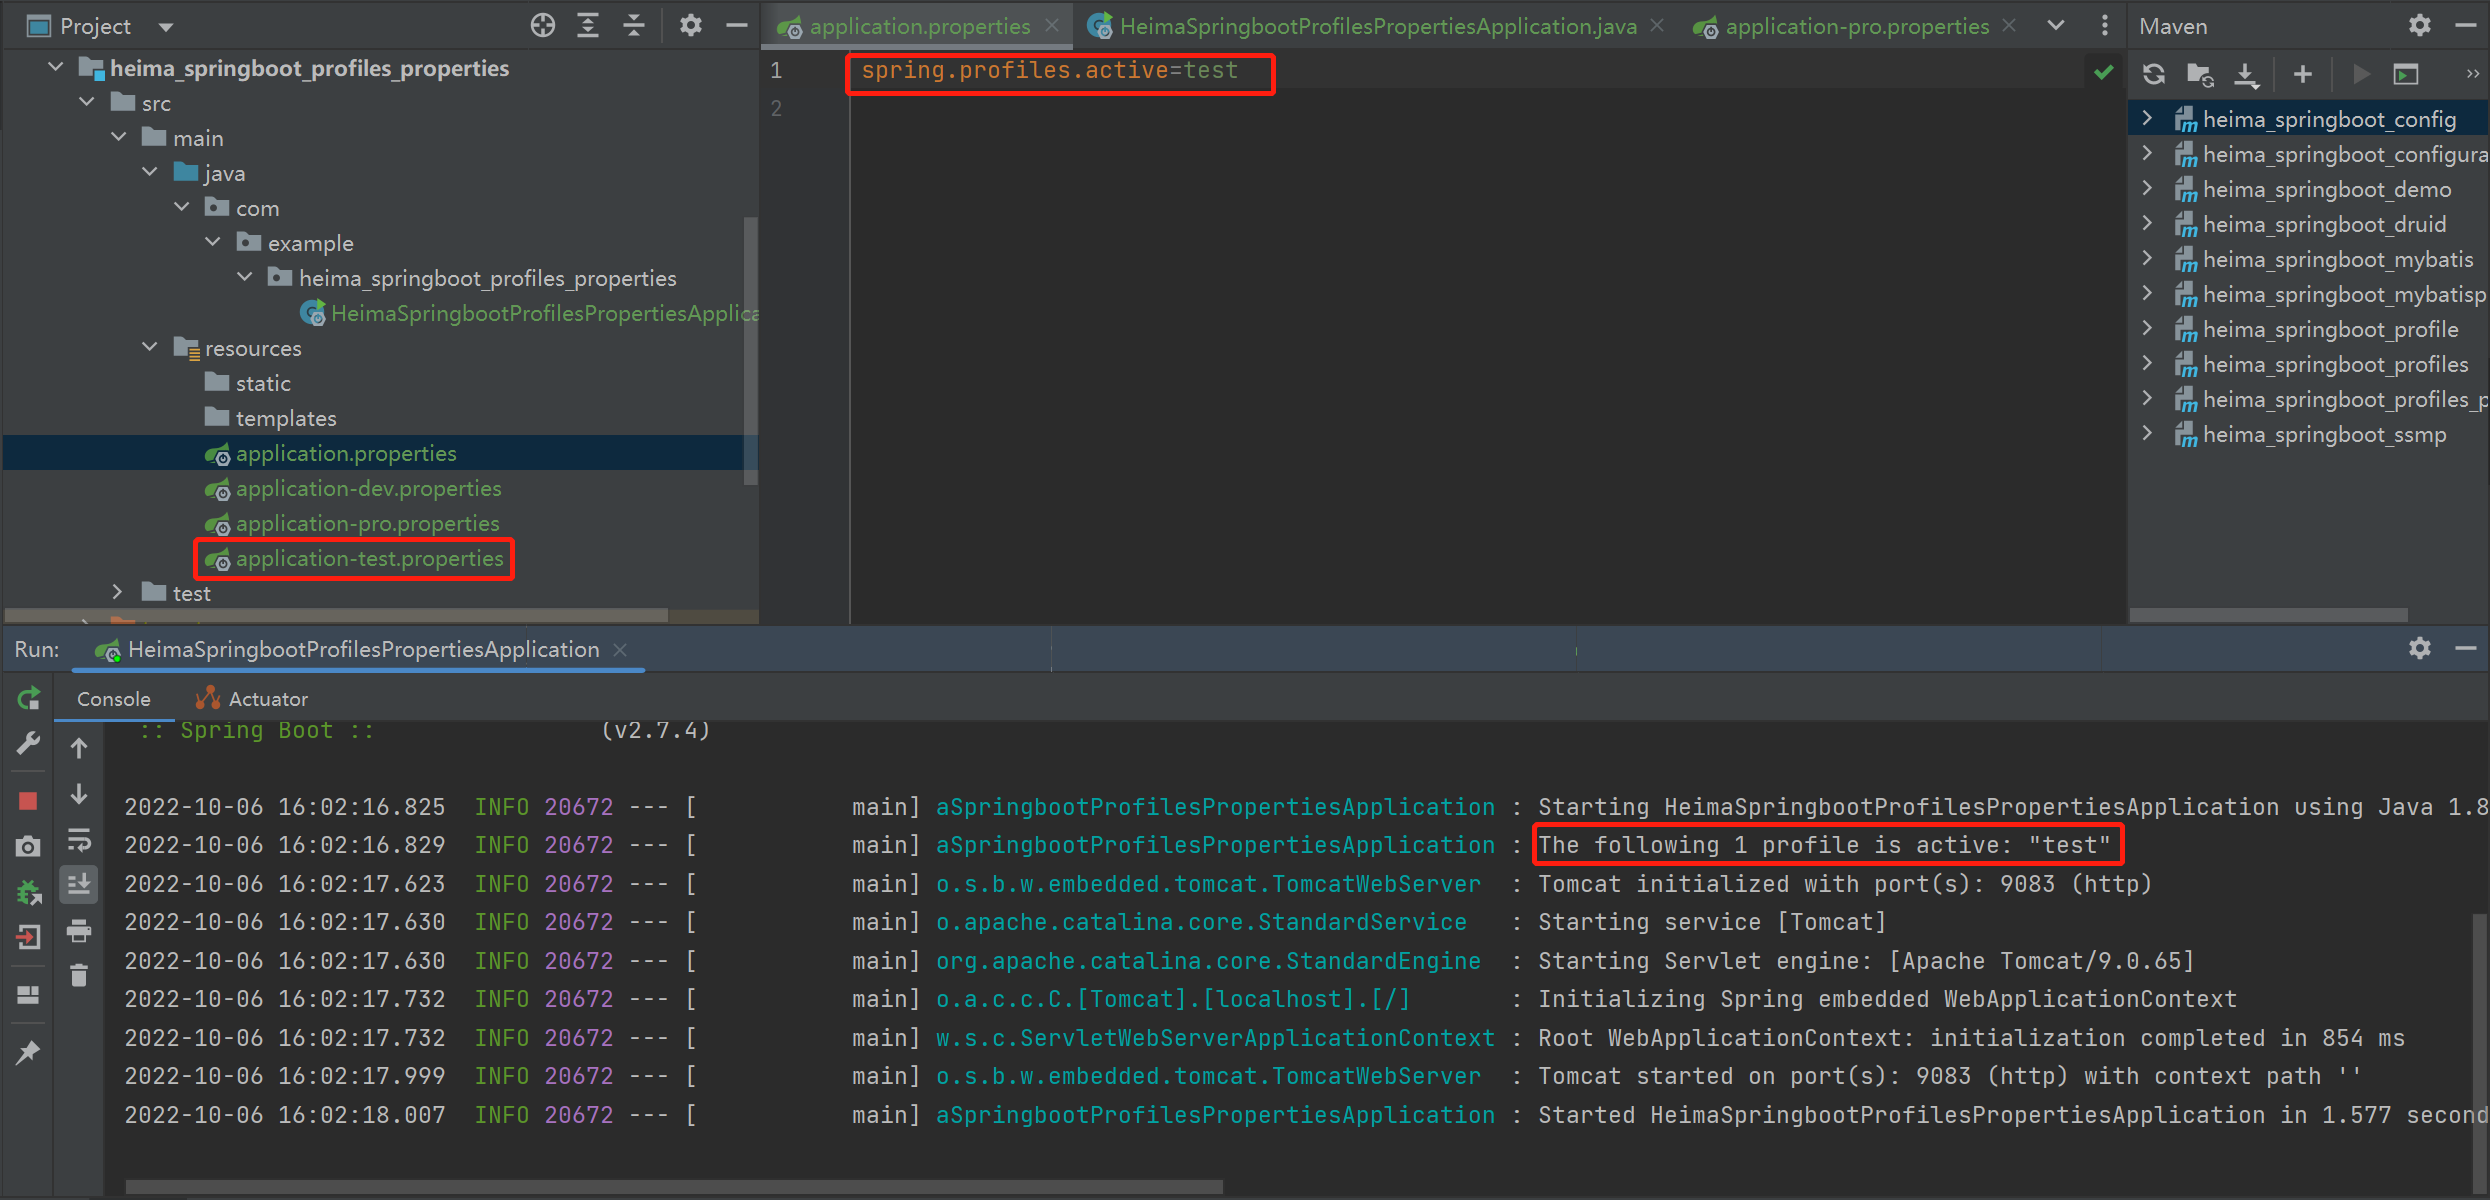
主启动配置文件application.properties
1 spring.profiles.active =dev
环境分类配置文件application-pro.properties
环境分类配置文件application-dev.properties
环境分类配置文件application-test.properties
小结:
properties文件多环境配置仅支持多文件格式
多环境分组管理 多环境开发独立配置文件书写技巧(二) 根据功能对配置文件中的信息进行拆分,并制作成独立的配置文件,命名规则如下
1 2 3 4 spring: profiles: active: dev include: devDB,devMVC
注意事项:当主环境dev与其他环境有相同属性时,主环境属性生效;其他环境中有相同属性时,最后加载的环境属性生效
1 The following profiles are active: devDB,devMVC,dev
从Spring2.4版开始使用group属性替代include属性,降低了配置书写量
使用group属性定义多种主环境与子环境的包含关系
1 2 3 4 5 6 7 spring : profiles : active : dev group : "dev" : devDB,devMVC "pro" : proDB,proMVC "test" : testDB,testRedis,testMVC
注意事项:使用group属性,会覆盖 主环境dev (active) 的内容,最后加载的环境属性生效
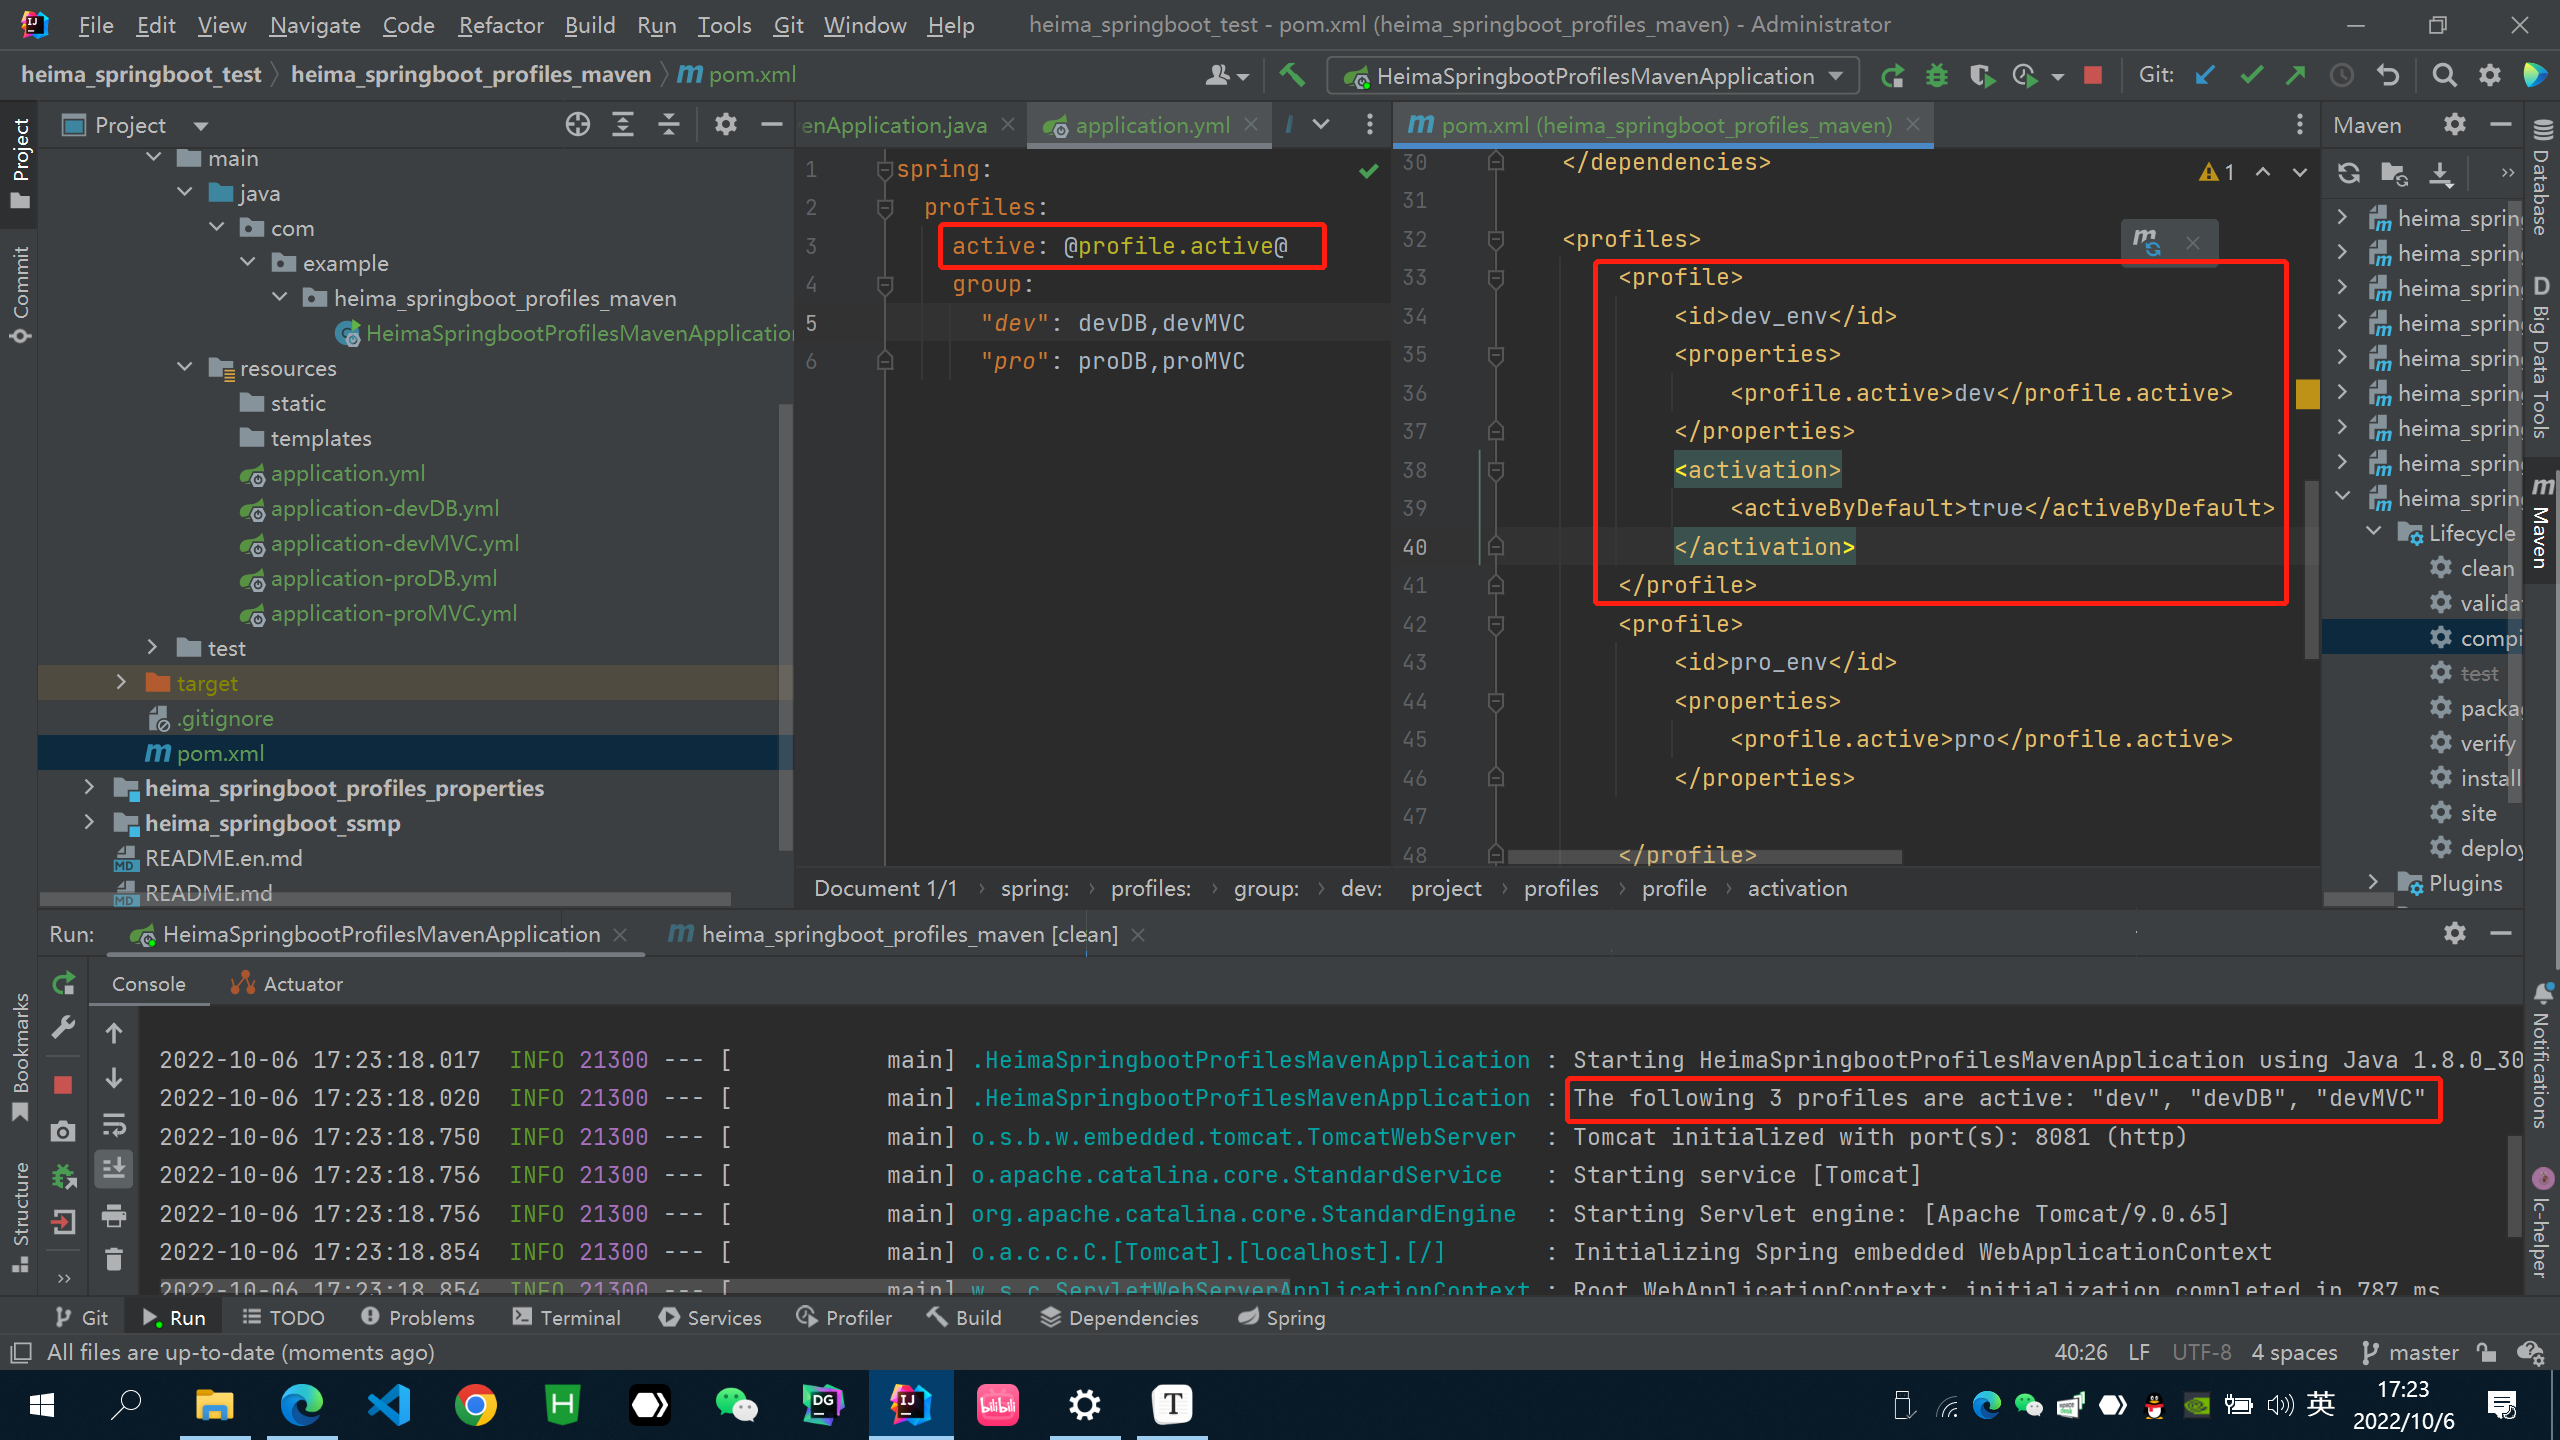
1 The following profiles are active: dev,devDB,devMVC
小结:
多环境开发使用group属性设置配置文件分组,便于线上维护管理
多环境开发控制
Maven与SpringBoot多环境兼容
①:Maven中设置多环境属性
1 2 3 4 5 6 7 8 9 10 11 12 13 14 15 16 17 18 19 20 21 22 23 24 25 26 <profiles > <profile > <id > dev_env</id > <properties > <profile.active > dev</profile.active > </properties > <activation > <activeByDefault > true</activeByDefault > </activation > </profile > <profile > <id > pro_env</id > <properties > <profile.active > pro</profile.active > </properties > </profile > <profile > <id > test_env</id > <properties > <profile.active > test</profile.active > </properties > </profile > </profiles >
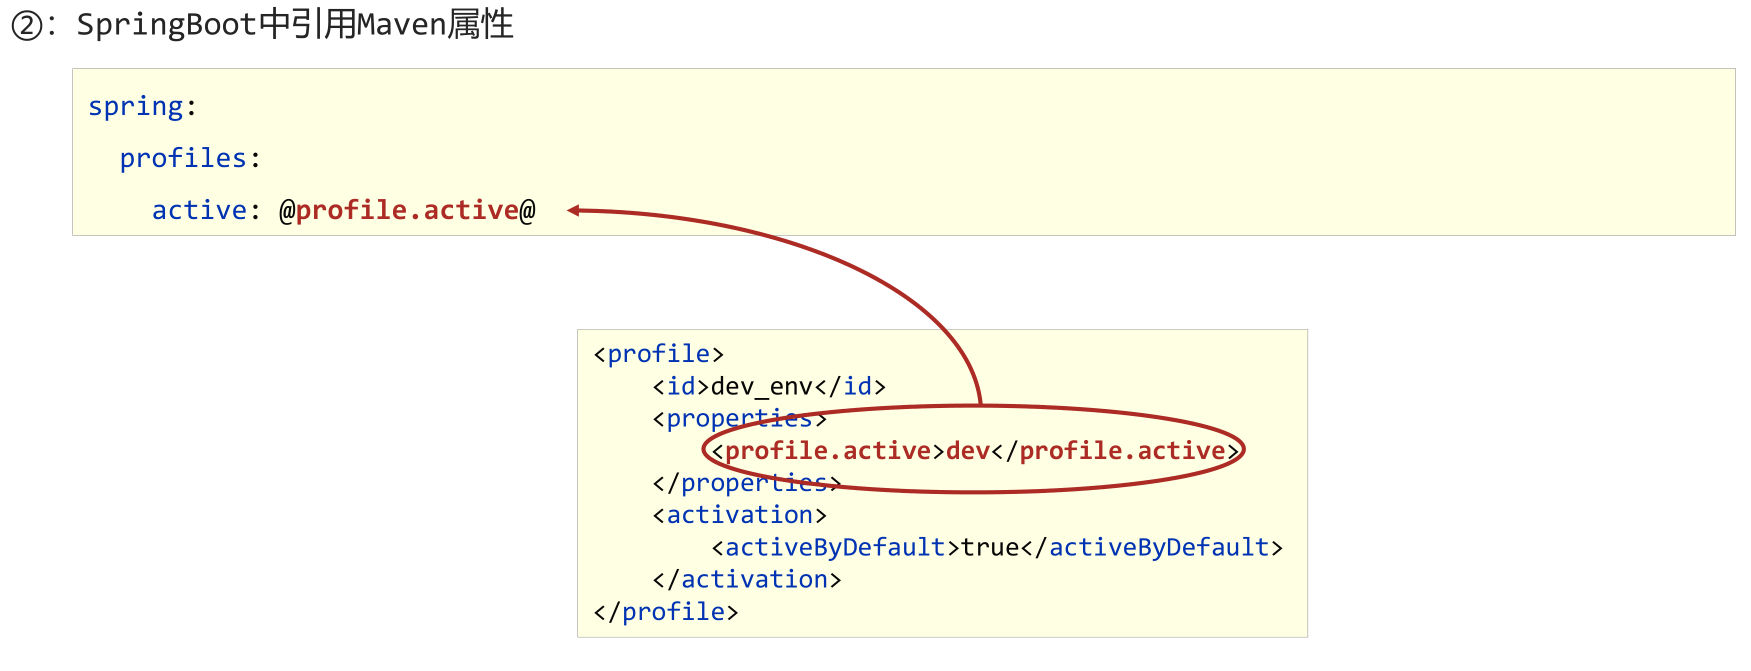
②:SpringBoot中引用Maven属性
1 2 3 4 5 6 spring: profiles: active: @profile.active@ group: "dev": devDB,devMVC "pro": proDB,proMVC
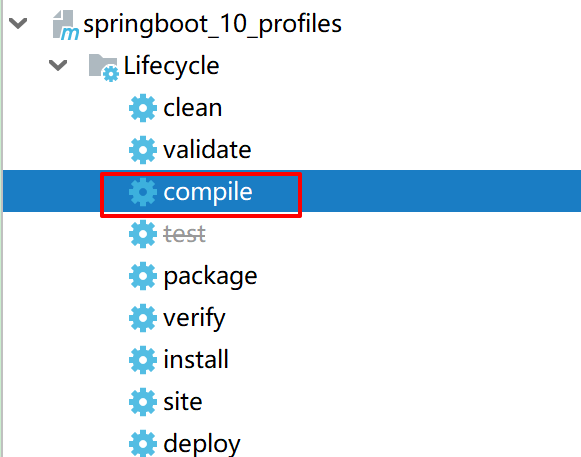
③:执行Maven打包指令,并在生成的boot打包文件.jar文件中查看对应信息修改pom.xml 文件后,启动没有生效 手动 compile 即可
或者 设置 IDEA进行自动编译
小结:
总结:
多环境开发(YAML版)
多环境开发(Properties版)
Maven与SpringBoot多环境冲突现象解决方案
日志 日志基础操作 日志(log)作用
编程期调试代码
运营期记录信息
记录日常运营重要信息(峰值流量、平均响应时长……)
记录应用报错信息(错误堆栈)
记录运维过程数据(扩容、宕机、报警……)
代码中使用日志工具记录日志
1 2 3 4 5 <dependency > <groupId > org.projectlombok</groupId > <artifactId > lombok</artifactId > </dependency >
①:添加日志记录操作
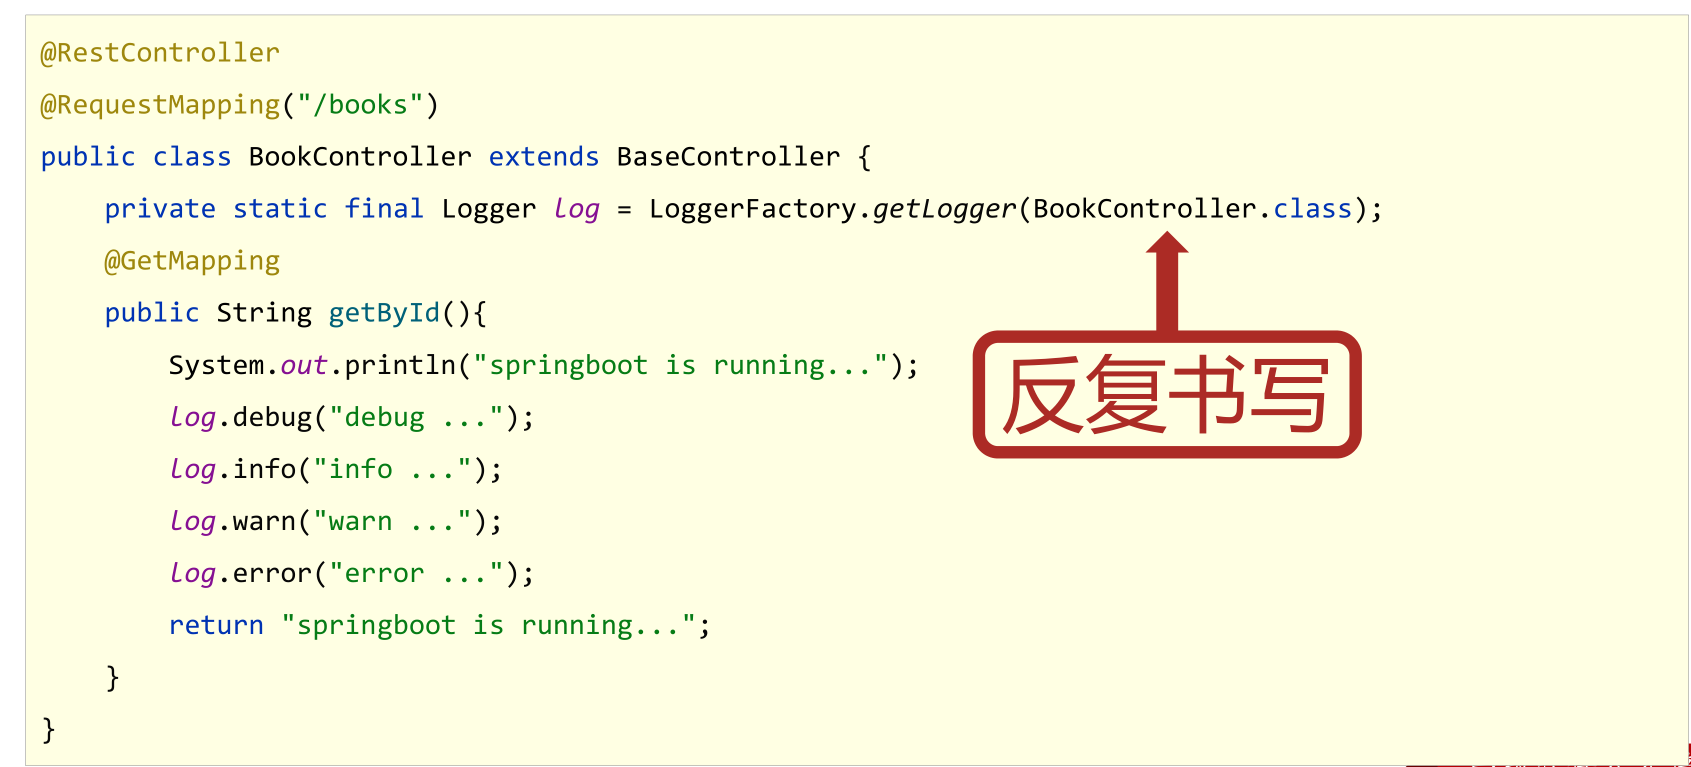
1 2 3 4 5 6 7 8 9 10 11 12 13 14 15 @RestController @RequestMapping("/books") public class BookController { private static final Logger log = LoggerFactory.getLogger(BookController.class); @GetMapping public String getById () { System.out.println("springboot is running..." ); log.debug("debug ..." ); log.info("info ..." ); log.warn("warn ..." ); log.error("error ..." ); return "springboot is running..." ; } }
日志级别
TRACE:运行堆栈信息,使用率低
DEBUG:程序员调试代码使用
INFO:记录运维过程数据
WARN:记录运维过程报警数据
ERROR:记录错误堆栈信息
FATAL:灾难信息,合并计入ERROR
②:设置日志输出级别
1 2 3 4 5 6 debug: true logging: level: root: debug
③:设置日志组,控制指定包对应的日志输出级别,也可以直接控制指定包对应的日志输出级别
1 2 3 4 5 6 7 8 9 10 11 12 13 logging: group: ebank: com.example.controller,com.example.service,com.example.dao iservice: com.alibaba level: root: info ebank: warn
小结:
日志用于记录开发调试与运维过程消息
日志的级别共6种,通常使用4种即可,分别是DEBUG,INFO,WARN,ERROR
可以通过日志组或代码包的形式进行日志显示级别的控制
教你一招:快速创建日志对象
使用lombok提供的注解@Slf4j简化开发,减少日志对象的声明操作
1 2 3 4 5 6 7 8 9 10 11 12 13 14 15 16 17 18 19 20 @Slf4j @RestController @RequestMapping("/books") public class BookController { @GetMapping public String getById () { System.out.println("springboot is running...2" ); log.debug("debug..." ); log.info("info..." ); log.warn("warn..." ); log.error("error..." ); return "springboot is running...2" ; } }
小结:
基于lombok提供的@Slf4j注解为类快速添加日志对象
日志输出格式控制
PID:进程ID,用于表明当前操作所处的进程,当多服务同时记录日志时,该值可用于协助程序员调试程序
所属类/接口名:当前显示信息为SpringBoot重写后的信息,名称过长时,简化包名书写为首字母,甚至直接删除
设置日志输出格式
1 2 3 logging: pattern: console: "%d - %m%n"
1 2 3 4 logging: pattern: console: "%d %clr(%5p) --- [%16t] %clr(%-40.40c){cyan} : %m %n"
小结:
日志输出格式设置规则
文件记录日志(运维实用篇完结) 1 2 3 logging: file: name: server.log
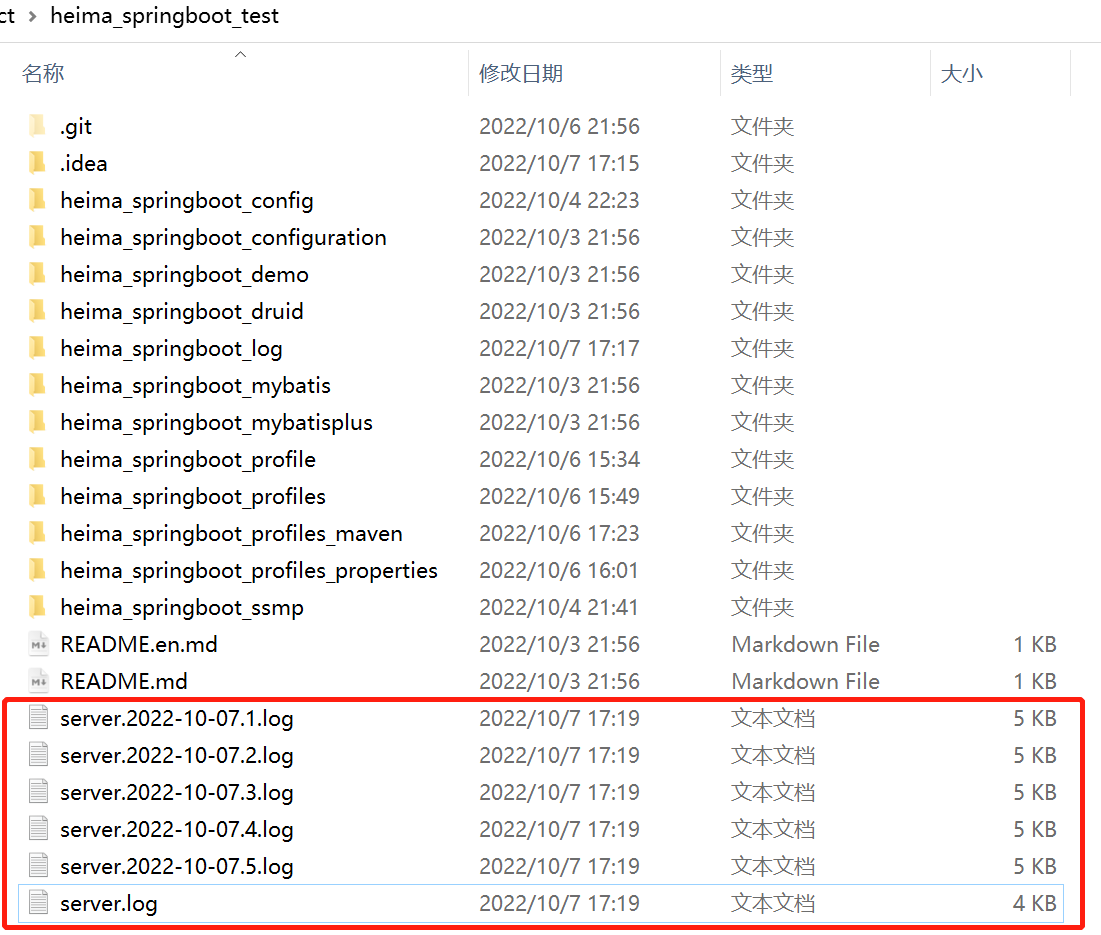
1 2 3 4 5 6 7 logging: file: name: server.log logback: rolling policy: max-file-size: 4KB file-name-pattern: server.%d{yyyy-MM-dd}.%i.log
小结:
日志记录到文件
日志文件格式设置
总结:
日志基础使用规则
编辑日志输出格式
日志文件设置
